

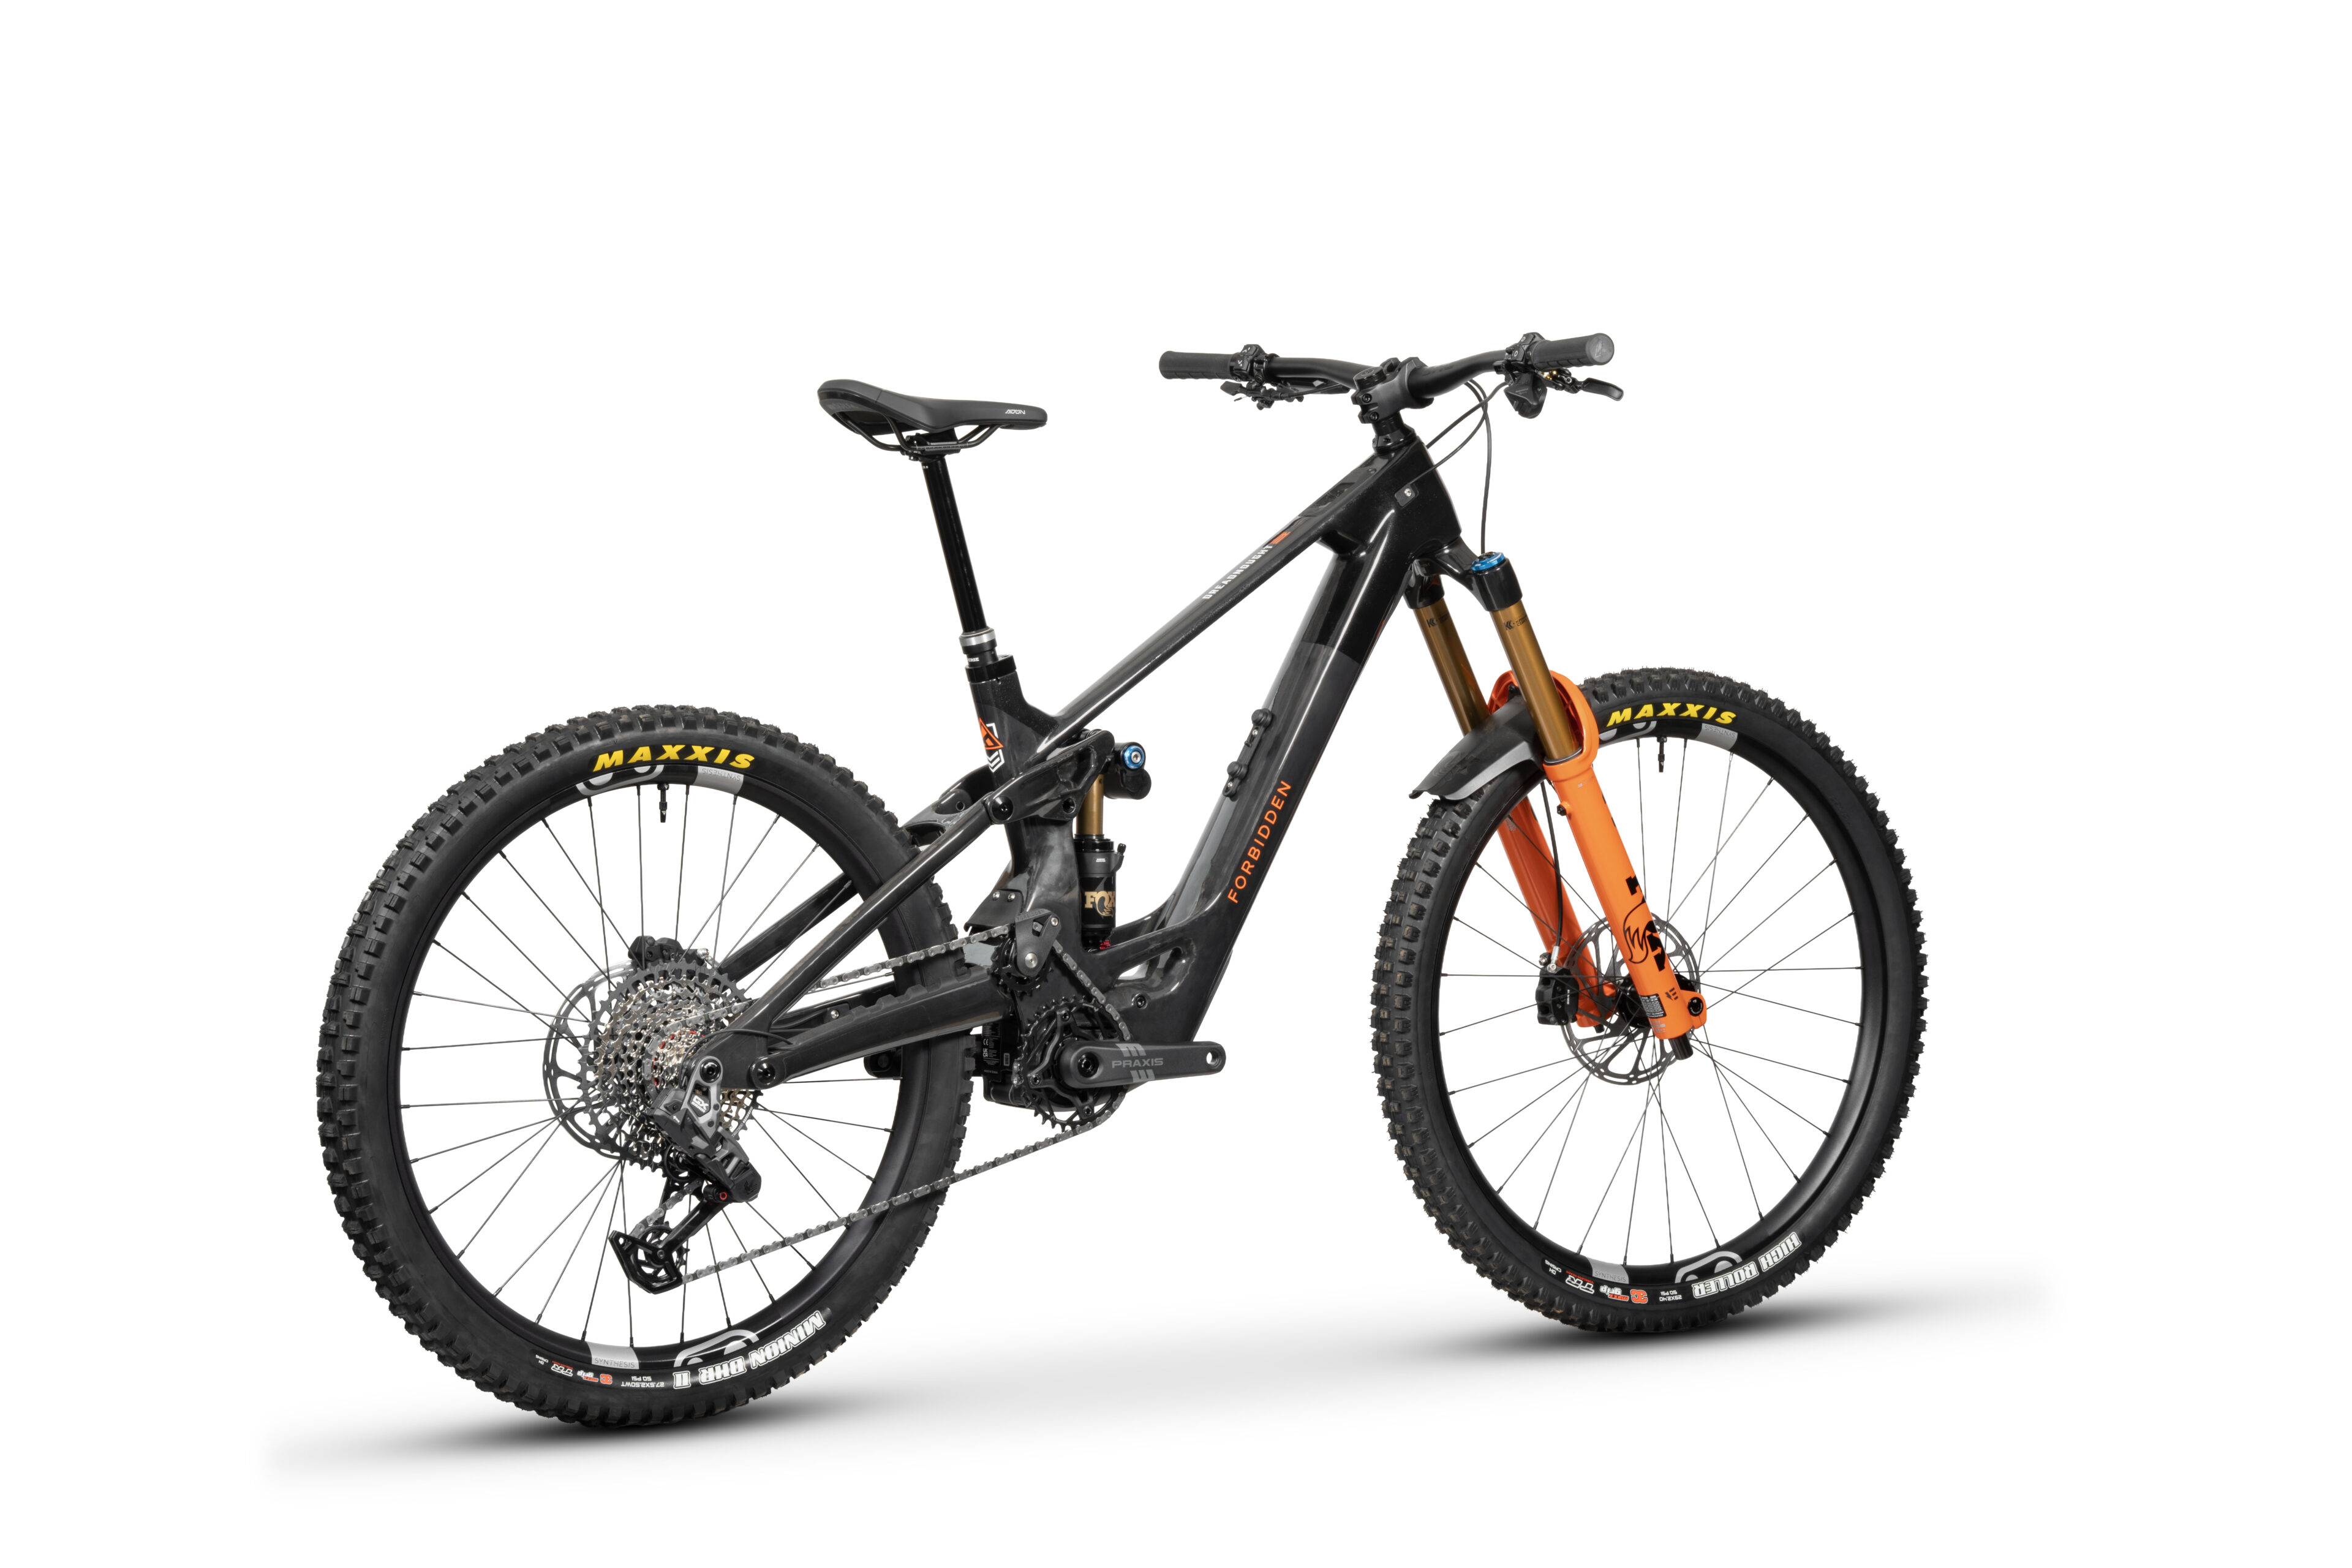
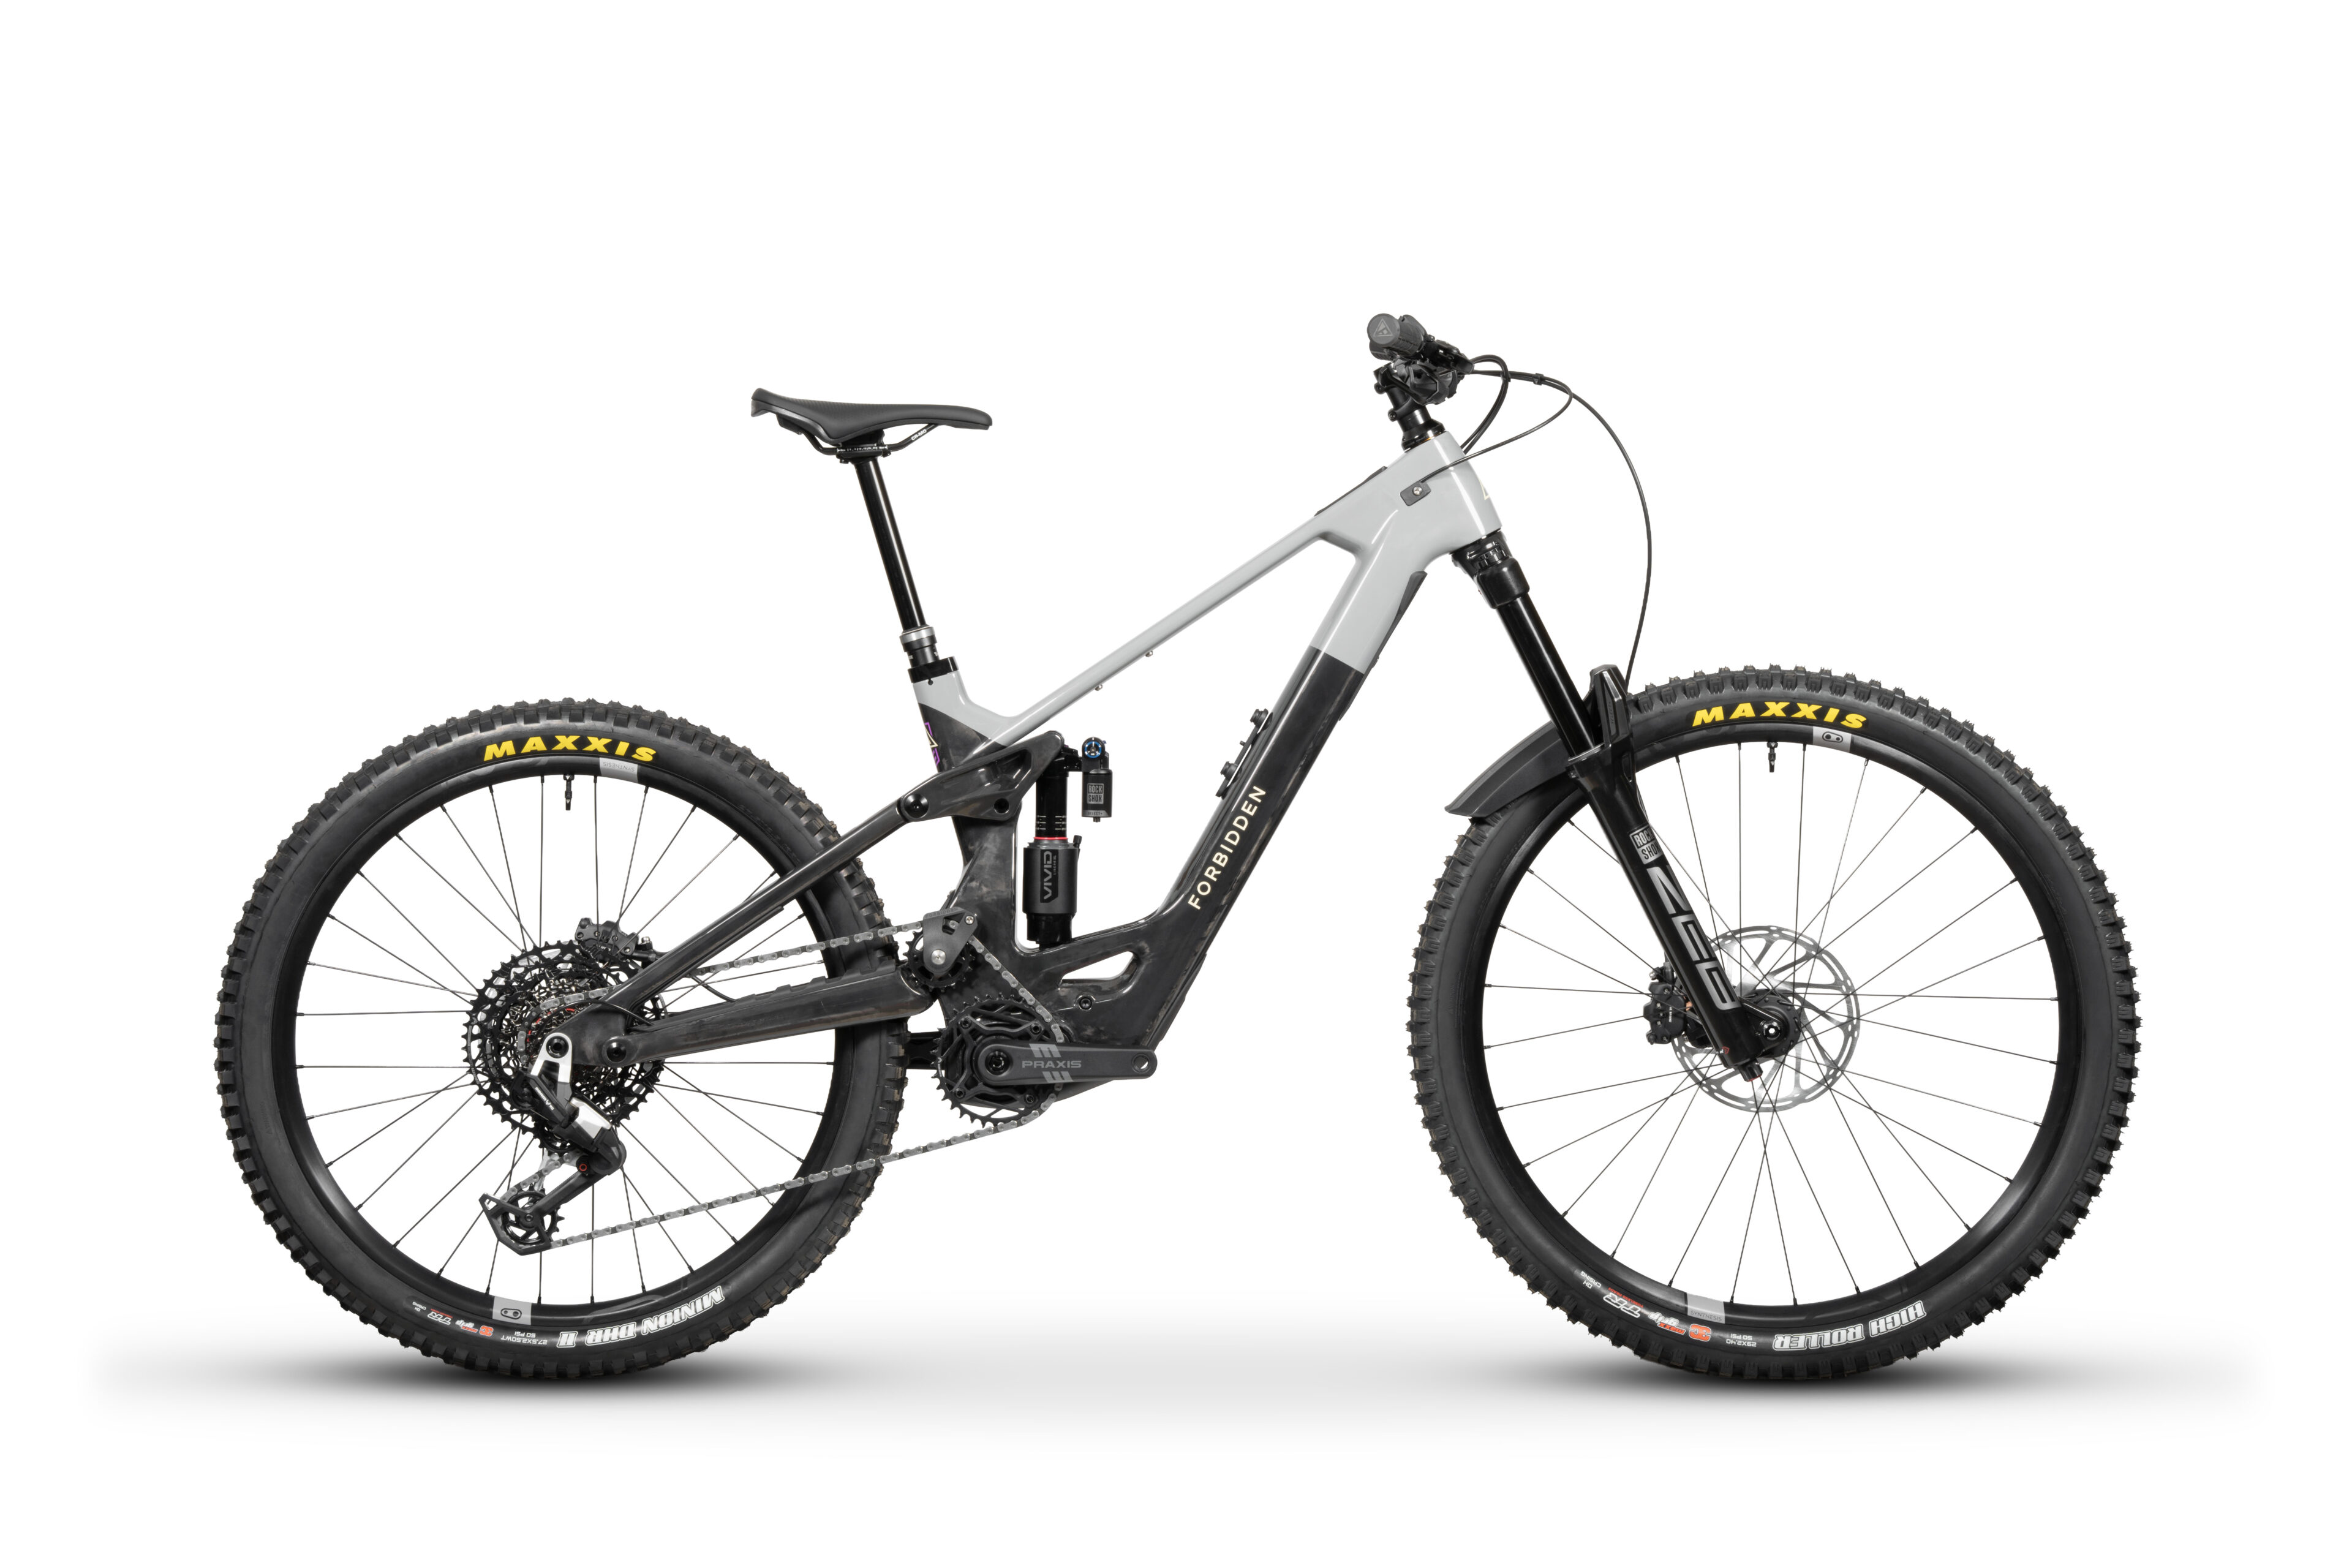
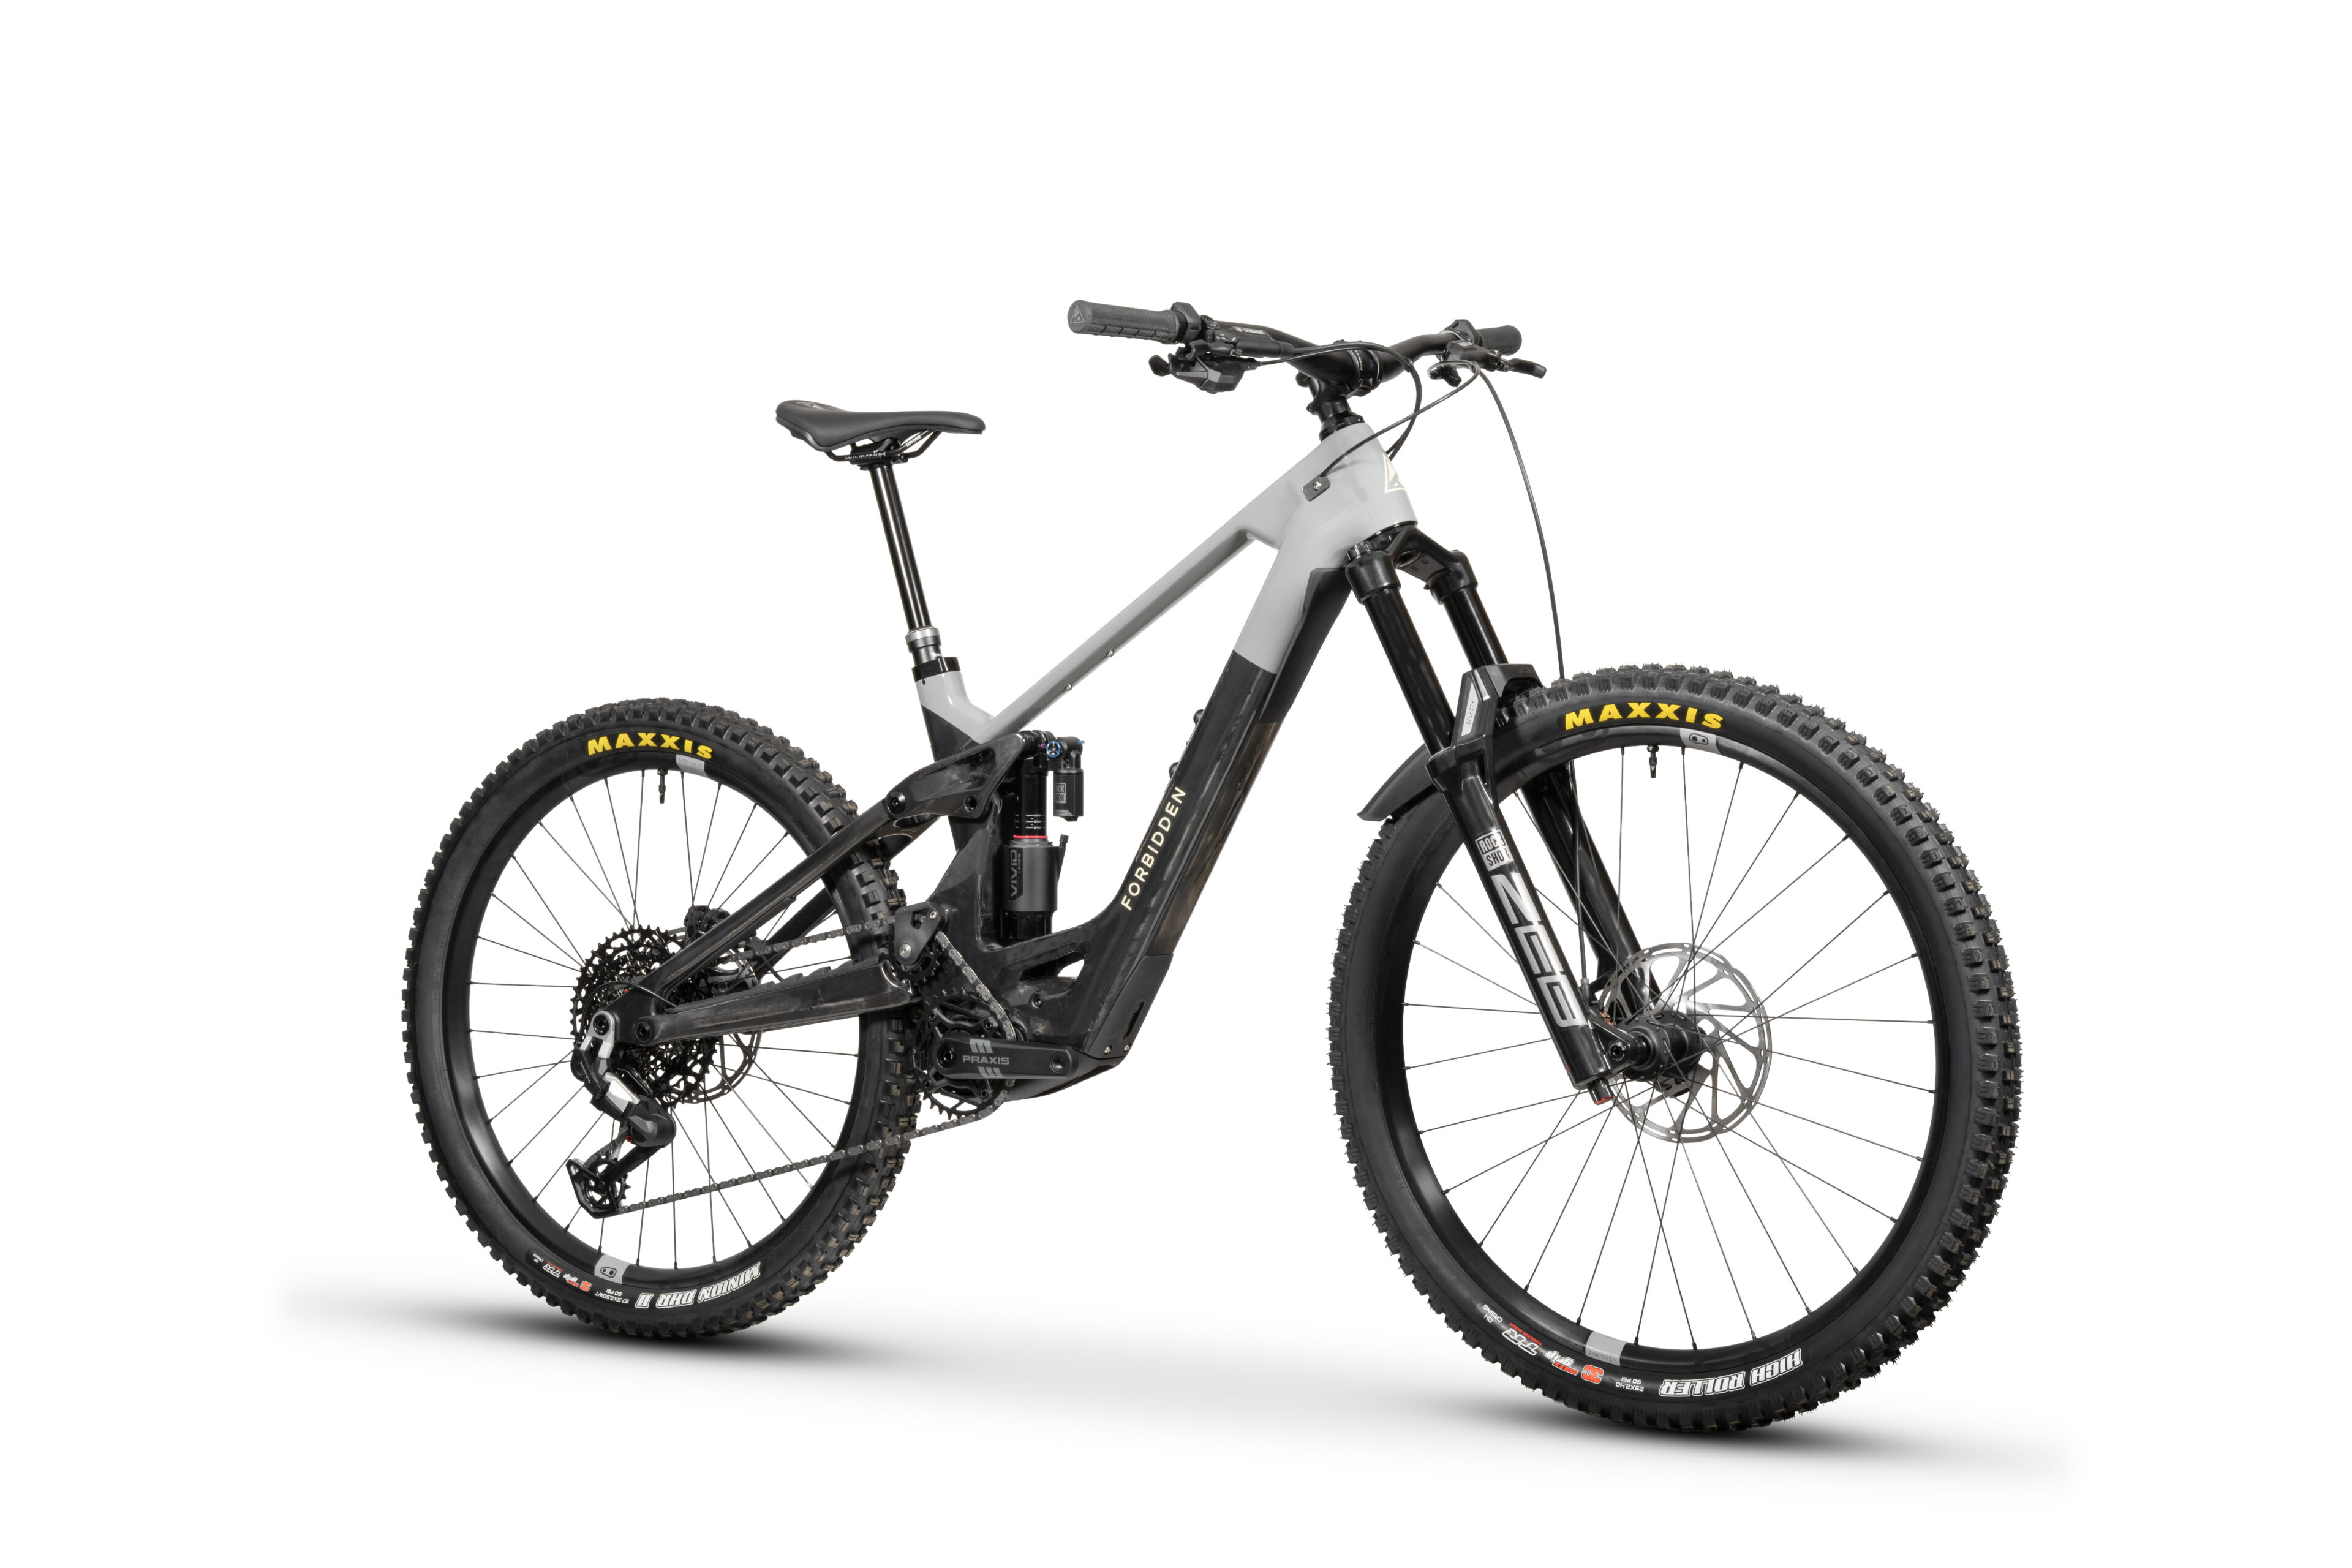
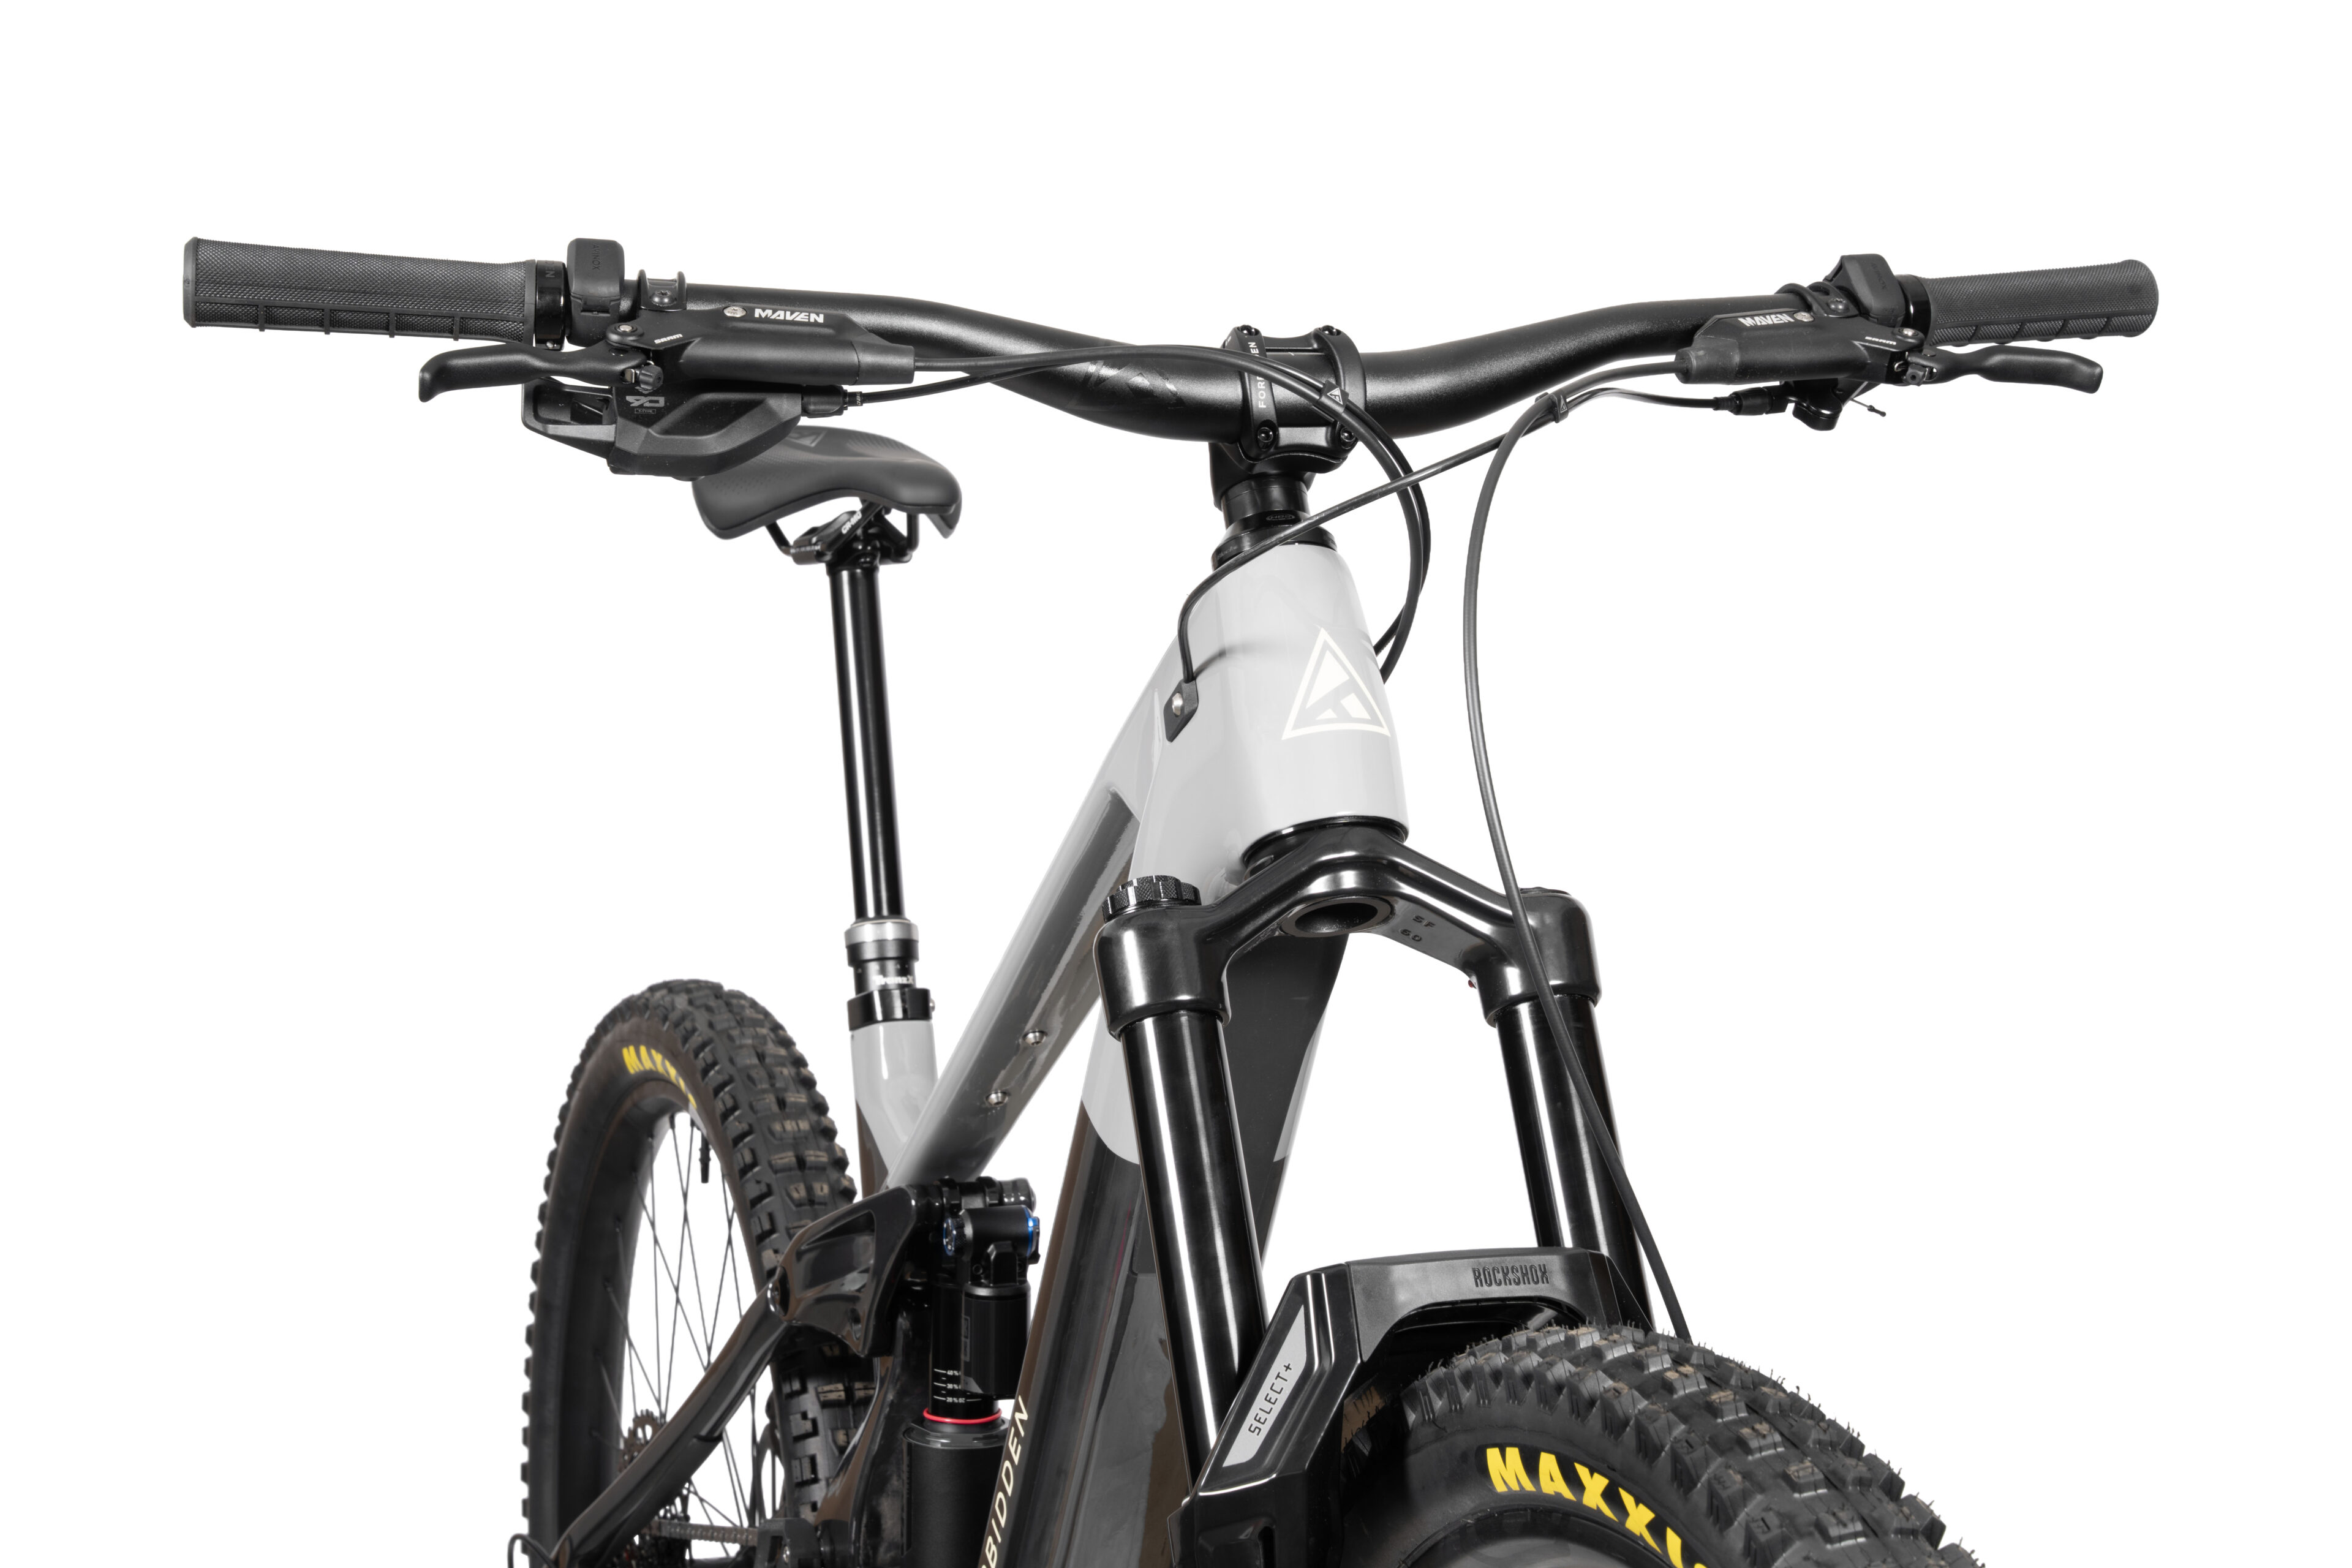
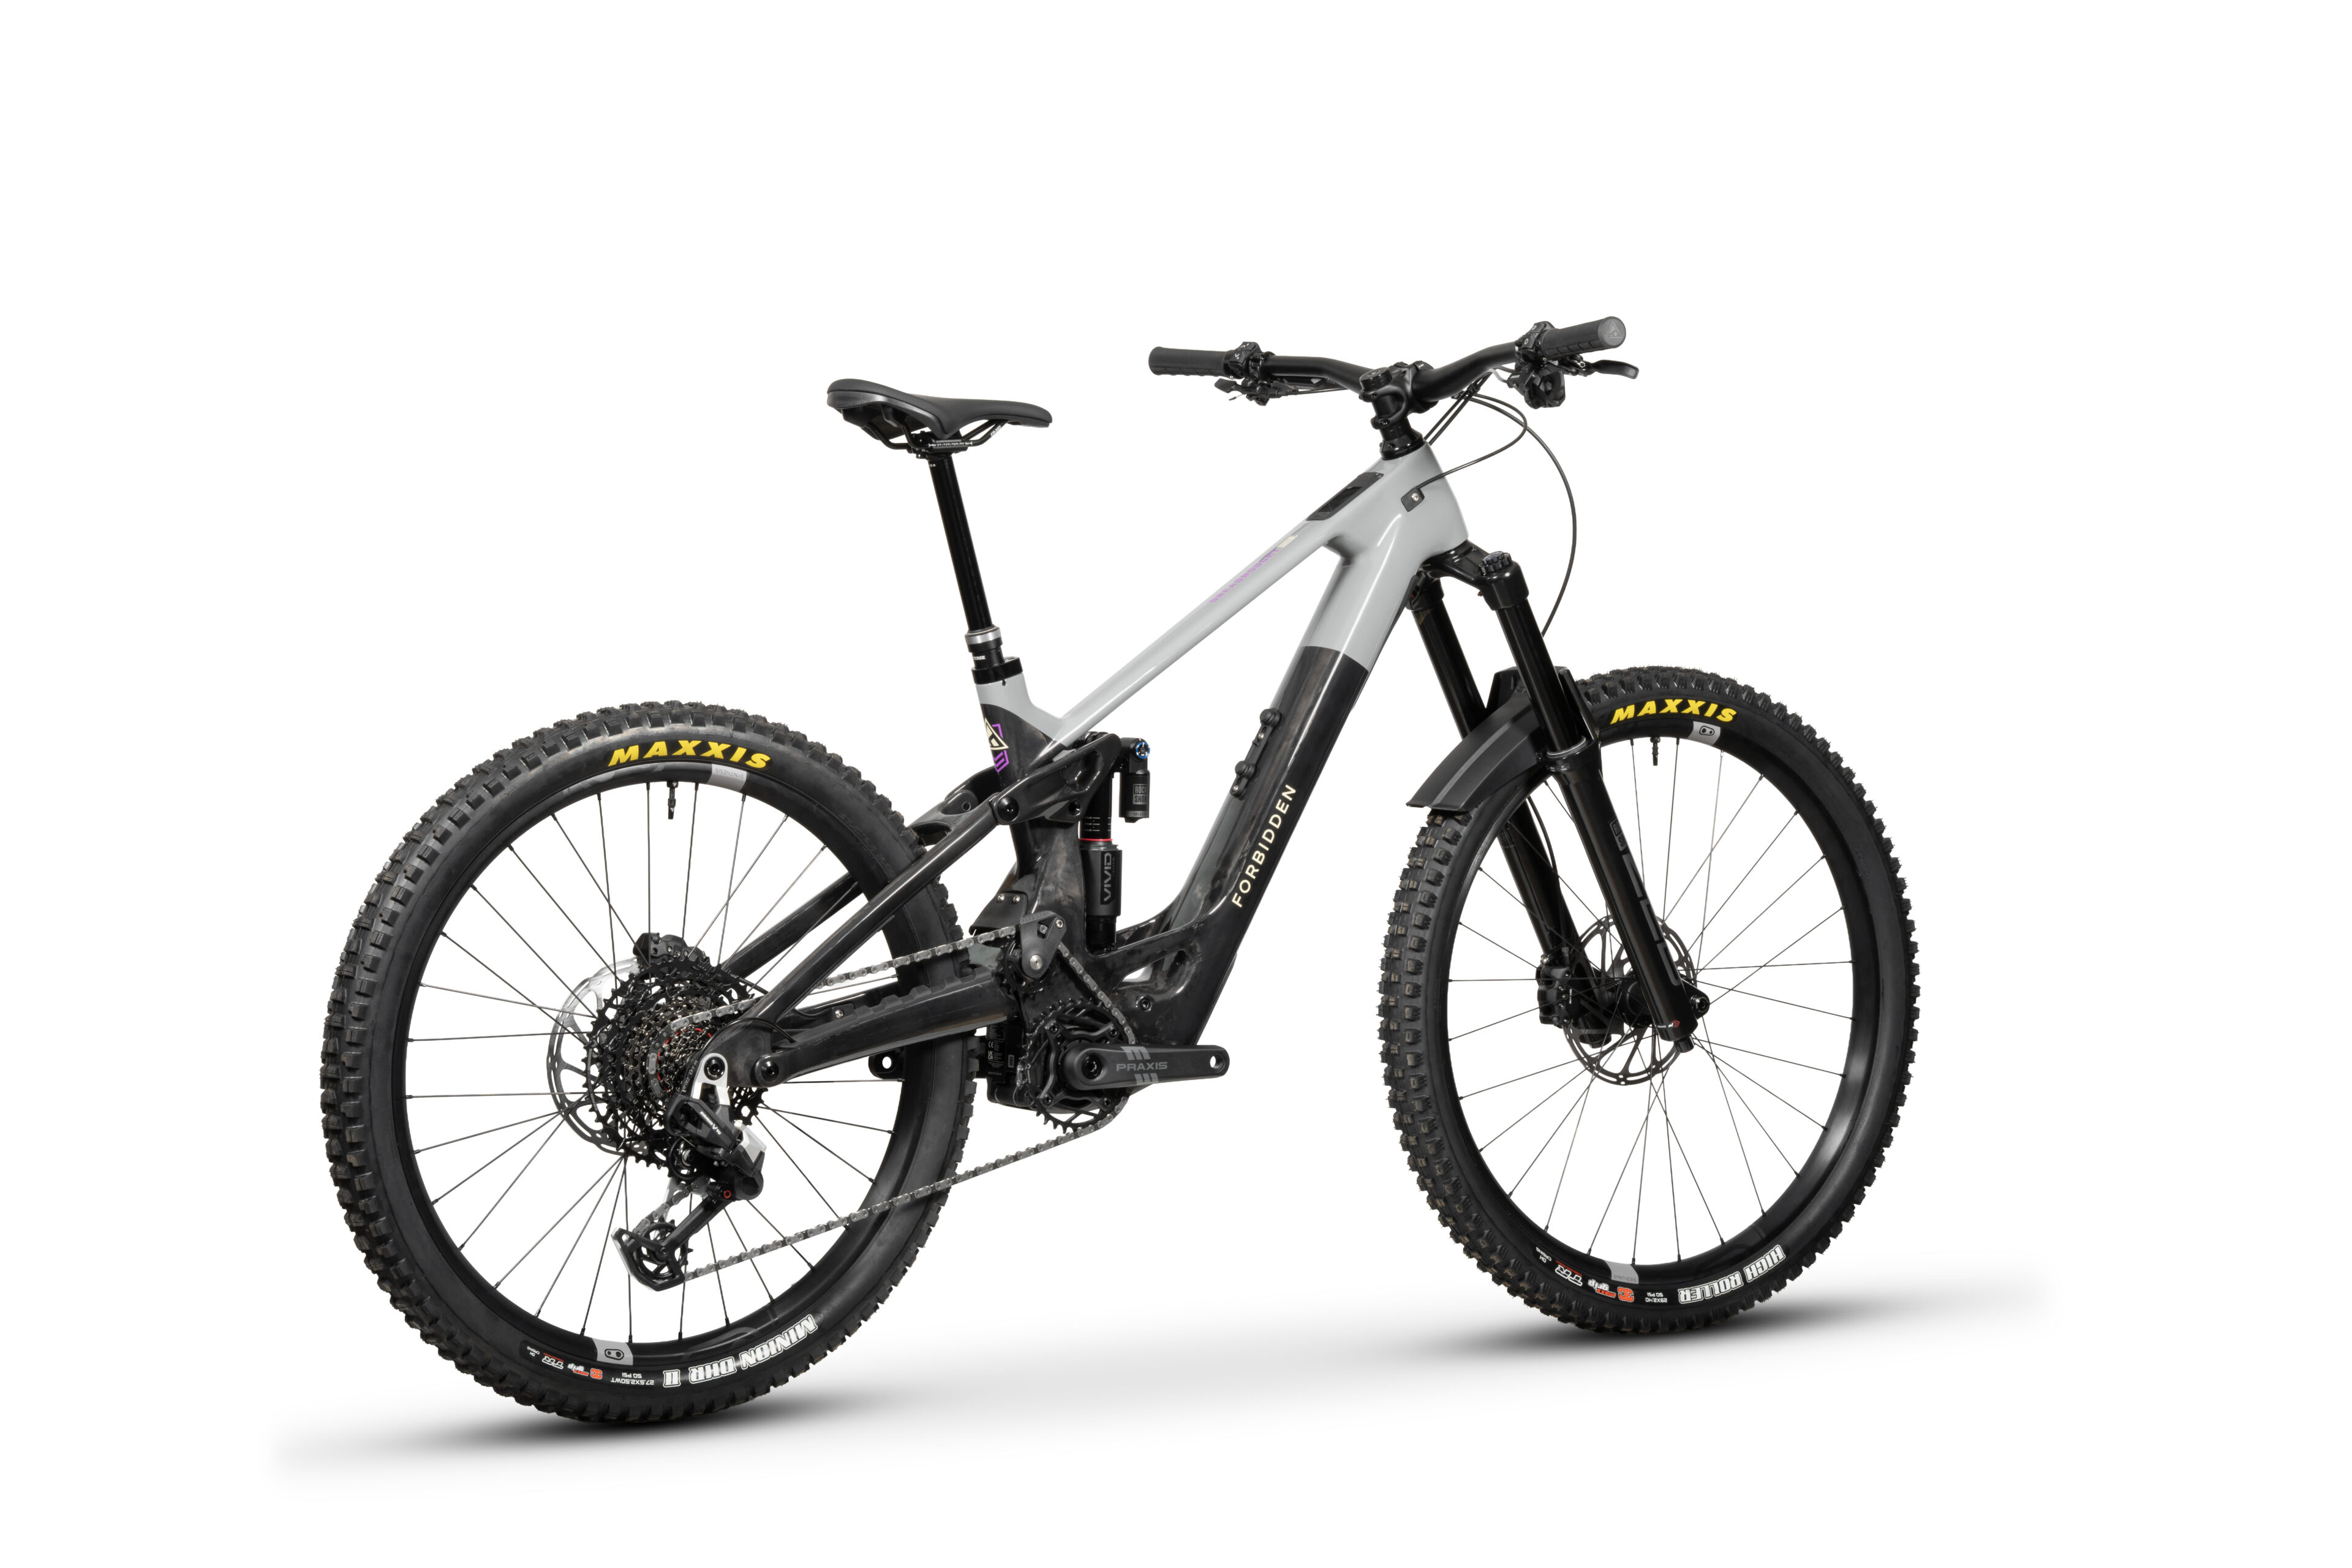
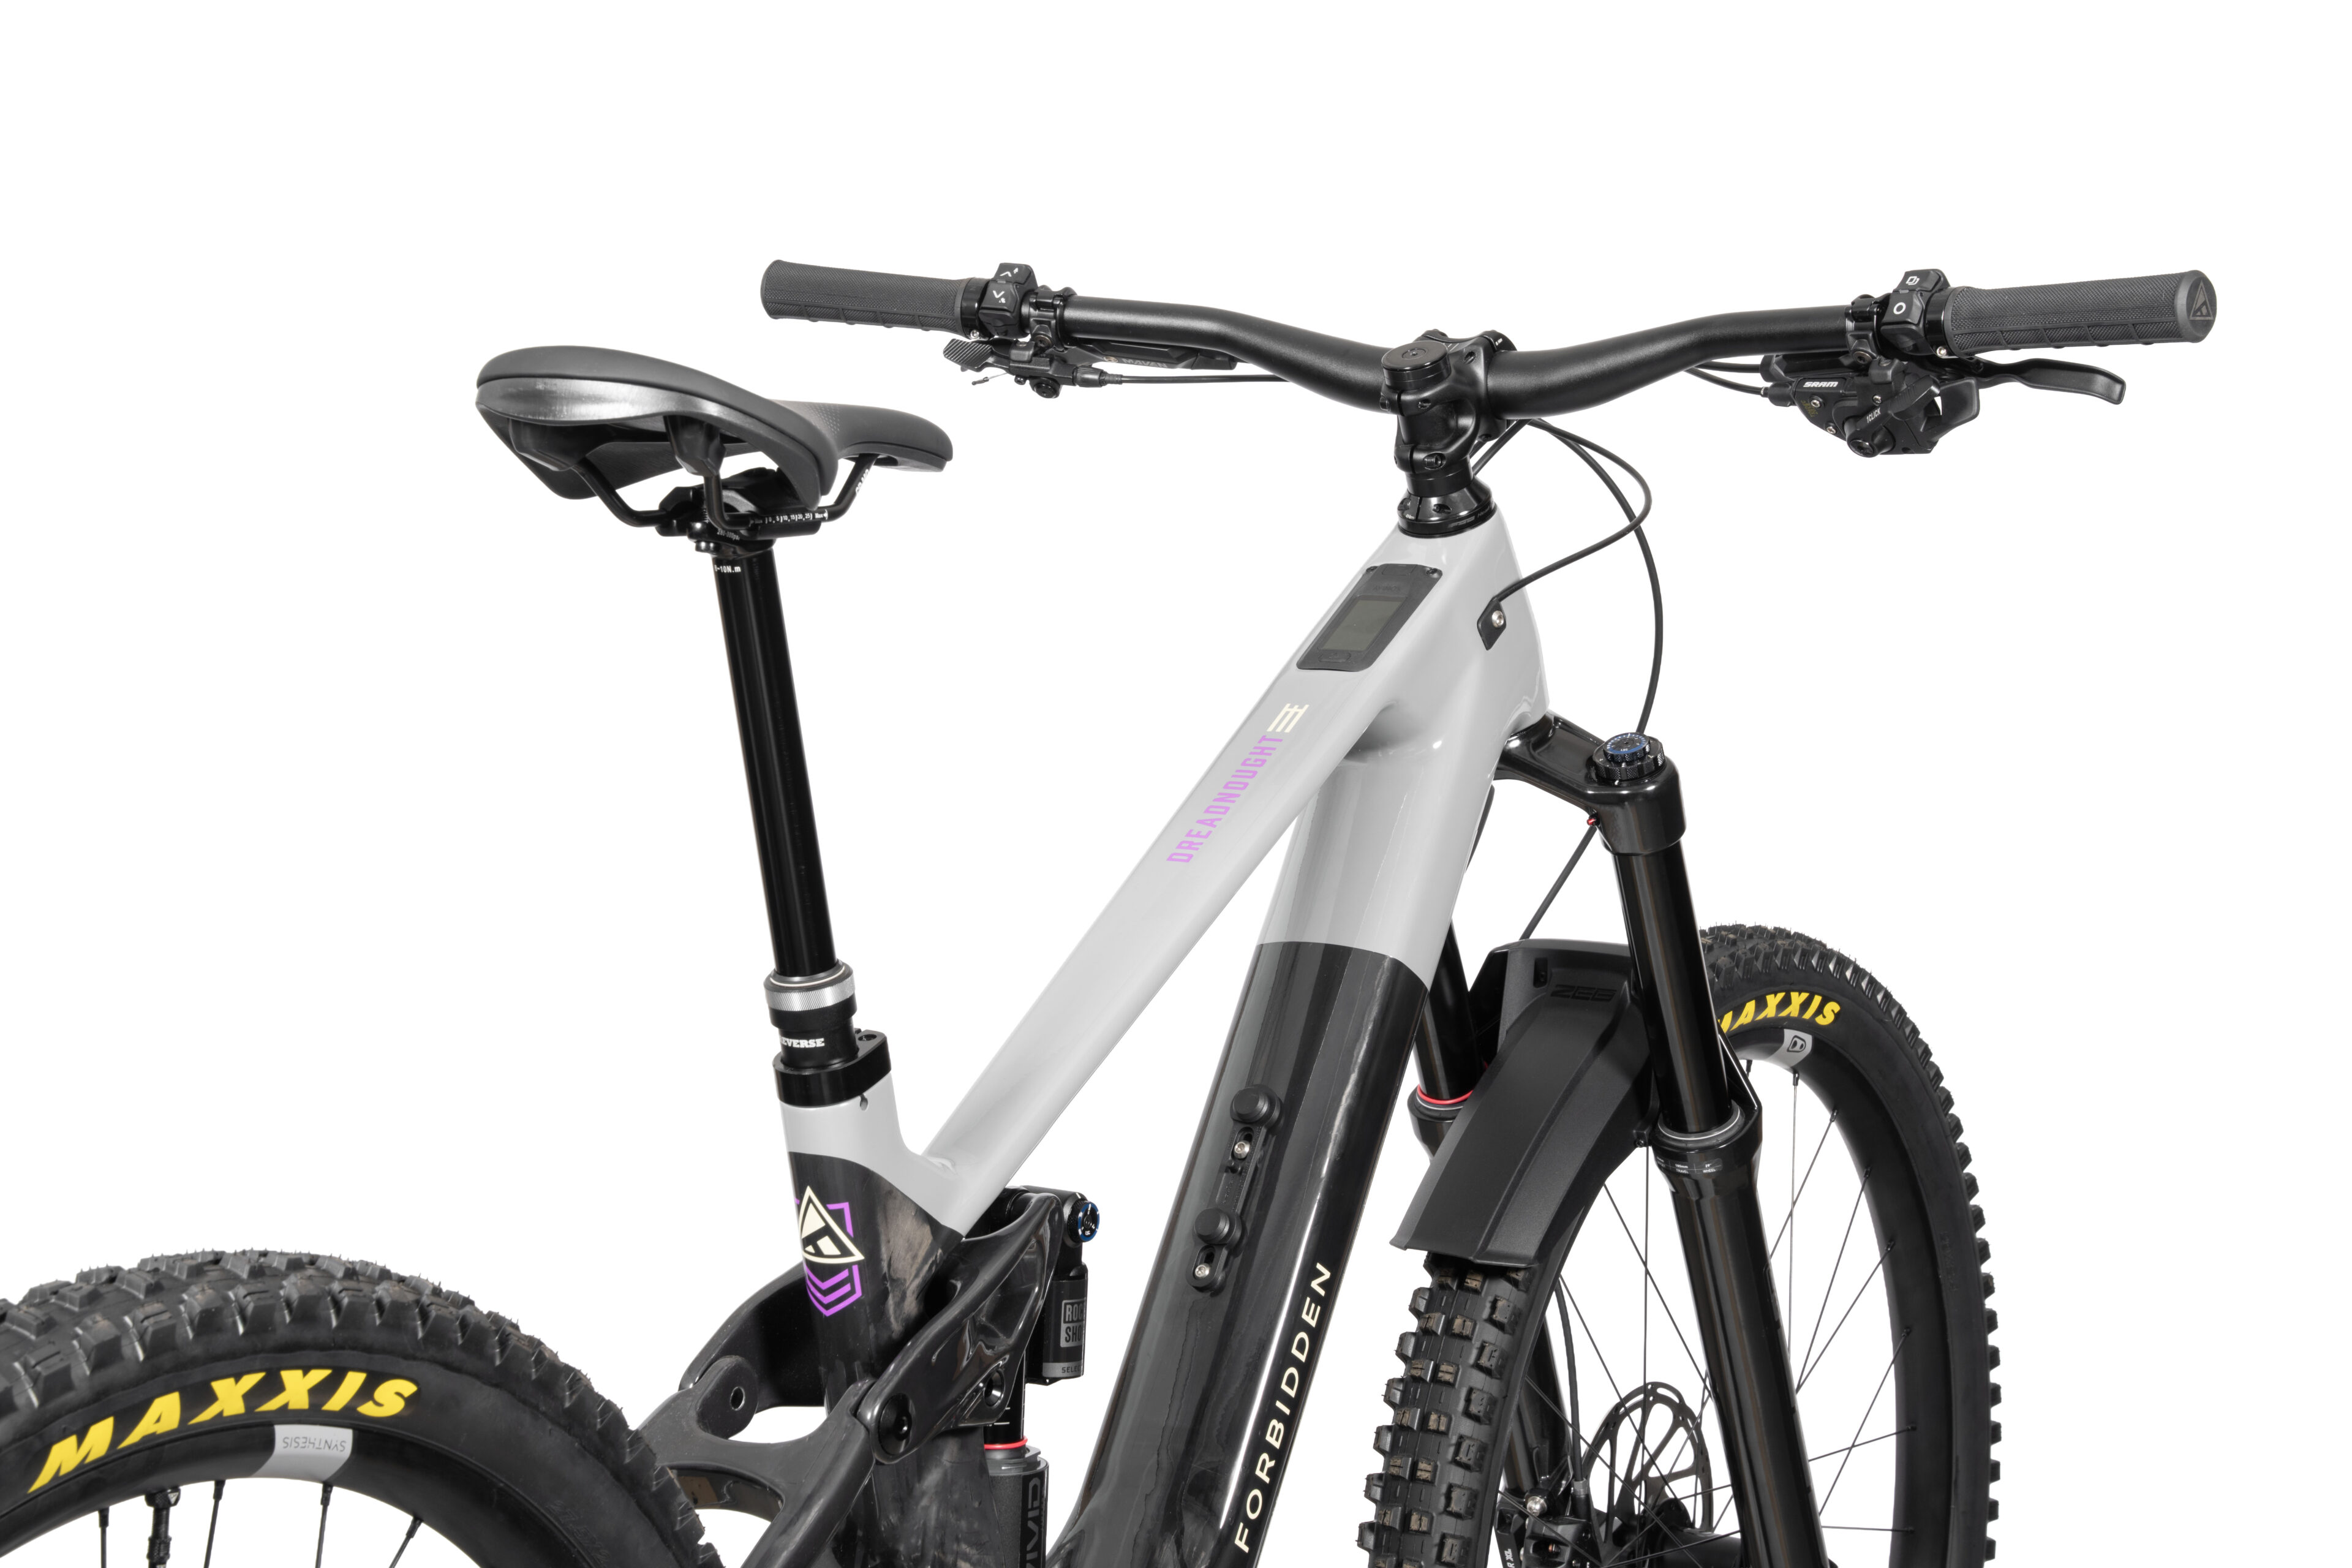
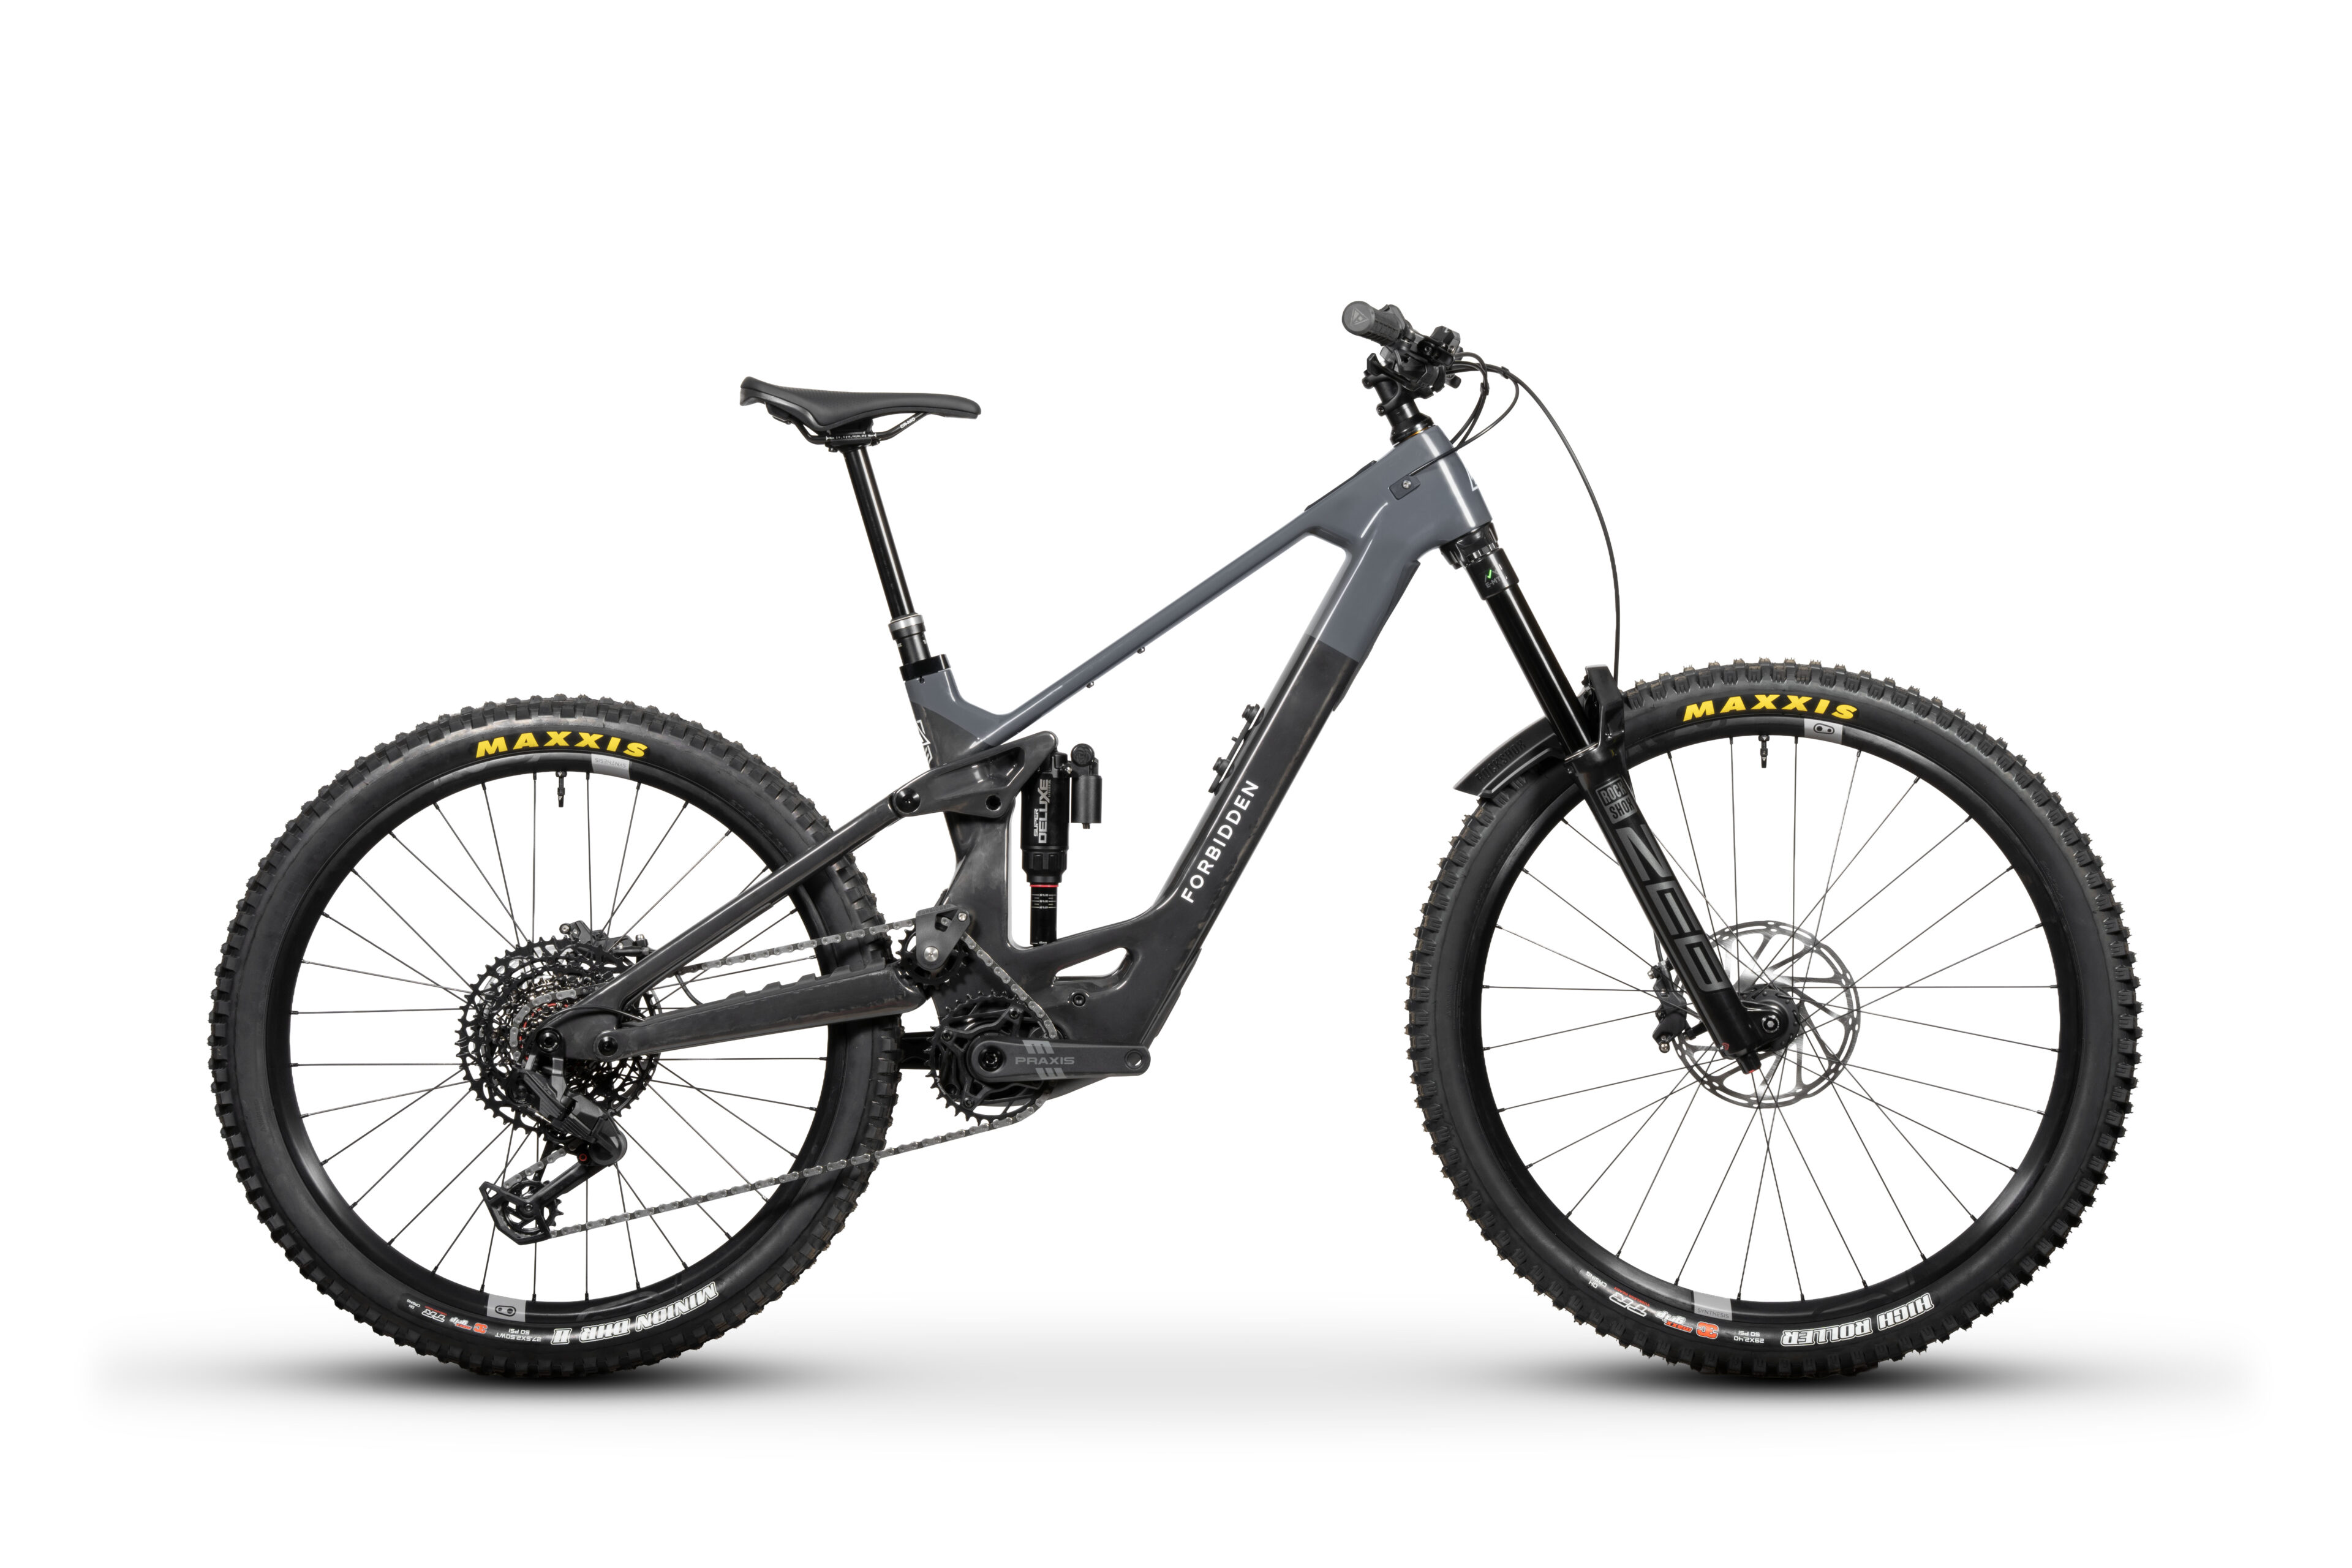
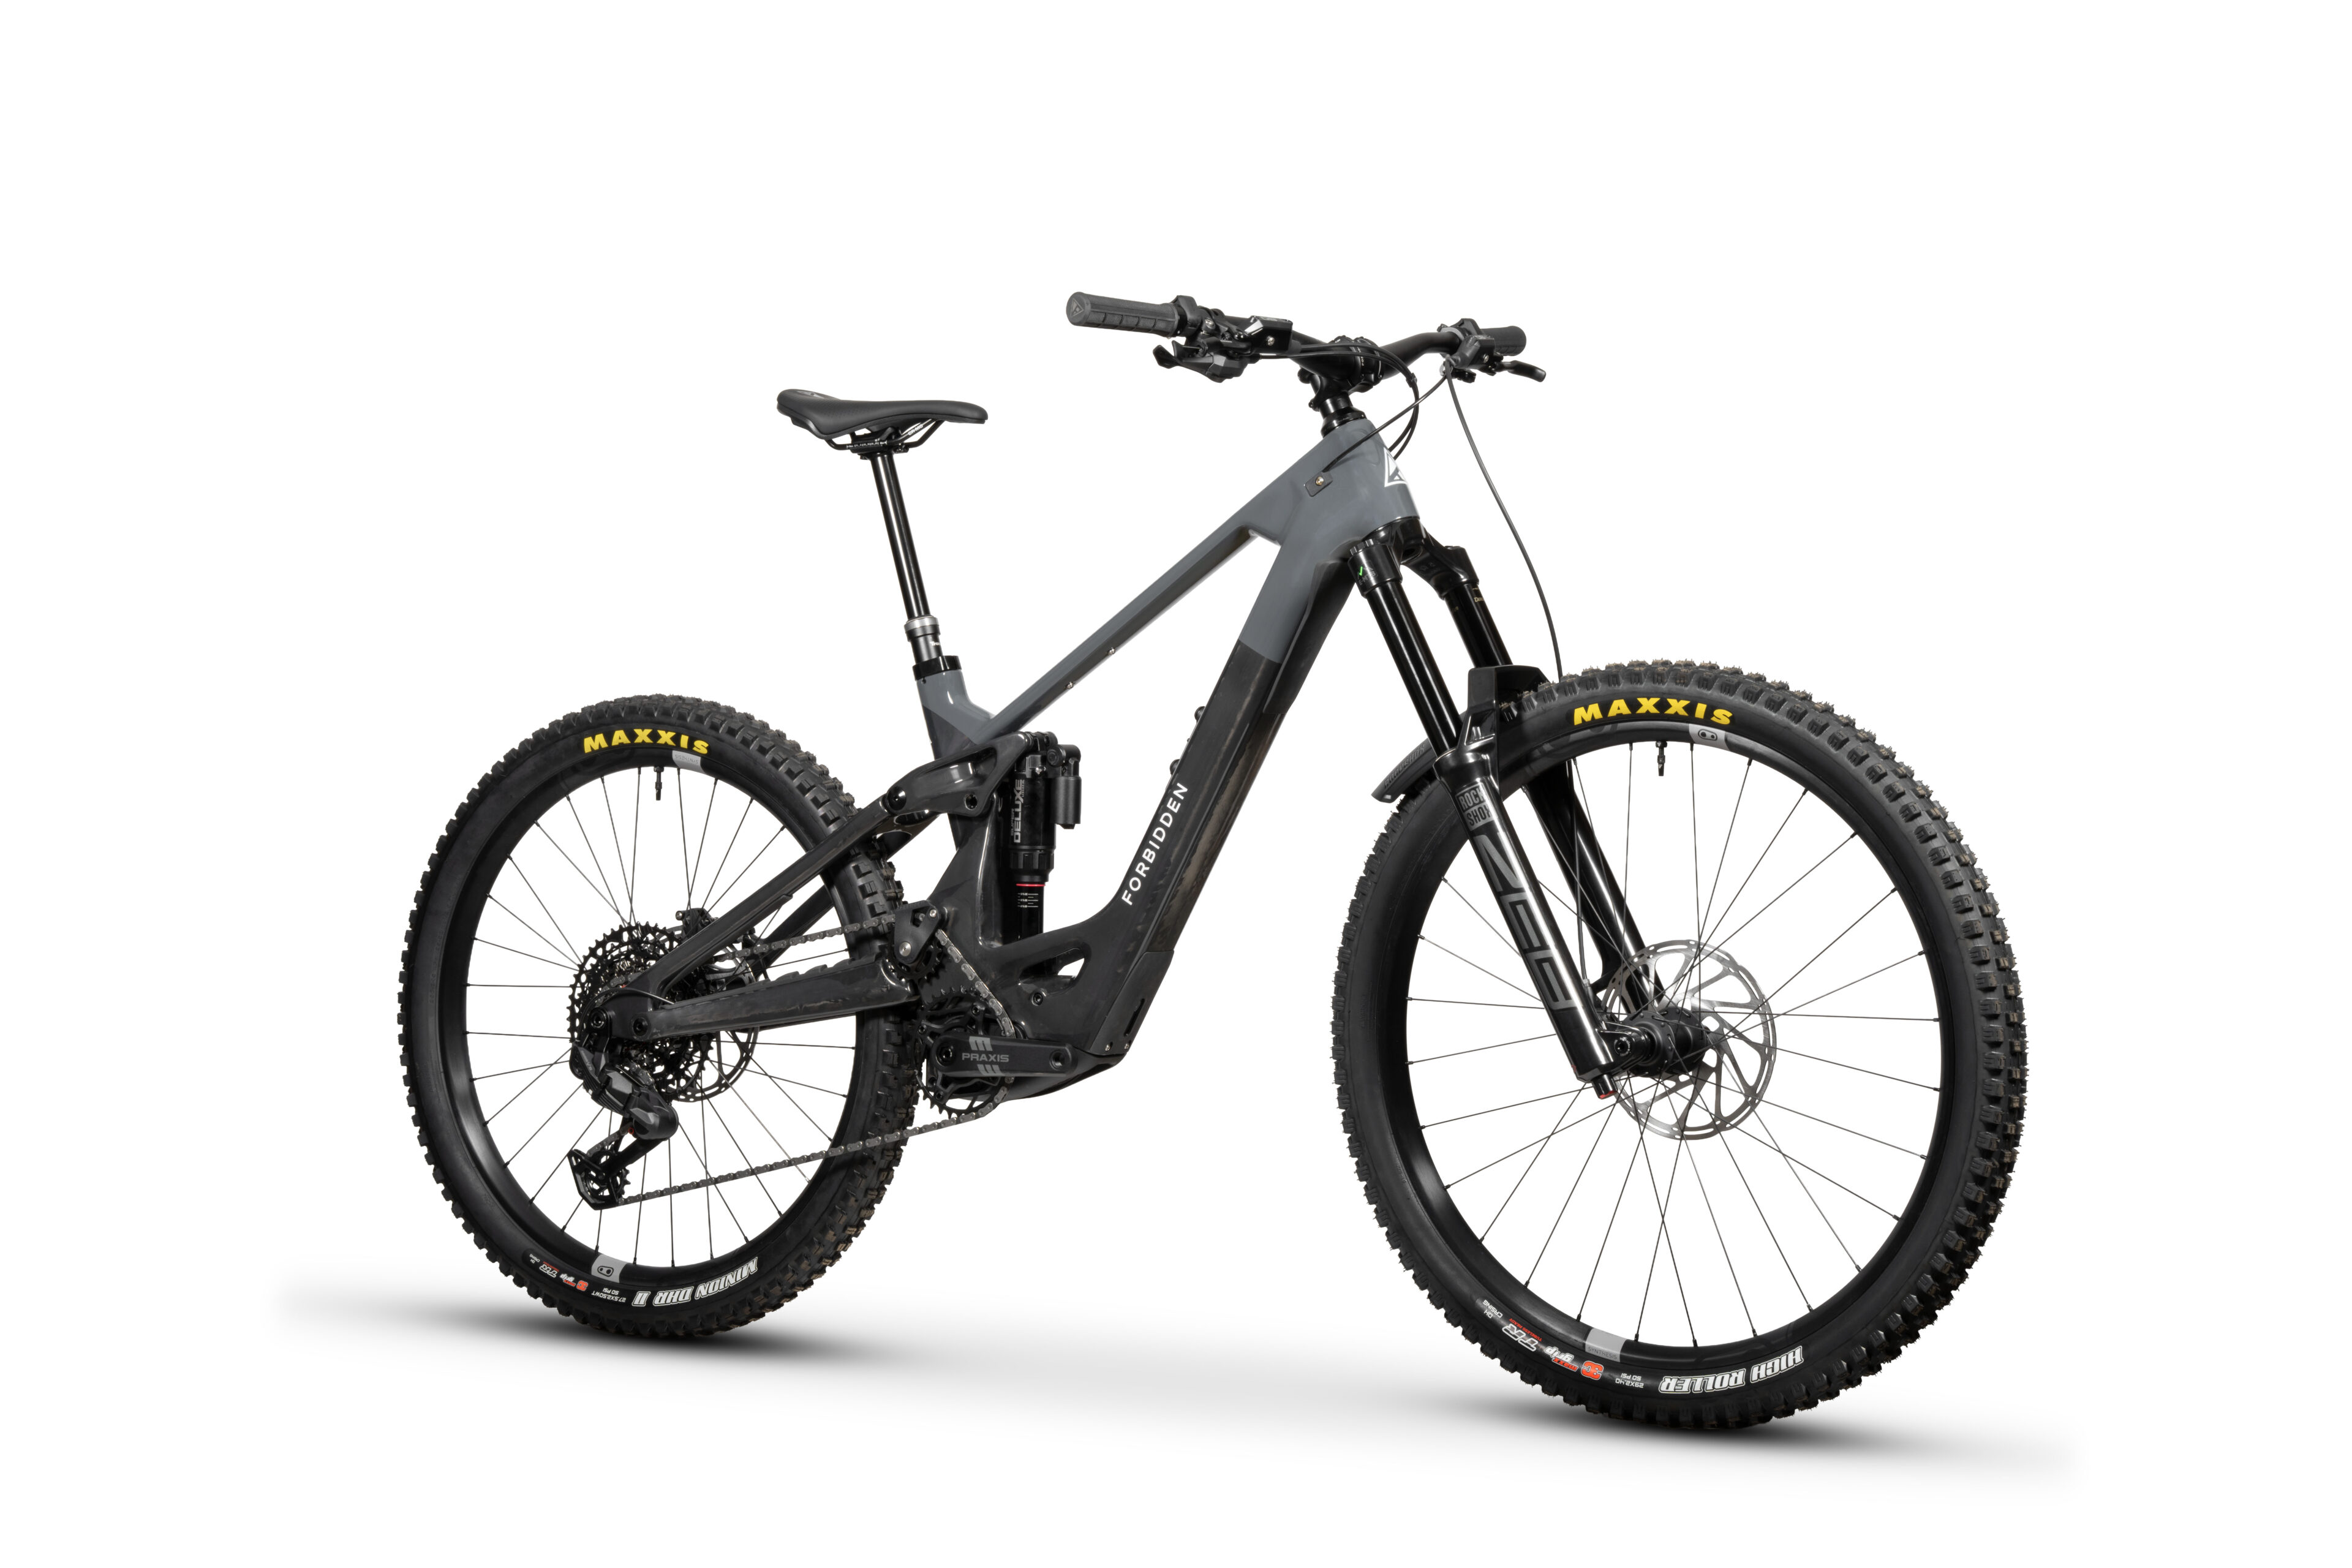
Introducing Dreadnought E. An e-MTB built from the ground up with a singular purpose – to charge through the most chaotic, rowdy lines you can find, and whisk you back to the top, asking for more. Big travel. Full power. Zero hesitation.
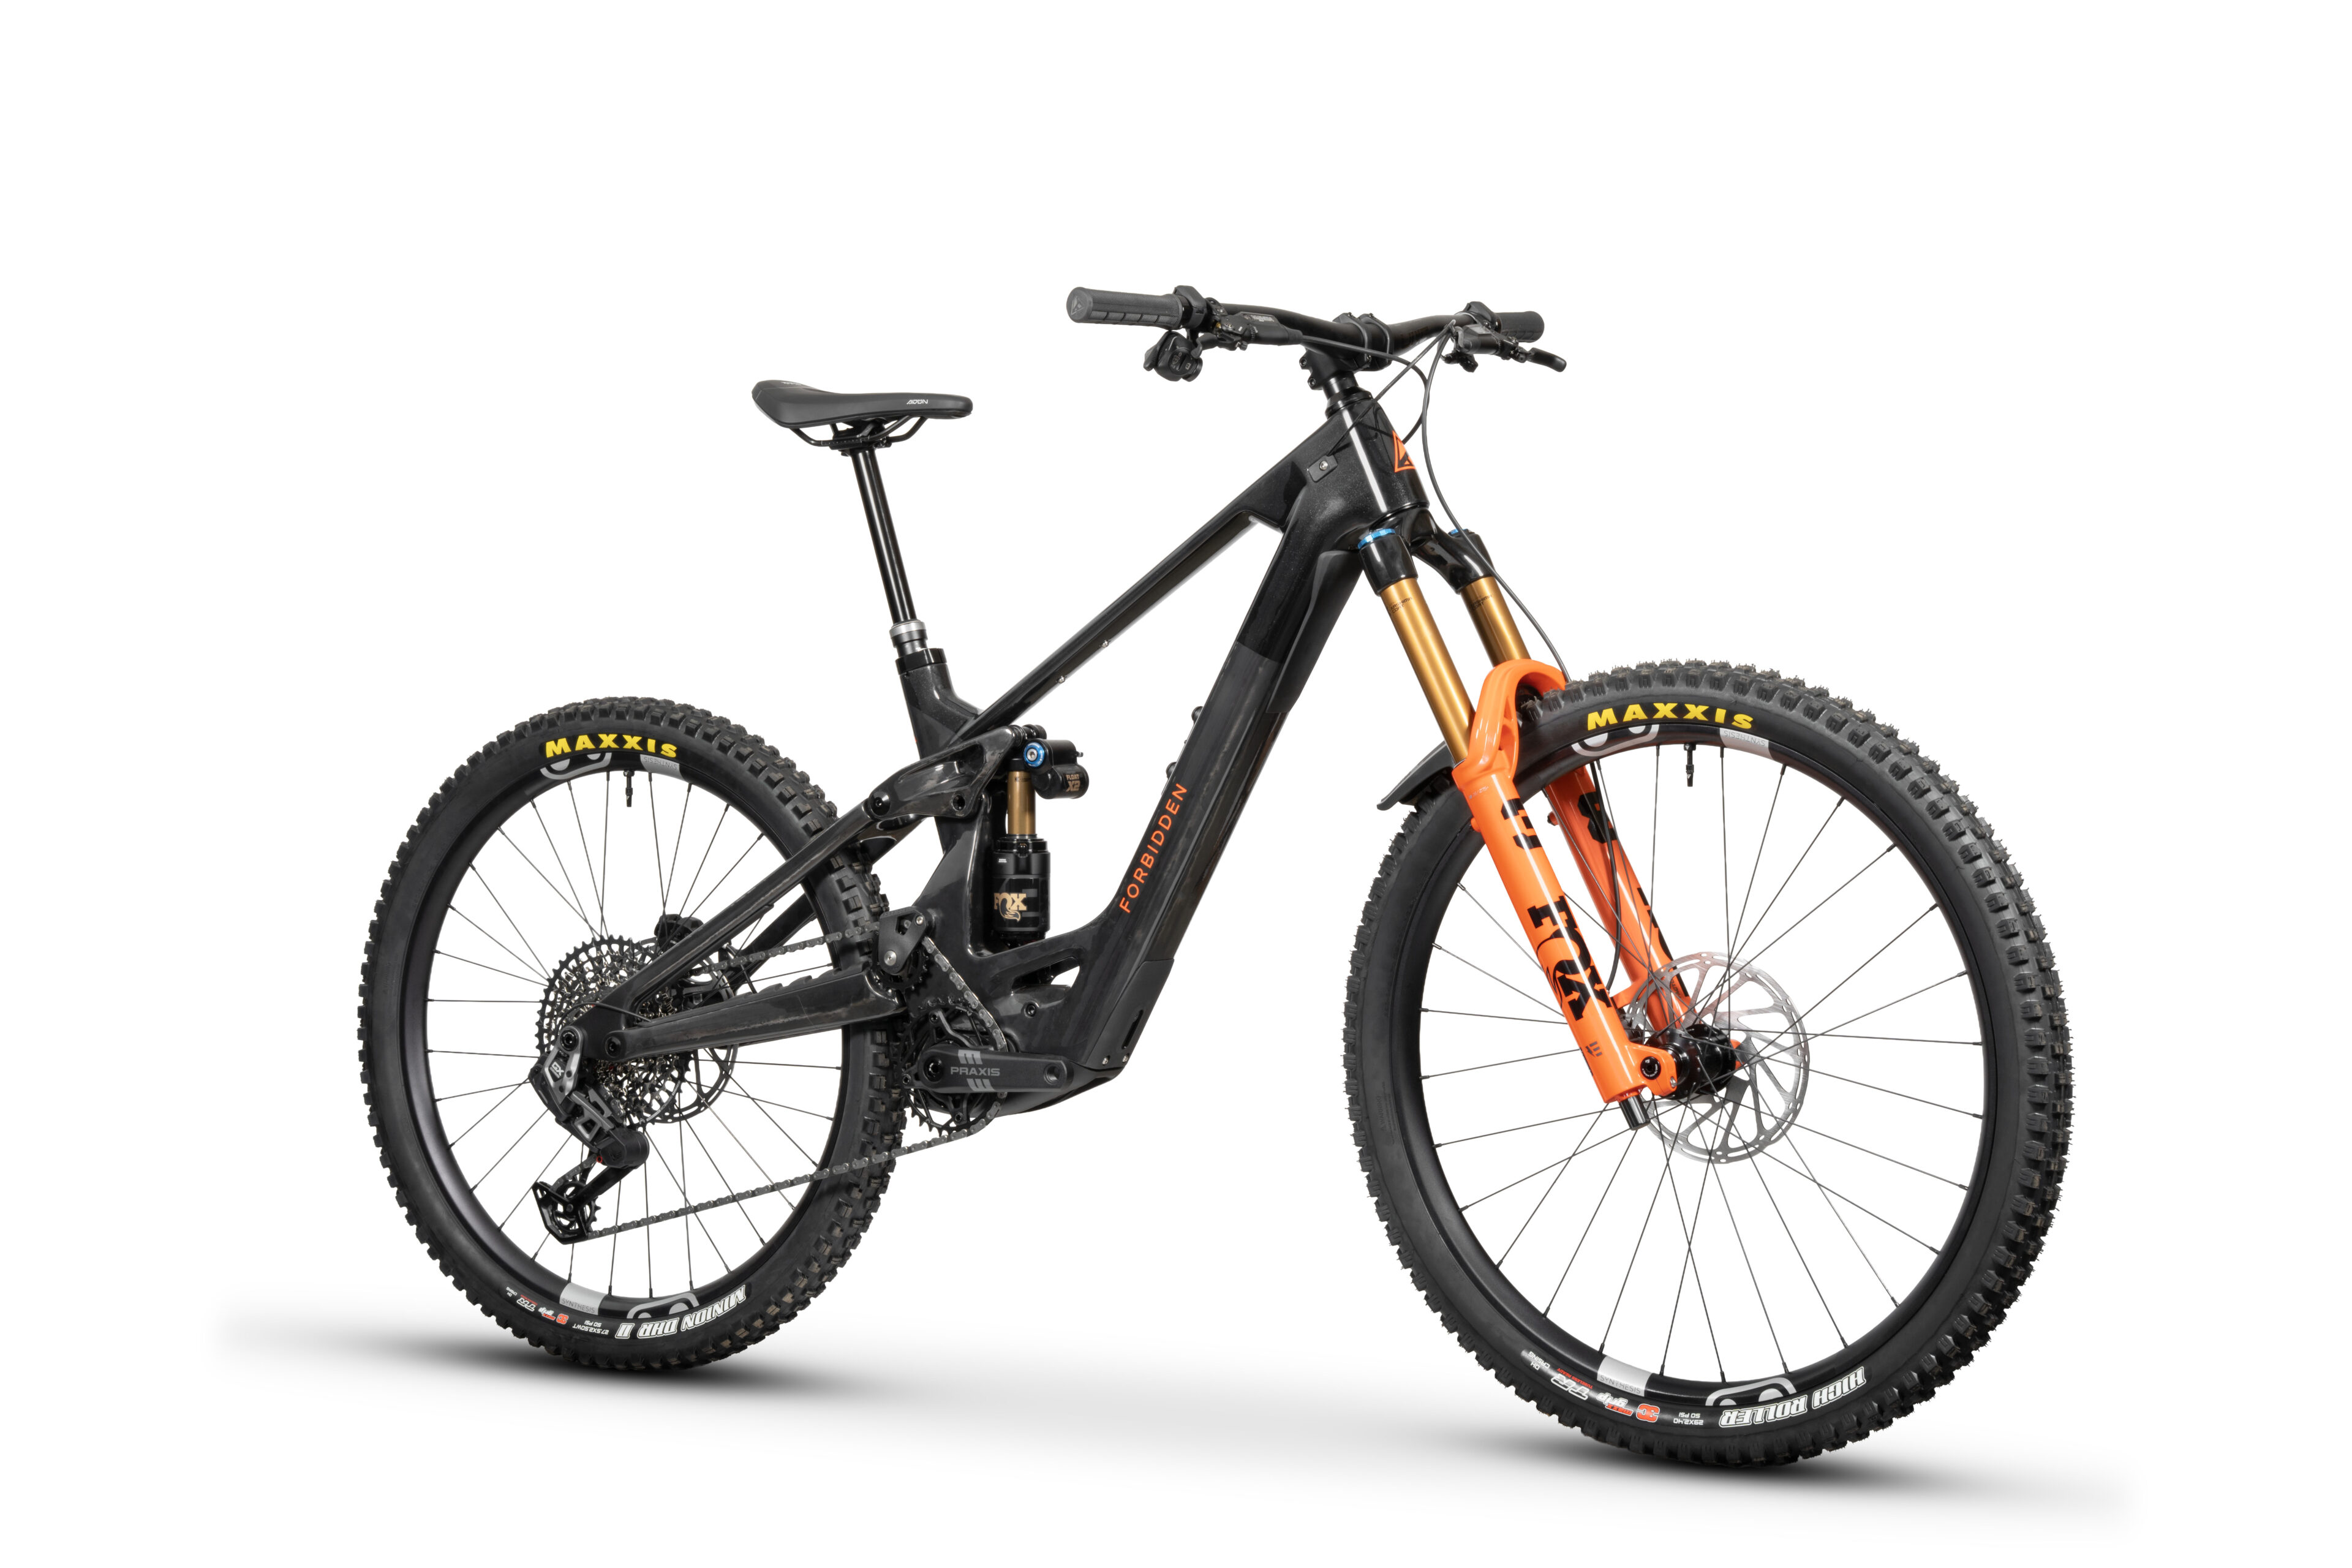
Featuring 170mm of rear travel paired with a 180mm fork, combined with a rearward, yet reserved axle path, Dreadnought E has the ability to plow when you drop your heels, but still offer pop and support when it’s needed to get off the ground or pump to generate that addictive speed.
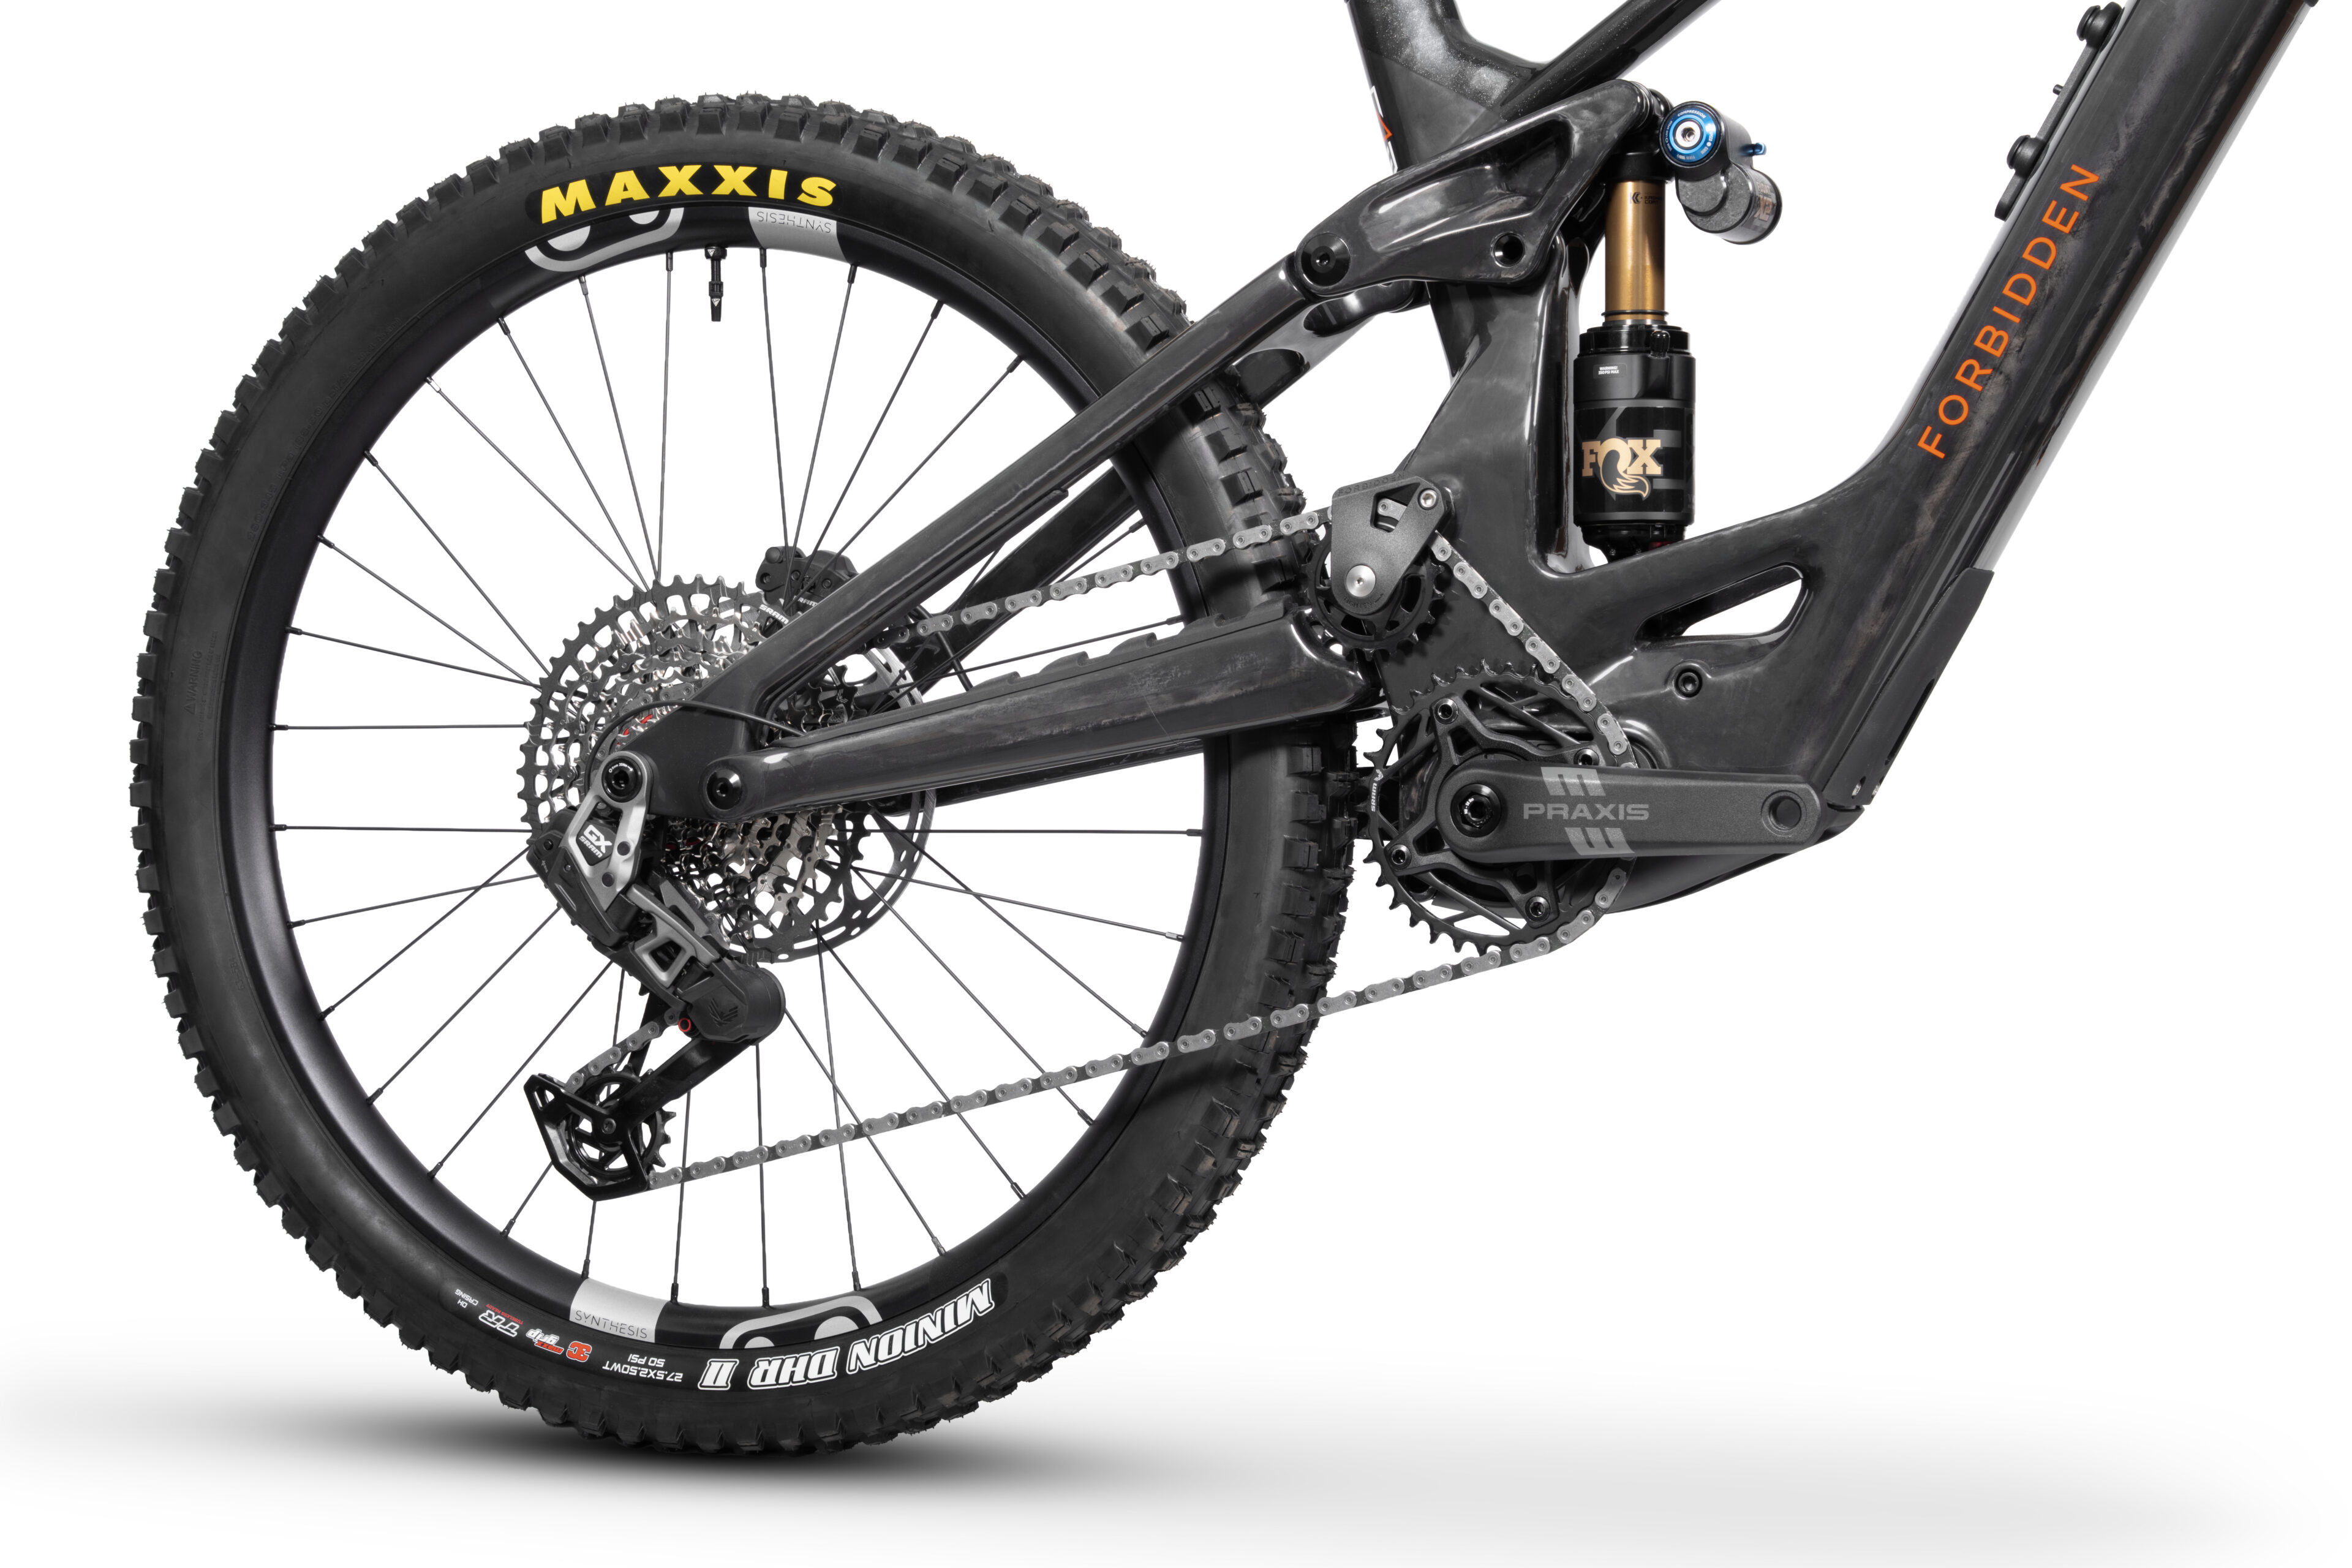
Dreadnought E is spec’d with the all-new Avinox M2 and M2S drive systems. Tier 1 and Tier 2 run the Avinox M2S, a 2.6 kg unit delivering 130 Nm of torque (150 Nm Boost) and 1300 watts. Tier 3 and Tier 4 run the Avinox M2, weighing 2.65 kg, delivering 110 Nm of torque (125 Nm Boost) and 1100 watts. Both options can be paired with 600 Wh or 800 Wh batteries, so you can choose a lighter setup or maximum range depending on how deep the mission goes.
Dreadnought E isn’t here to play nice, it’s here to go further, hit harder, and redefine what a full-power, big-travel e-MTB is supposed to feel like.
Introducing Dreadnought E. An e-MTB built from the ground up with a singular purpose – to charge through the most chaotic, rowdy lines you can find, and whisk you back to the top, asking for more. Big travel. Full power. Zero hesitation.
Featuring 170mm of rear travel paired with a 180mm fork, combined with a rearward, yet reserved axle path, Dreadnought E has the ability to plow when you drop your heels, but still offer pop and support when it’s needed to get off the ground or pump to generate that addictive speed.
Dreadnought E is spec’d with the all-new Avinox M2 and M2S drive systems. Tier 1 and Tier 2 run the Avinox M2S, a 2.6 kg unit delivering 130 Nm of torque (150 Nm Boost) and 1300 watts. Tier 3 and Tier 4 run the Avinox M2, weighing 2.65 kg, delivering 110 Nm of torque (125 Nm Boost) and 1100 watts. Both options can be paired with 600 Wh or 800 Wh batteries, so you can choose a lighter setup or maximum range depending on how deep the mission goes.
Dreadnought E isn’t here to play nice, it’s here to go further, hit harder, and redefine what a full-power, big-travel e-MTB is supposed to feel like.
-
Intended Use
All Mountain
-
Suspension
170mm Rear / 180mm Front
-
Wheel Size
Mixed Wheel (MX)
-
Motor | Battery
Avinox M2S or Avinox M2 | 600Wh or 800Wh


Scroll
Scroll
Scroll
Scroll
Do you want to understand thescience behind the witchcraft?
Do you want to understand the science behind the witchcraft?
Dreadnought E Specs
Dreadnought E Specs
Dreadnought E Tier 1 |
Dreadnought E Tier 2 |
Dreadnought E Tier 3 |
Dreadnought E Tier 4 |
|
|---|---|---|---|---|
|
FRAME |
FRAME Dreadnought E Full Carbon High-Modulus Carbon Fiber | Trifecta V2 High Pivot 4-Bar Suspension | One Ride Geometry | Enduro Max Bearings |
FRAME Dreadnought E Full Carbon High-Modulus Carbon Fiber | Trifecta V2 High Pivot 4-Bar Suspension | One Ride Geometry | Enduro Max Bearings |
FRAME Dreadnought E Full Carbon High-Modulus Carbon Fiber | Trifecta V2 High Pivot 4-Bar Suspension | One Ride Geometry | Enduro Max Bearings |
FRAME Dreadnought E Full Carbon High-Modulus Carbon Fiber | Trifecta V2 High Pivot 4-Bar Suspension | One Ride Geometry | Enduro Max Bearings |
|
FORK |
FORK RockShox Zeb Ultimate 180mm Travel | Charger 3.2 RC2 | Linear XL w/ Buttercup | LSR, HSC/LSC, Adjustable Bottom Out External | 44mm Offset | 15x110mm Thru-Axle | Red |
FORK Fox 38 Factory 180mm Travel | Grip X2 | Float Glidecore | HSR/LSR, HSC/LSC Adjust | 44mm Offset | 15x110mm Thru-Axle | Gloss Orange |
FORK RockShox ZEB Select+ 180mm Travel | Charger 3.2 RC2 | LinearXL | Rebound, HSC/LSC Adjust | Adjustable Bottom Out Internal | 44mm Offset | Maxle Stealth 15x110 Thru-Axle | Gloss Black |
FORK RockShox ZEB 180mm Travel | Delta RC | Debonair + | LSR/LSC Adjust | 44mm Offset | Maxle Stealth 15x110 Thru-Axle | Gloss Black |
|
REAR SHOCK |
REAR SHOCK RockShox Vivid Coil S1 - 300lb, S2 - 350lb, S3 - 400lb, S4 - 450lb | LSR, HSC/LSC, ABO Adjust | 2 Position Threshold Lever | Bearing Adapter Eyelets | S1/S2 R55 C26 Tune, S3/S4 R55 C30 Tune | 230x65mm |
REAR SHOCK Fox Float X2 Air Factory Evol | HSR/LSR, HSC/LSC | 2 Position Threshold Lever | Bearing Adapter Eyelets | CL60, RS50 LMM, Rezi B60, Bleed 0.9, MCU Short | 230x65mm |
REAR SHOCK RockShox Vivid Air Select+ LinearXL | Rebound, LSC Adjust | 2 Position Threshold Lever | Bearing Adapter Eyelets | S1/S2 R55 C26 Tune, S3/S4 R55 C30 Tune | 230x65mm |
REAR SHOCK RockShox Super Deluxe LinearXL | Rebound Adjust | Bearing Adapter Eyelets | S1/S2 R55 C26 Tune, S3/S4 R55 C30 Tune | 230x65mm |
|
HEADSET |
HEADSET FSA Orbit ZS ZS44/ZS56 | Sealed Cartridge Bearings | 6000 Series Alloy Cups And Materials | Sealed Steel Crown Race |
HEADSET FSA Orbit ZS ZS44/ZS56 | Sealed Cartridge Bearings | 6000 Series Alloy Cups And Materials | Sealed Steel Crown Race |
HEADSET FSA Orbit ZS ZS44/ZS56 | Sealed Cartridge Bearings | 6000 Series Alloy Cups And Materials | Sealed Steel Crown Race |
HEADSET FSA Orbit ZS ZS44/ZS56 | Sealed Cartridge Bearings | 6000 Series Alloy Cups And Materials | Sealed Steel Crown Race |
|
GRIPS |
GRIPS Forbidden 128mm length | Single Sided Lock-On | Black |
GRIPS Forbidden 128mm length | Single Sided Lock-On | Black |
GRIPS Forbidden 128mm length | Single Sided Lock-On | Black |
GRIPS Forbidden 128mm length | Single Sided Lock-On | Black |
|
HANDLE BARS |
HANDLE BARS OneUp Alloy 800mm Width | S1-S2:20mm / S3-S4:35mm Rise | 8° Backsweep 5° Upward | 35mm Bar Bore |
HANDLE BARS OneUp Alloy 800mm Width | S1-S2:20mm / S3-S4:35mm Rise | 8° Backsweep 5° Upward | 35mm Bar Bore |
HANDLE BARS Forbidden Alloy 800mm Width | S1-S2:20mm / S3-S4:35mm Rise | 8° Backsweep 5° Upward | 35mm Bar Bore |
HANDLE BARS Forbidden Alloy 800mm Width | S1-S2:20mm / S3-S4:35mm Rise | 8° Backsweep 5° Upward | 35mm Bar Bore |
|
STEM |
STEM OneUp Forged 42mm Length | 35mm Bar Clamp | Black | Forged 6061 Aluminum |
STEM OneUp Forged 42mm Length | 35mm Bar Clamp | Black | Forged 6061 Aluminum |
STEM Forbidden Forged 40mm Length | 35mm Bar Clamp | Black |
STEM Forbidden Forged 40mm Length | 35mm Bar Clamp | Black |
|
SEAT POST |
SEAT POST OneUp V3 31.6mm | Size Specific Travel S1:150mm / S2:180mm / S3:210mm / S4:240mm |
SEAT POST TranzX Reverse 31.6mm | Size Specific Travel S1:160mm / S2:180mm / S3:210mm / S4:240mm |
SEAT POST TranzX Reverse 31.6mm | Size Specific Travel S1:160mm / S2:180mm / S3:210mm / S4:240mm |
SEAT POST TranzX Reverse 31.6mm | Size Specific Travel S1:160mm / S2:180mm / S3:210mm / S4:240mm |
|
SEAT POST REMOTE |
SEAT POST REMOTE OneUp V3 Aluminum Remote | Oversized Bearing | MatchMaker X Integrated Dropper Remote| |
SEAT POST REMOTE TransX GLS Aluminum Remote | Oversized Bearing | MatchMaker X Integrated Dropper Remote |
SEAT POST REMOTE TransX GLS Aluminum Remote | Bearing | MatchMaker X Integrated Dropper Remote |
SEAT POST REMOTE TransX GLS Aluminum Remote | Bearing | 22.2mm Clamp |
|
SEAT POST CLAMP |
SEAT POST CLAMP Forbidden 7075 CNC Aluminum | 34.9mm | Black Anodized |
SEAT POST CLAMP Forbidden 7075 CNC Aluminum | 34.9mm | Black Anodized |
SEAT POST CLAMP Forbidden 7075 CNC Aluminum | 34.9mm | Black Anodized |
SEAT POST CLAMP Forbidden 7075 CNC Aluminum | 34.9mm | Black Anodized |
|
SADDLE |
SADDLE Fizik Terra Aidon X5 145mm Width | X5: Ride-Compliant Fiber Reinforced Nylon Shell And S-Alloy Rail | Black |
SADDLE Fizik Terra Aidon X5 145mm Width | X5: Ride-Compliant Fiber Reinforced Nylon Shell And S-Alloy Rail | Black |
SADDLE Forbidden 143mm Width | Atmos Shaping | Cro-Mo Rail | Black |
SADDLE Forbidden 143mm Width | Atmos Shaping | Cro-Mo Rail | Black |
|
FRONT BRAKE |
FRONT BRAKE SRAM Maven - Ultimate Stealth Body | SwingLink | Reach & Contact Adjustment | Organic Pads |
FRONT BRAKE SRAM Maven - Silver Stealth Body | SwingLink | Reach & Contact Adjustment | Organic Pads |
FRONT BRAKE SRAM Maven Base | Stealth Body | Reach Adjustment | Organic Pads |
FRONT BRAKE SRAM DB4 Stealth Body | Reach Adjustment | Organic Pads |
|
FRONT BRAKE ROTOR |
FRONT BRAKE ROTOR SRAM HS2 6-Bolt | 2.0mm Thickness | Superior Heat Managment |
FRONT BRAKE ROTOR SRAM Centerline 6-Bolt | 2.0mm Thickness |
FRONT BRAKE ROTOR SRAM Centerline 6-Bolt | 2.0mm Thickness |
FRONT BRAKE ROTOR SRAM Centerline 6-Bolt | 2.0mm Thickness |
|
REAR BRAKE |
REAR BRAKE SRAM Maven - Ultimate Stealth Body | SwingLink | Reach & Contact Adjustment | Organic Pads |
REAR BRAKE SRAM Maven - Silver Stealth Body | SwingLink | Reach & Contact Adjustment | Organic Pads |
REAR BRAKE SRAM Maven Base | Stealth Body | Reach Adjustment | Organic Pads |
REAR BRAKE SRAM DB4 Stealth Body | Reach Adjustment | Organic Pads |
|
REAR BRAKE ROTOR |
REAR BRAKE ROTOR SRAM HS2 6-Bolt | 2.0mm Thickness | Superior Heat Managment |
REAR BRAKE ROTOR SRAM Centerline 6-Bolt | 2.0mm Thickness |
REAR BRAKE ROTOR SRAM Centerline 6-Bolt | 2.0mm Thickness |
REAR BRAKE ROTOR SRAM Centerline 6-Bolt | 2.0mm Thickness |
|
REAR SHIFTER |
REAR SHIFTER SRAM Pod Rocker With MMX Clamp | AXS Controller | Rocking Actuation |
REAR SHIFTER SRAM Pod Rocker With MMX Clamp | AXS Controller | Rocking Actuation |
REAR SHIFTER SRAM Eagle 90 With MMX Clamp | Single Click | Two Button Design |
REAR SHIFTER SRAM Eagle 70 22.2 Clamp | Single Click | Two Button Design |
|
REAR DERAILLEUR |
REAR DERAILLEUR SRAM X0 T-Type Hangerless Interface | Overload Clutch | Replaceable Skid Plates |
REAR DERAILLEUR SRAM GX T-Type Hangerless Interface | Overload Clutch | Replaceable Skid Plates |
REAR DERAILLEUR SRAM Eagle 90 T-Type Hangerless Interface | Replaceable Skid Plates |
REAR DERAILLEUR SRAM Eagle 70 T-Type Hangerless Interface | Replaceable Skid Plates |
|
CASSETTE |
CASSETTE SRAM XS-1295 12speed | XD Fit | 10-12-14-16-18-21-24-28-32-38-44-52T |
CASSETTE SRAM XS-1275 12speed | XD Fit | 10-12-14-16-18-21-24-28-32-38-44-52T |
CASSETTE SRAM XS-1270 12speed | HG Fit | 10-12-14-16-18-21-24-28-32-38-44-52T |
CASSETTE SRAM XS-1270 12speed | HG Fit | 10-12-14-16-18-21-24-28-32-38-44-52T |
|
CHAIN |
CHAIN SRAM GX T-Type 12speed | Links = S1:120 / S2:122 / S3:124 / S4:126 |
CHAIN SRAM GX T-Type 12speed | Links = S1:120 / S2:122 / S3:124 / S4:126 |
CHAIN SRAM Eagle 70 T-Type 12speed | Links = S1:120 / S2:122 / S3:124 / S4:126 |
CHAIN SRAM Eagle 70 T-Type 12speed | Links = S1:120 / S2:122 / S3:124 / S4:126 |
|
CRANKSET |
CRANKSET SRAM X0 E 150mm | SRAM 34T Chainring | 55mm Chainline | Alloy |
CRANKSET Praxis Type 2 Alloy E-Cranks 150mm | SRAM 34T Chainring | 55mm Chainline | Black |
CRANKSET Praxis Type 2 Alloy E-Cranks 150mm | SRAM 34T Chainring | 55mm Chainline | Black |
CRANKSET Praxis Type 7 Alloy E-Cranks 150mm | SRAM 34T Chainring | 55mm Chainline | Alloy |
|
PEDALS |
PEDALS Not included |
PEDALS Not included |
PEDALS Not included |
PEDALS Not included |
|
UPPER CHAIN GUIDE |
UPPER CHAIN GUIDE Forbidden Race Guide |
UPPER CHAIN GUIDE Forbidden Race Guide |
UPPER CHAIN GUIDE Forbidden Race Guide |
UPPER CHAIN GUIDE Forbidden Race Guide |
|
LOWER CHAIN GUIDE |
LOWER CHAIN GUIDE |
LOWER CHAIN GUIDE |
LOWER CHAIN GUIDE |
LOWER CHAIN GUIDE |
|
BOTTOM BRACKET |
BOTTOM BRACKET Avinox ISIS Interface |
BOTTOM BRACKET Avinox ISIS Interface |
BOTTOM BRACKET Avinox ISIS Interface |
BOTTOM BRACKET Avinox ISIS Interface |
|
FRONT HUB |
FRONT HUB Crank Brothers Ratchet 110x15mm | 28-Hole | 6-Bolt | Black Anodized |
FRONT HUB Crank Brothers Ratchet 110x15mm | 28-Hole | 6-Bolt | Black Anodized |
FRONT HUB Crankbrothers Synthesis 110x15mm | 28-Hole | 6-Bolt | Black Anodized |
FRONT HUB Crankbrothers Synthesis 110x15mm | 28-Hole | 6-Bolt | Black Anodized |
|
FRONT AXLE |
FRONT AXLE Maxle Stealth 6mm Hex Fitment |
FRONT AXLE Fox Kabolt 6mm Hex Fitment |
FRONT AXLE Maxle Stealth 6mm Hex Fitment |
FRONT AXLE Maxle Stealth 6mm Hex Fitment |
|
REAR HUB |
REAR HUB Crank Brothers Ratchet Ratchet Internals | XD Driver | 148x12mm | 32hole | 6-Bolt | Black Anodized Decal |
REAR HUB Crank Brothers Ratchet Ratchet Internals | XD Driver | 148x12mm | 32hole | 6-Bolt | Black Anodized Decal |
REAR HUB Crankbrothers Synthesis HG Driver | 148x12mm | 32-Hole | 6-Bolt |
REAR HUB Crankbrothers Synthesis HG Driver | 148x12mm | 32-Hole | 6-Bolt |
|
REAR AXLE |
REAR AXLE SRAM Maxle Stealth 180x12mm | 5mm Hex Fitment |
REAR AXLE SRAM Maxle Stealth 180x12mm | 5mm Hex Fitment |
REAR AXLE SRAM Maxle Stealth 180x12mm | 5mm Hex Fitment |
REAR AXLE SRAM Maxle Stealth 180x12mm | 5mm Hex Fitment |
|
SPOKES |
SPOKES Sapim E-Light / Strong Front: Sapim E-Light / Rear: Sapim Strong | Black ED Coated Stainless | Black Brass 14mm Nipples |
SPOKES Sapim E-Light / Strong Front: Sapim E-Light / Rear: Sapim Strong | Black ED Coated Stainless | Black Brass 14mm Nipples |
SPOKES Sapim E-Light / Strong Front: Sapim E-Light / Rear: Sapim Strong | Black ED Coated Stainless | Black Brass 14mm Nipples |
SPOKES Sapim E-Light / Strong Front: Sapim E-Light / Rear: Sapim Strong | Black ED Coated Stainless | Black Brass 14mm Nipples |
|
RIMS |
RIMS Crankbrothers Synthesis Carbon Enduro Front 31.5mm / Rear 31.5mm Internal Width | Tubeless Ready | Black with Grey Graphics |
RIMS Crank Brothers Alloy 2.0 Front 31mm / Rear 29.5mm Internal Width | Tubeless Ready | Black with Grey Graphics |
RIMS Crankbrothers Alloy 1.0 Front 31.5mm / Rear 31.5mm Internal Width | Tubeless Ready | Black with Grey Graphics |
RIMS Crankbrothers Alloy 1.0 Front 31.5mm / Rear 31.5mm Internal Width | Tubeless Ready | Black with Grey Graphics |
|
FRONT TIRE |
FRONT TIRE Maxxis High Roller 3 3C, MaxxGrip, DH Casing 29 x 2.4 | 3C MaxxGrip Rubber Compound | 60tpi | Folding | Tubeless Ready | DH Casing |
FRONT TIRE Maxxis High Roller 3 3C, MaxxGrip, DH Casing 29 x 2.4 | 3C MaxxGrip Rubber Compound | 60tpi | Folding | Tubeless Ready | DH Casing |
FRONT TIRE Maxxis High Roller 3 3C, MaxxGrip, DH Casing 29 x 2.4 | 3C MaxxGrip Rubber Compound | 60tpi | Folding | Tubeless Ready | DH Casing |
FRONT TIRE Maxxis High Roller 3 3C, MaxxGrip, DH Casing 29 x 2.4 | 3C MaxxGrip Rubber Compound | 60tpi | Folding | Tubeless Ready | EXO+ Casing |
|
REAR TIRE |
REAR TIRE Maxxis DHRII 3C, MaxxGrip, DH Casing 27.5 x 2.5 | 3C MaxxGrip Rubber Compound | 120tpi | Folding | Tubeless Ready | DH Casing |
REAR TIRE Maxxis DHRII 3C, MaxxGrip, DH Casing 27.5 x 2.5 | 3C MaxxGrip Rubber Compound | 120tpi | Folding | Tubeless Ready | DH Casing |
REAR TIRE Maxxis DHRII 3C, MaxxGrip, DH Casing 27.5 x 2.5 | 3C MaxxGrip Rubber Compound | 120tpi | Folding | Tubeless Ready | DH Casing |
REAR TIRE Maxxis DHRII 3C, MaxxGrip, DH Casing 27.5 x 2.5 | 3C MaxxGrip Rubber Compound | 120tpi | Folding | Tubeless Ready | DH Casing |
|
MOTOR |
MOTOR Avinox M2S Drive Unit: 130 Nm | 1300w Peak Power | Avinox DP100 Screen: 2-inch OLED Touch Screen Control Display | Avinox Wireless Controllers: Right and left sides |
MOTOR Avinox M2S Drive Unit: 130 Nm | 1300w Peak Power | Avinox DP100 Screen: 2-inch OLED Touch Screen Control Display | Avinox Wireless Controllers: Right and left sides |
MOTOR Avinox M2 Drive Unit: 110 Nm (120Nm Boost) | 1100w Peak Power | Avinox DPC100 Screen: 2-inch OLED Display | Avinox Wireless Controllers: Right and left sides |
MOTOR Avinox M2 Drive Unit: 110 Nm (120Nm Boost) | 1100w Peak Power | Avinox DPC100 Screen: 2-inch OLED Display | Avinox Wireless Controllers: Right and left sides |
|
BATTERY |
BATTERY Avinox Integrated Li-ion Battery: 600Wh or 800Wh |
BATTERY Avinox Integrated Li-ion Battery: 600Wh or 800Wh |
BATTERY Avinox Integrated Li-ion Battery: 600Wh or 800Wh |
BATTERY Avinox Integrated Li-ion Battery: 600Wh or 800Wh |
|
Included |
Included Frame Protection Film Preinstalled in High Wear Areas. Full OE Integrated Kit Available Extra |
Included Frame Protection Film Preinstalled in High Wear Areas. Full OE Integrated Kit Available Extra |
Included Frame Protection Film Preinstalled in High Wear Areas. Full OE Integrated Kit Available Extra |
Included Frame Protection Film Preinstalled in High Wear Areas. Full OE Integrated Kit Available Extra |
|
Included |
Included Avinox 508W Charger Approx. 1 h 30 min (0–75%) |
Included Avinox 168W Charger Approx. 4 h 45 min (0–100%)approx. 3 h 3 min (0–75%) |
Included Avinox 168W Charger Approx. 4 h 45 min (0–100%)approx. 3 h 3 min (0–75%) |
Included Avinox 168W Charger Approx. 4 h 45 min (0–100%)approx. 3 h 3 min (0–75%) |
|
Included |
Included AXS Extension Cord |
Included AXS Extension Cord |
Included Fidlock TWIST Bike Base |
Included Fidlock TWIST Bike Base |
|
Included |
Included Fidlock TWIST Bike Base |
Included Fidlock TWIST Bike Base |
Included Stans Sealant - 250ml |
Included Stans Sealant - 250ml |
|
Included |
Included Stans Sealant - 250ml |
Included Stans Sealant - 250ml |
Included |
Included |
*Please note: we make every effort to ensure accuracy of the Spec Information, but they are subject to change.
*Please note: we make every effort to ensure accuracy of the Spec Information, but they are subject to change.
Size Guide
Size Guide
S1
S1
S2
S2
S3
S3
S4
S4
5'2
158cm
5'6
168cm
5'6
168cm
5'10
178cm
5'10
178cm
6'2
188cm
6'2
188cm
6'6
198cm
MX Geometry
MX Geometry
| Fork Size 180mm | S1 | S2 | S3 | S4 | |
|---|---|---|---|---|---|
| A | Reach | 425 | 445 | 461 | 481 |
| B | Stack | 635 | 648 | 669 | 682 |
| C | Hori. Top Tube Length | 575 | 598 | 619 | 642 |
| D | Seat Tube Length | 400 | 420 | 440 | 470 |
| E | Seat Tube Angle (Effective) | 76.75 | 76.75 | 76.75 | 76.75 |
| F | Seat Tube Angle (Actual) | 71.6 | 73.7 | 75.4 | 76.8 |
| G | Head Tube Length | 100 | 115 | 138 | 153 |
| H | Head Tube Angle | 63 | 63 | 63 | 63 |
| I | Front Center | 782 | 808 | 835 | 861 |
| J | Rear Center | 434 | 449 | 463 | 478 |
| K | Wheel base | 1215.5 | 1256.9 | 1298.2 | 1339.5 |
| L | BB Drop | -20 | -20 | -20 | -20 |
| M | BB Height | 340.8 | 340.8 | 340.8 | 340.8 |
| N | Stand Over | 720 | 720 | 720 | 720 |
| O | Fork Length | 596 | 596 | 596 | 596 |
| P | Fork Offset | 44 | 44 | 44 | 44 |
Size Guide
MX Geometry
Technical Info
Technical Info
-
MAX. FORK LENGTH (AXLE TO CROWN)
605mm
-
RECOMMENDED FORK OFFSET
44mm
-
SHOCK DIMENSIONS & HARDWARE
230 x 65mm (30mm x 8mm hardware)
-
S.H.I.S.
ZS44/28.6 ZS56/40
-
REAR DROPOUT SPACING (O.L.D.)
148mm
-
BRAKE MOUNT
200mm Post Mount
-
CHAIN LINE
55mm
-
MAX. CHAIN RING (PER FRAME SIZE)
S1: 36T S2: 36T S3: 38T S4: 38T
-
RECOMMENDED TIRE SIZE
27.5 x 2.5
-
MAX. SEAT POST INSERTION (PER FRAME SIZE)
S1: 260mm S2: 275mm S3:300mm S4: 320mm
-
SEATPOST DIAMETER
31.6mm
-
MAX. TIRE SIZE
27.5 x 2.6
The industry’s only TRULYPROPORTIONAL geometry.
The industry’s only TRULY PROPORTIONAL geometry.
Things You Should Know
Things You Should Know
Things YouShould Know
Things You Should Know
01 Trifecta V3 Platform
02 Avinox Drive System
03 Touch Screen and Controls
04 AXS Extension Cord Compatible
05 Carbon Rocker Link
06 Idler Pulley
07 Custom Frame Protection
08 Waterbottle Fitment

01
Trifecta V3 Platform
Trifecta V3 Platform
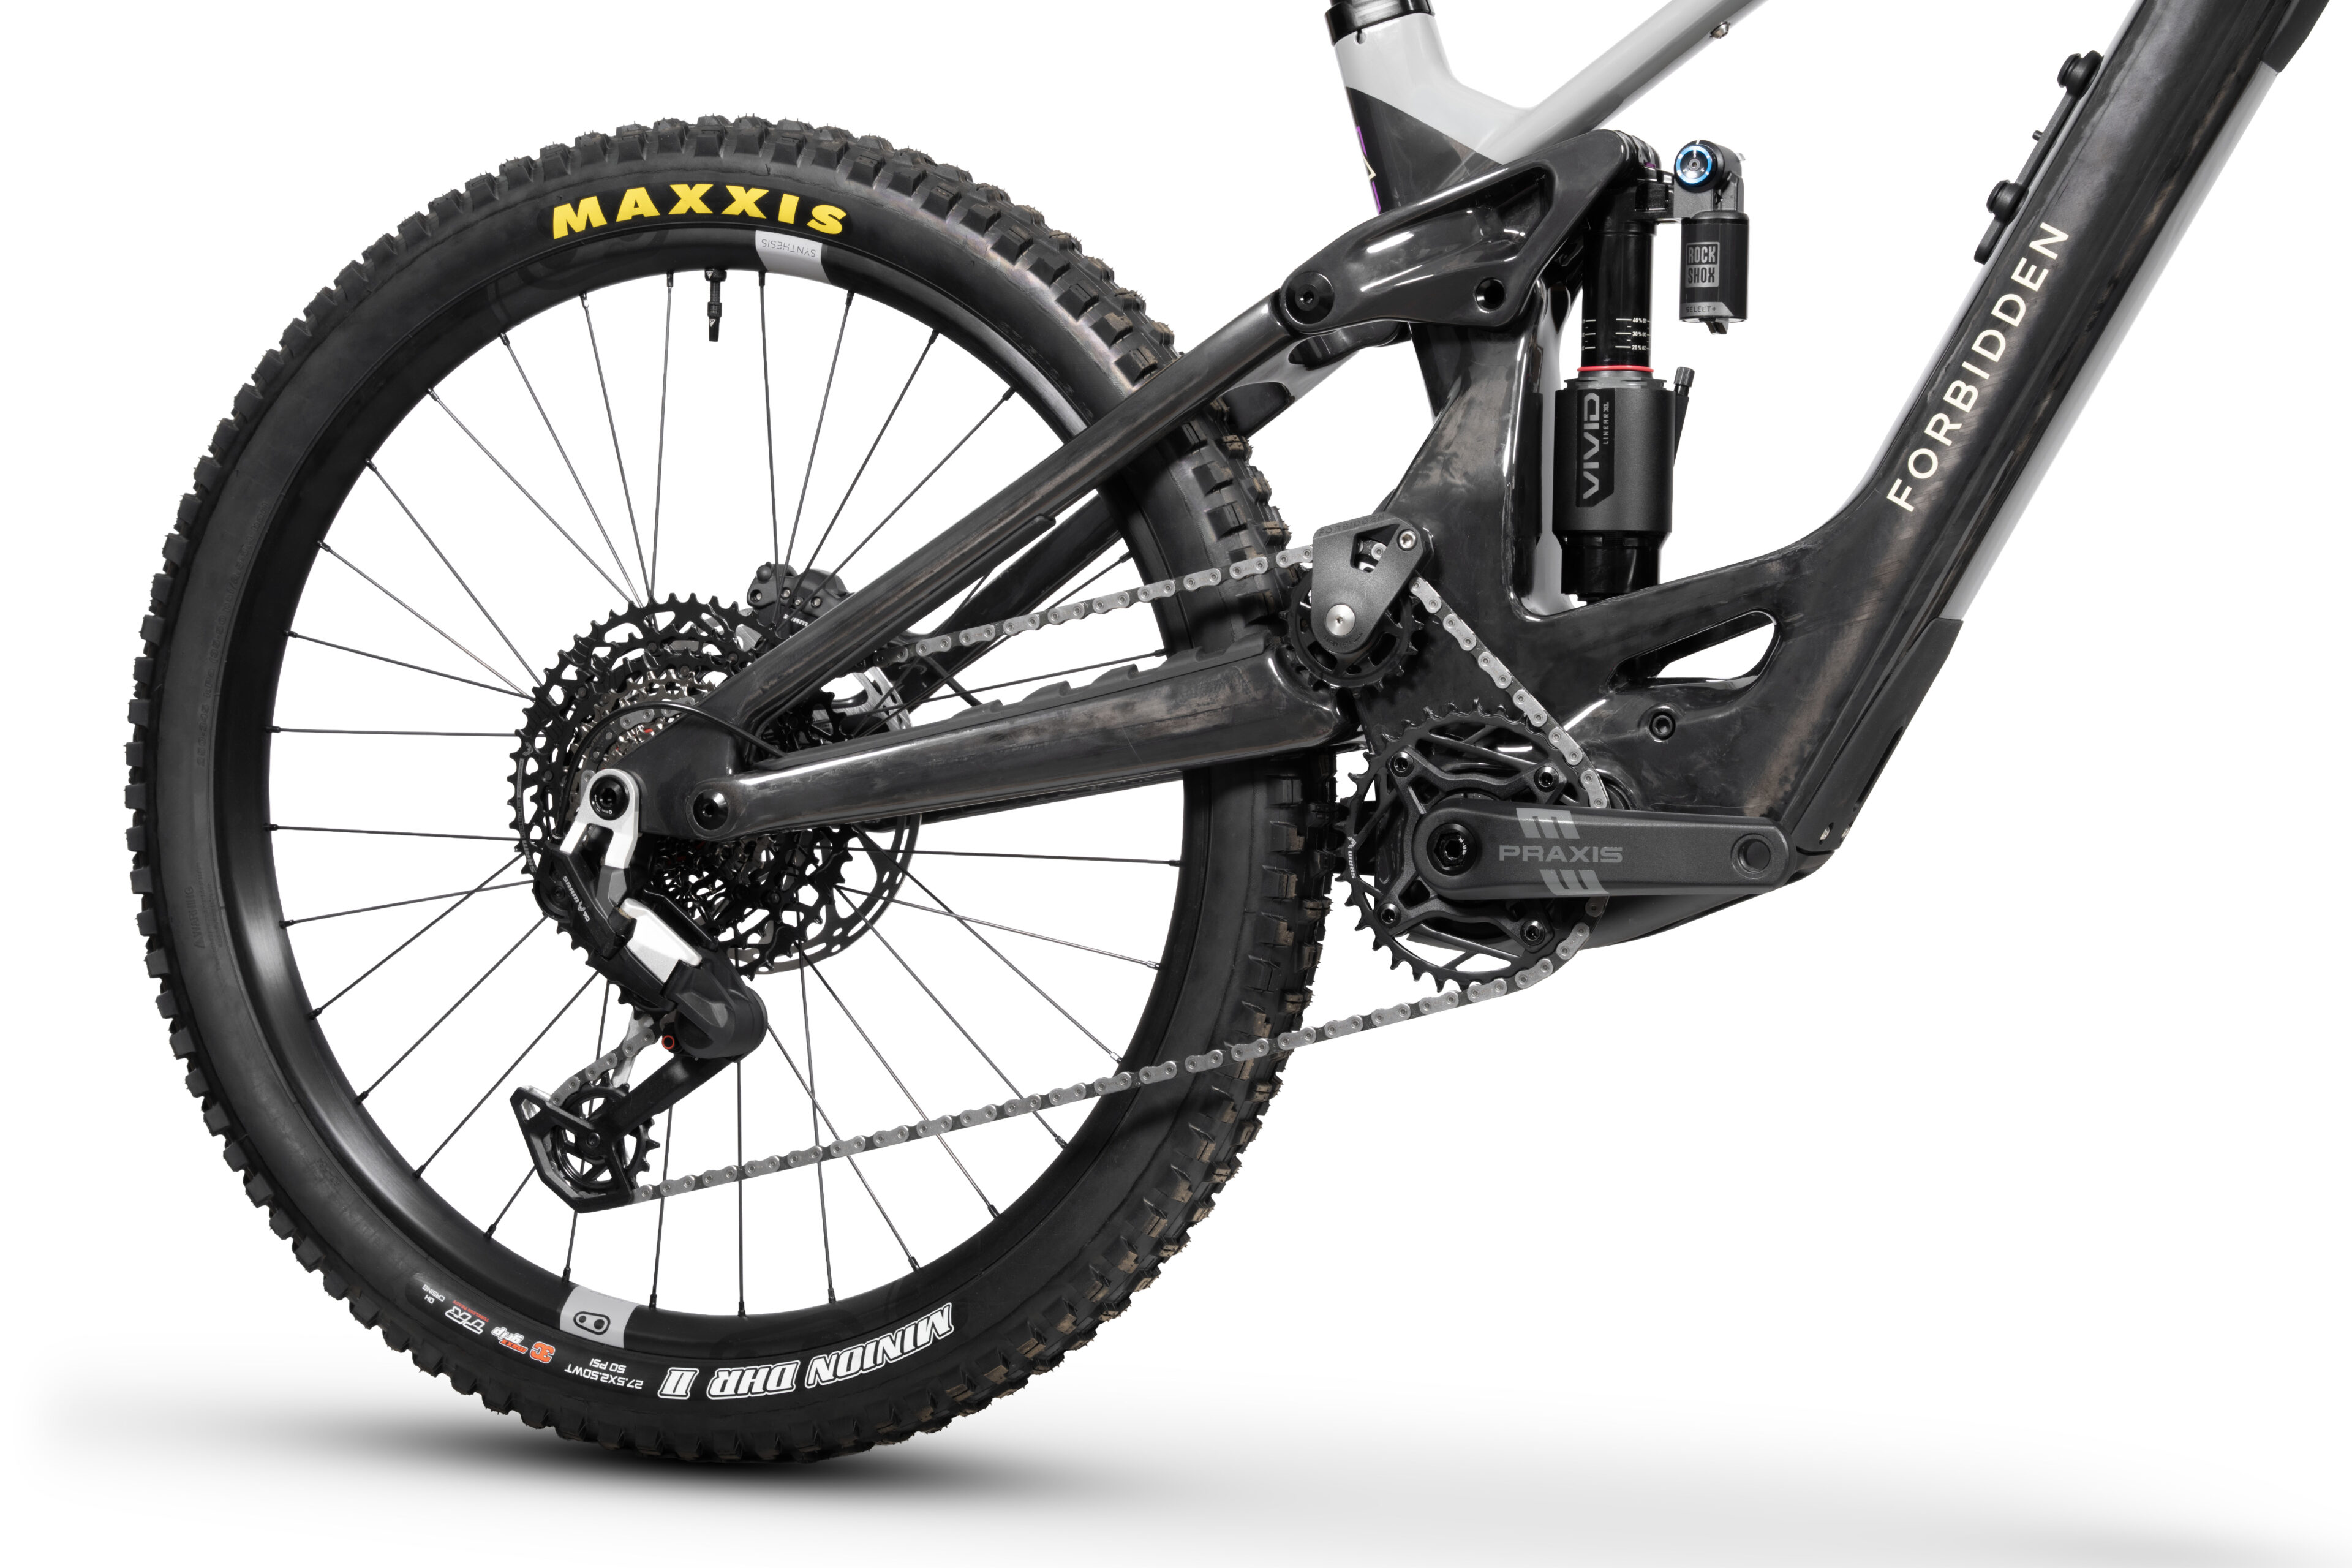
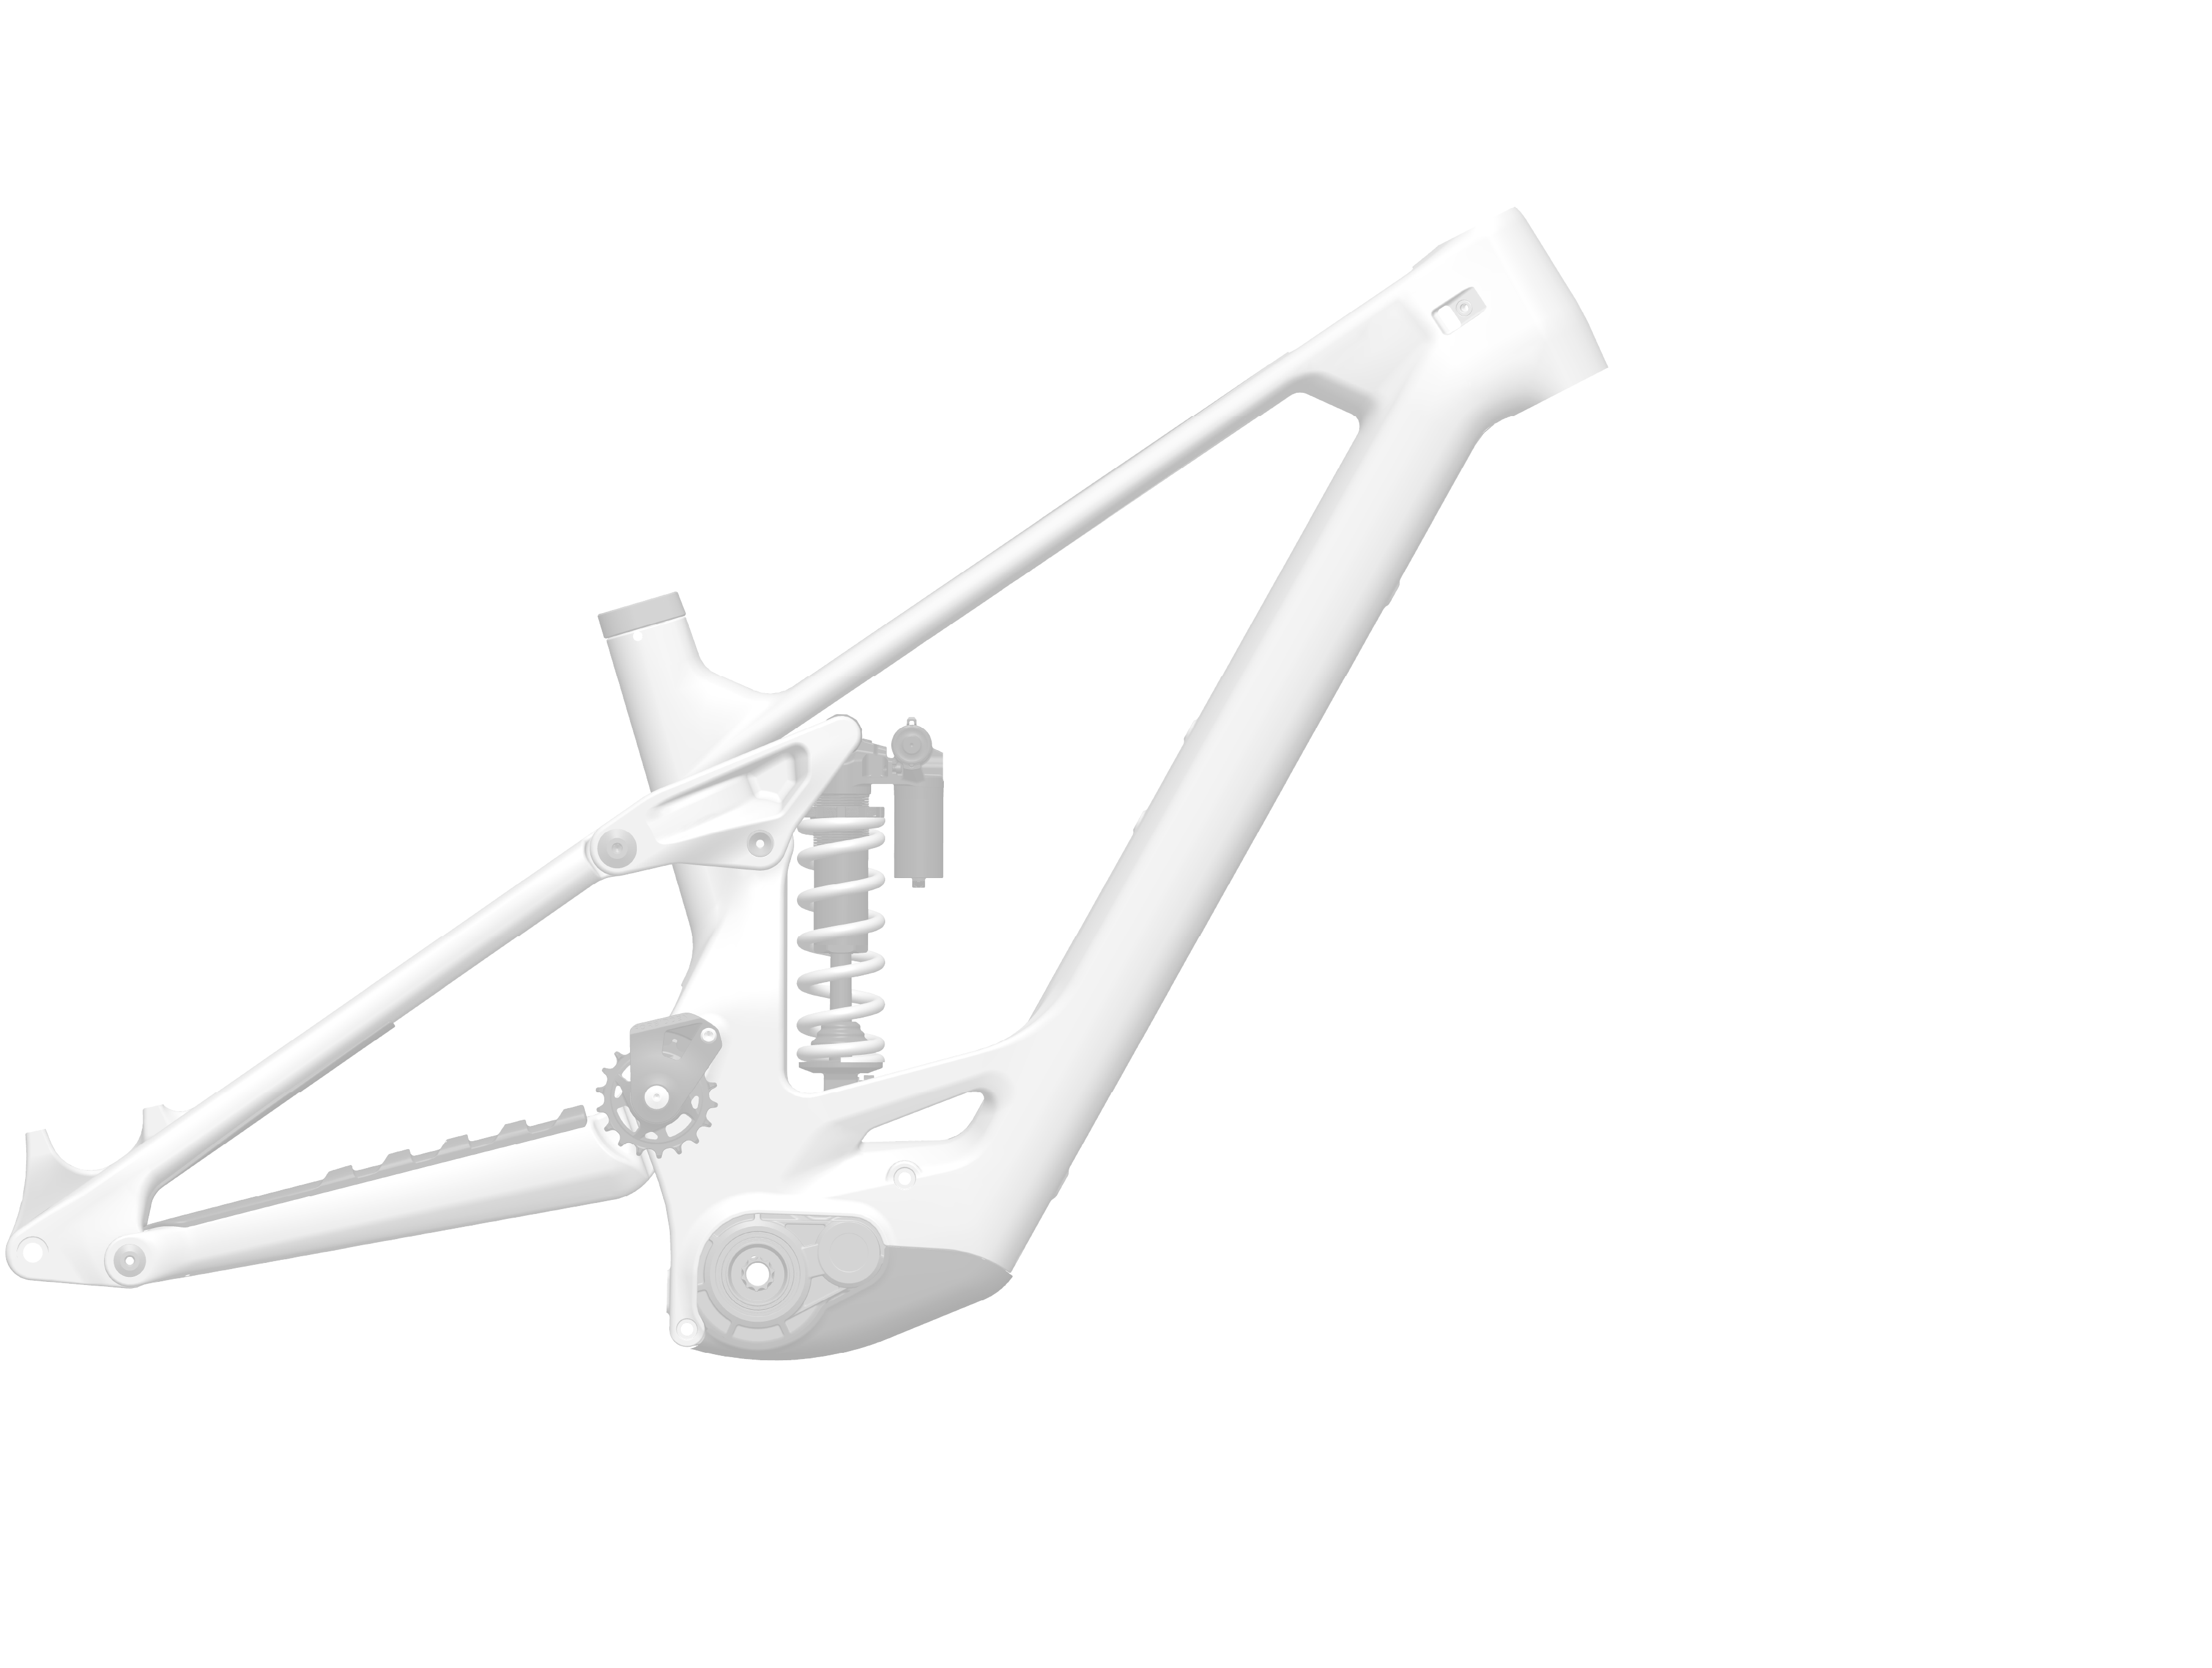
The latest iteration of our Trifecta platform elevates the spellbinding ride characteristics you expect from a Forbidden to a new level. We’ve fine-tuned the rearward axle path, idler position, and kinematics (the holy trinity of ride characteristics) to deliver the best e-MTB we’ve ever ridden. The new platform also gives us more seat post insertion and allows us to neatly package the motor and battery.
The latest iteration of our Trifecta platform elevates the spellbinding ride characteristics you expect from a Forbidden to a new level. We’ve fine-tuned the rearward axle path, idler position, and kinematics (the holy trinity of ride characteristics) to deliver the best e-MTB we’ve ever ridden. The new platform also gives us more seat post insertion and allows us to neatly package the motor and battery.

02
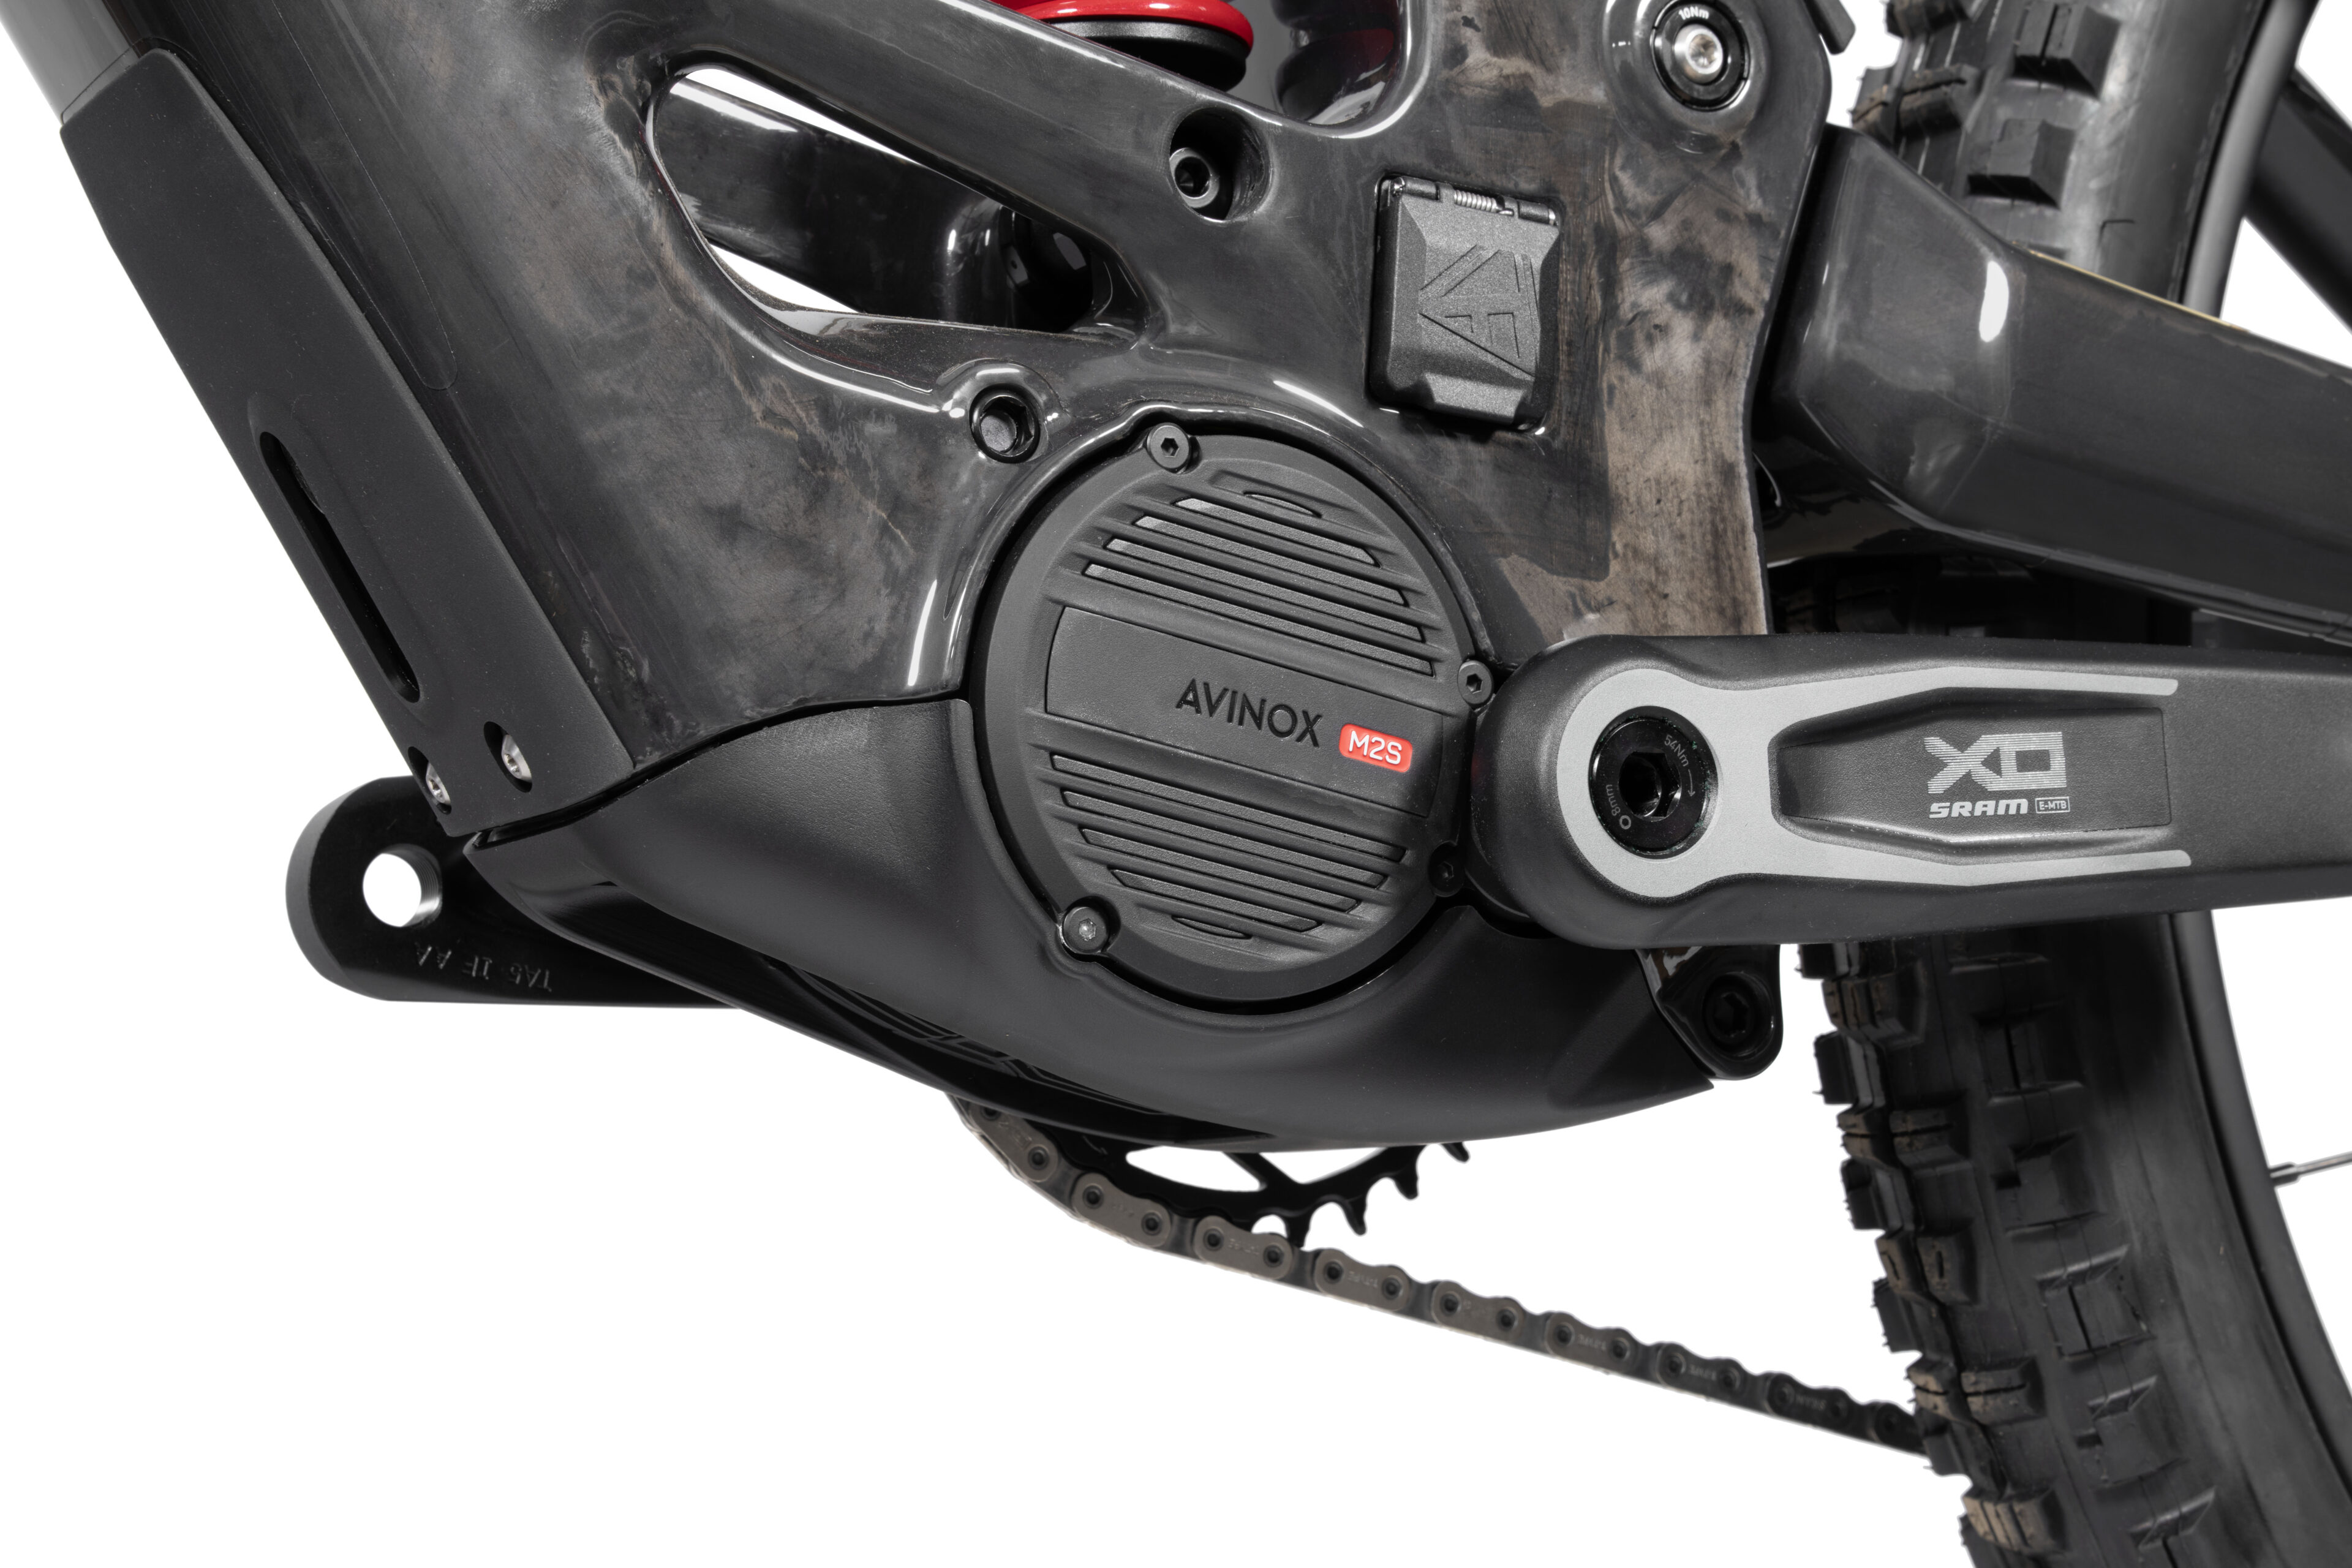
Avinox Drive System
Avinox Drive System
Dreadnought E is powered by the Avinox drive system in two trims depending on build kit. T1 and T2 get the M2S motor, delivering 130 Nm of torque (150 Nm Boost) and 1300 watts, in a 2.6 kg package. T3 and T4 run the M2 motor, delivering 110 Nm of torque (125 Nm Boost) and 1100 watts, with a motor weight of 2.65 kg. Both builds can be paired with 600 Wh or 800 Wh battery options, letting you choose between a lighter setup or maximum range.
Dreadnought E is powered by the Avinox drive system in two trims depending on build kit. T1 and T2 get the M2S motor, delivering 130 Nm of torque (150 Nm Boost) and 1300 watts, in a 2.6 kg package. T3 and T4 run the M2 motor, delivering 110 Nm of torque (125 Nm Boost) and 1100 watts, with a motor weight of 2.65 kg. Both builds can be paired with 600 Wh or 800 Wh battery options, letting you choose between a lighter setup or maximum range.

03
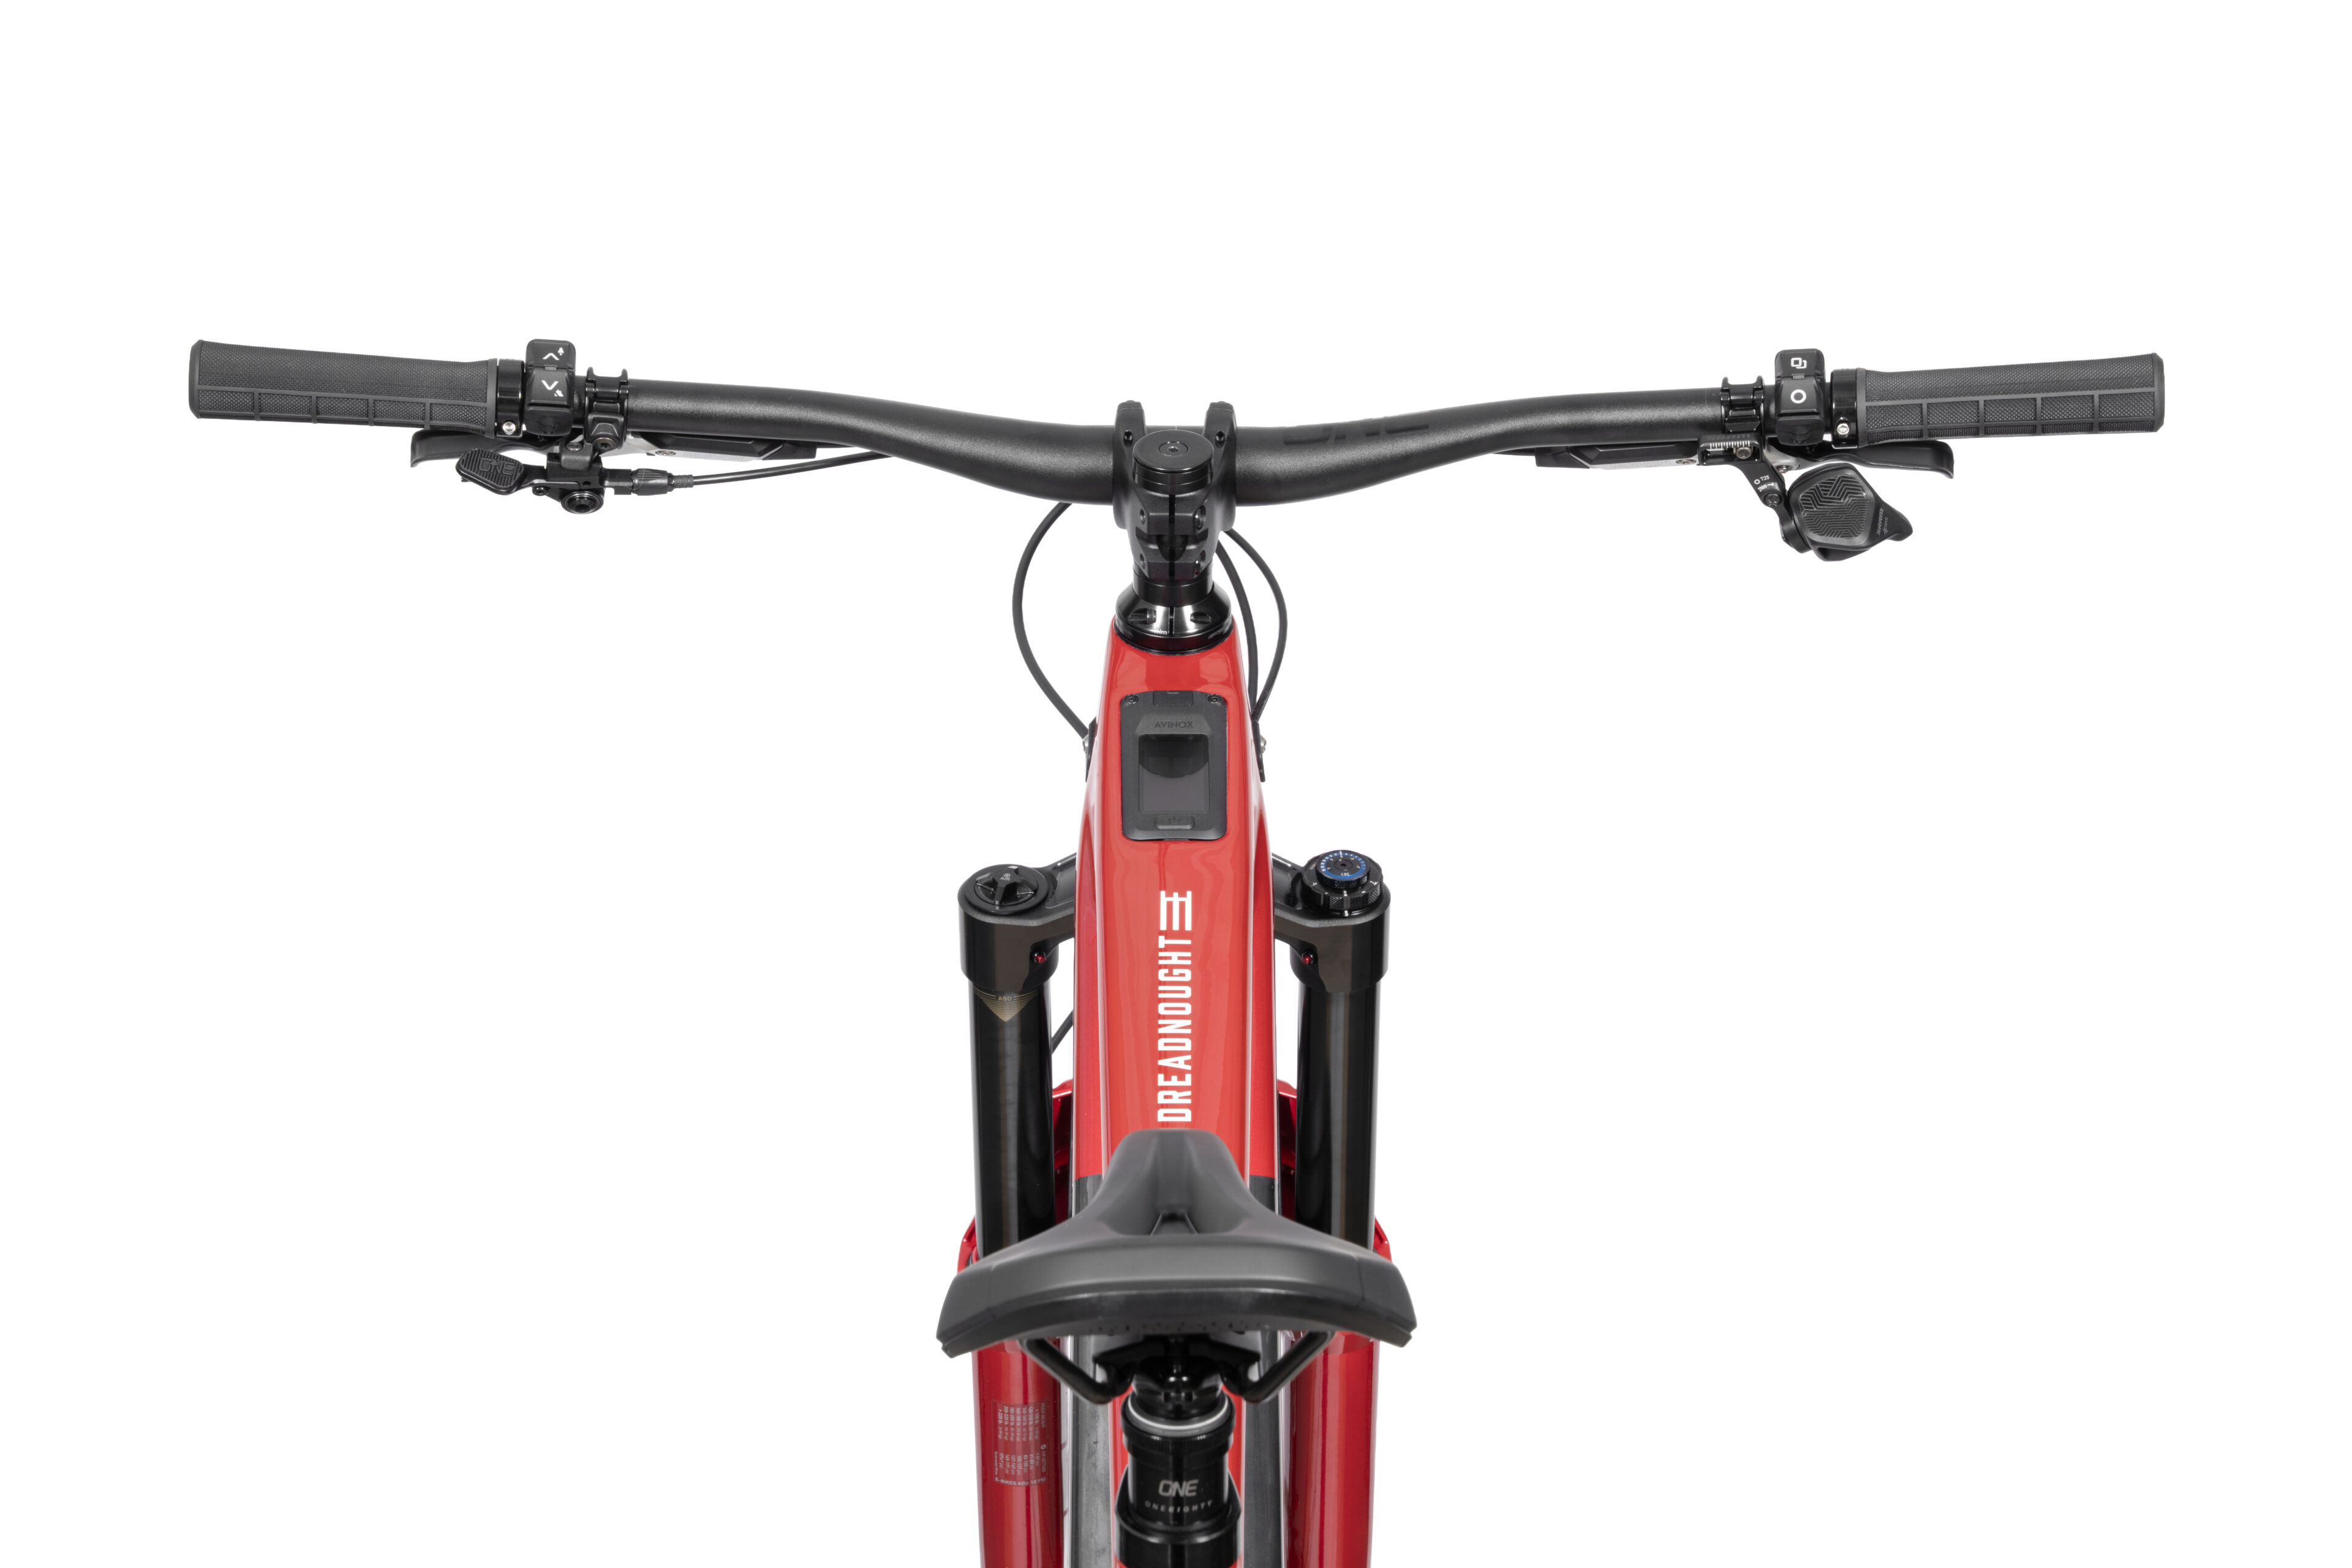
Touch Screen and Controls
Touch Screen and Controls
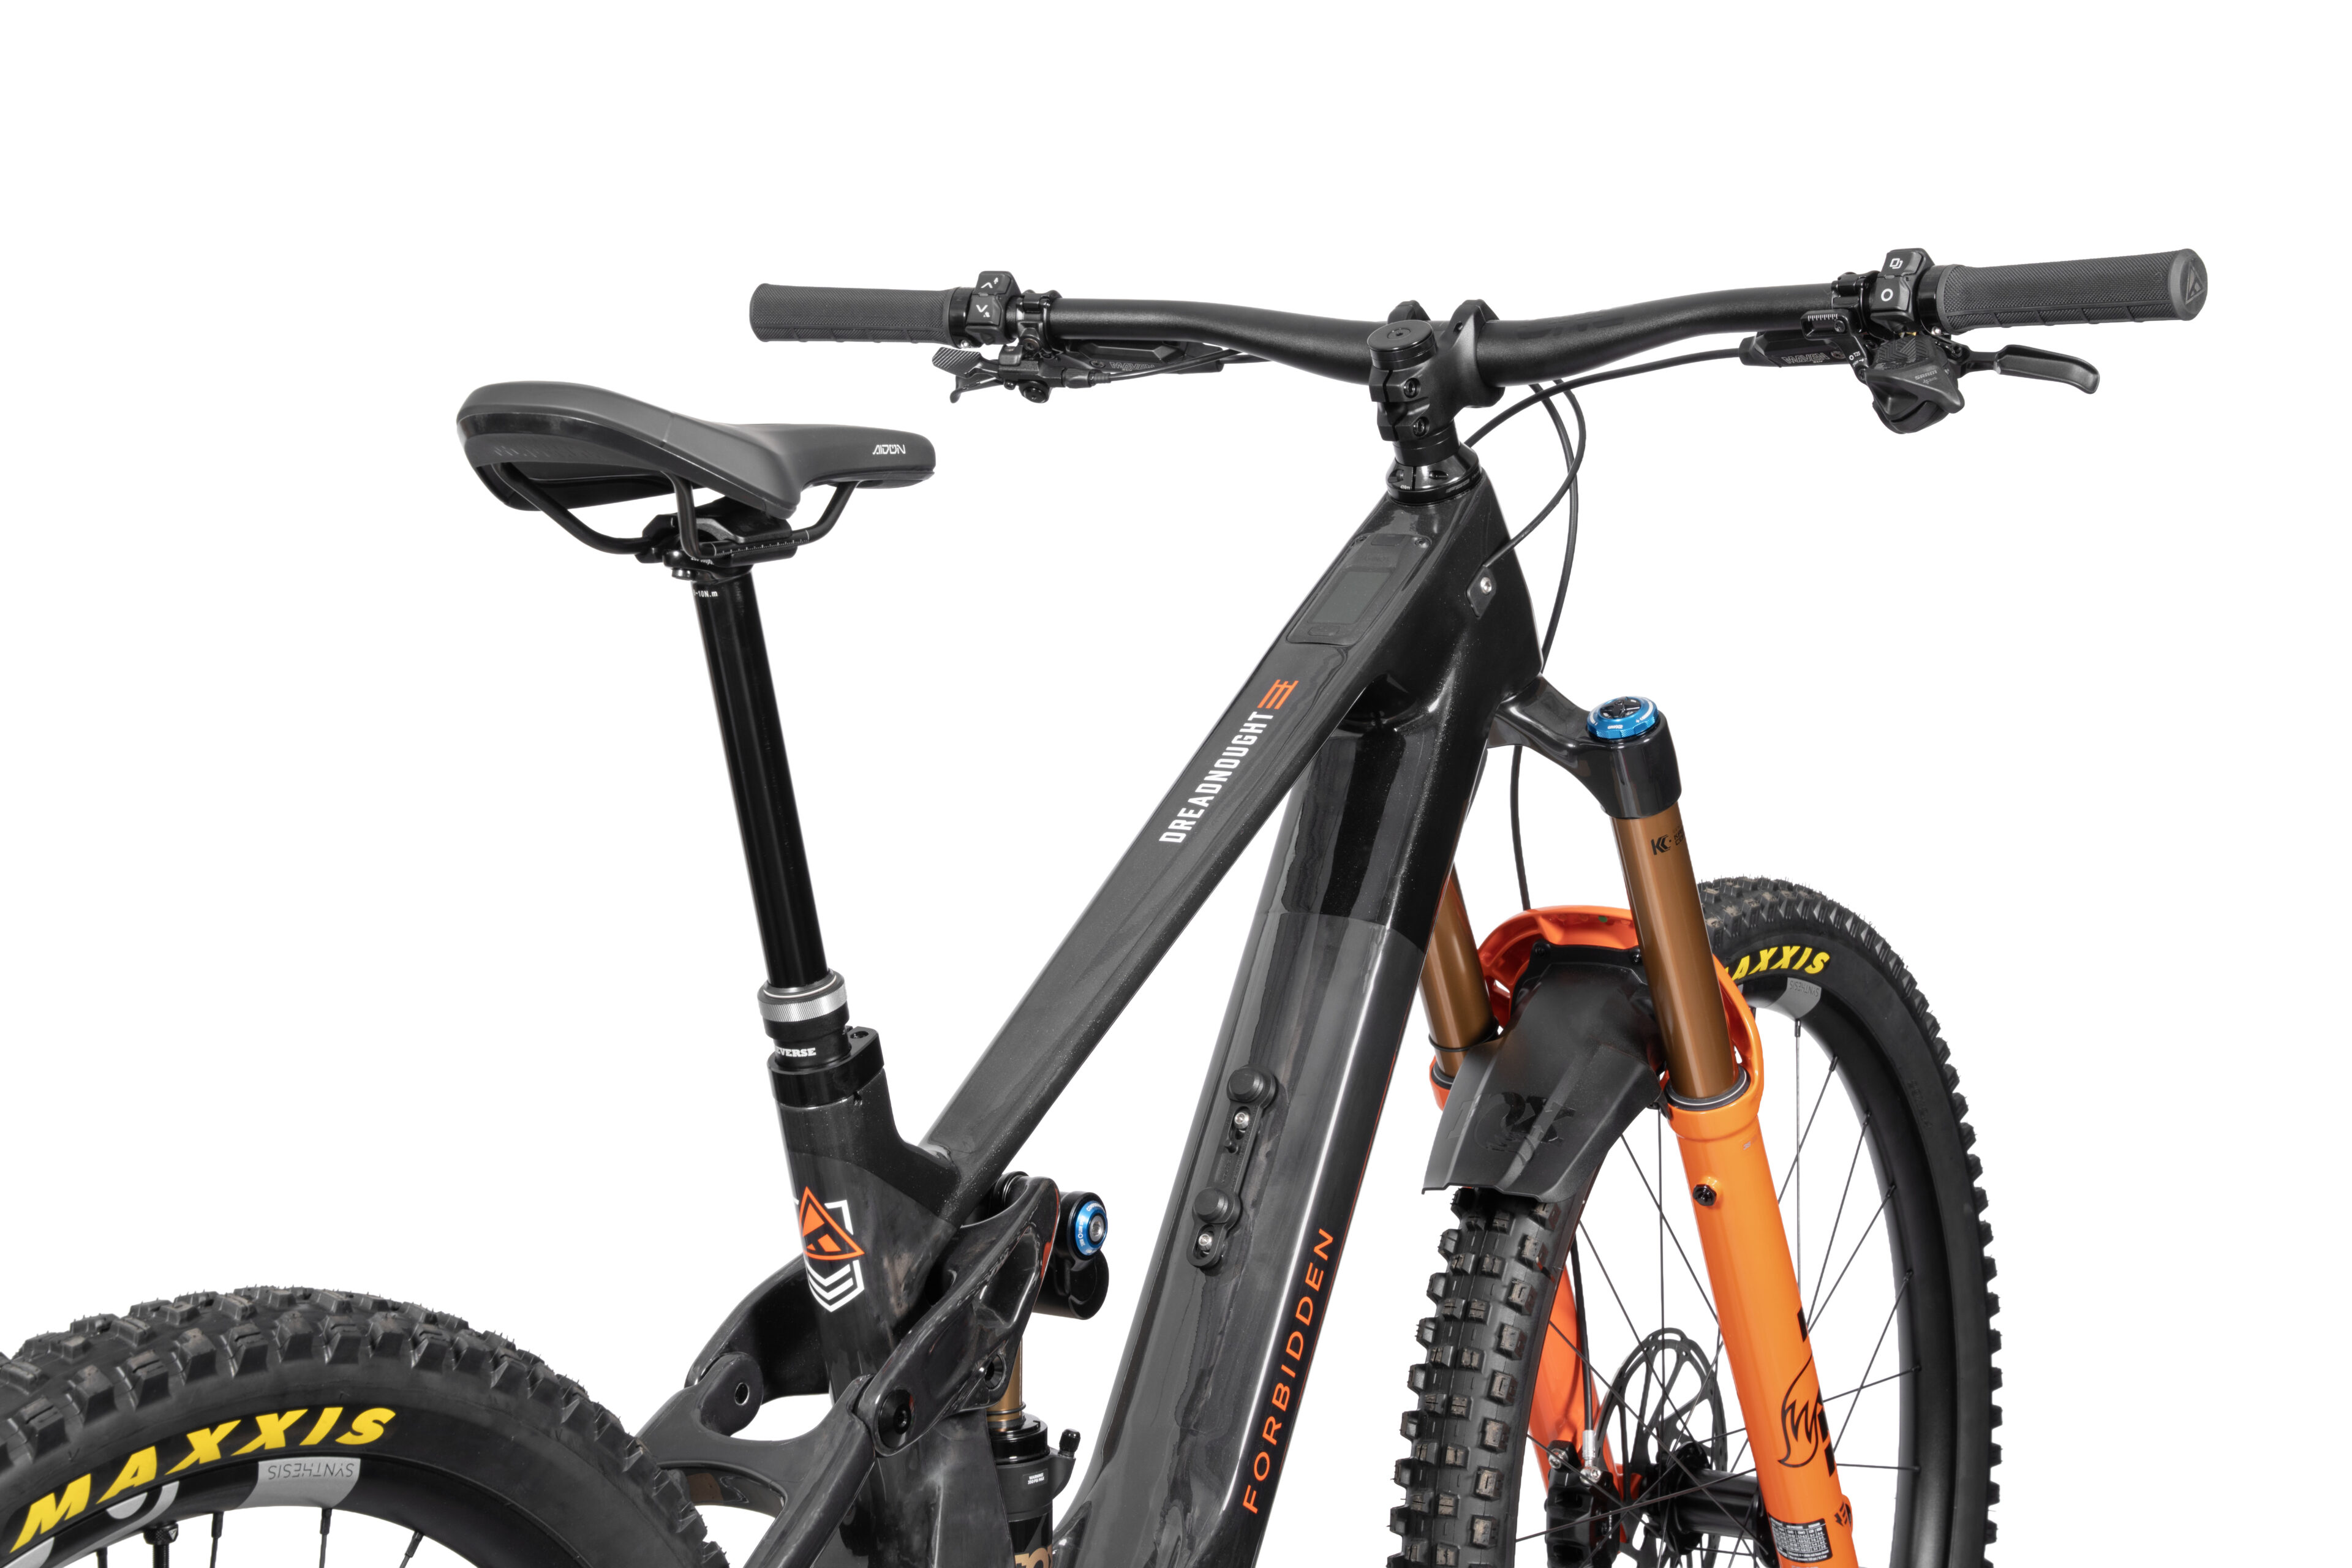
Dreadnought E features a 2-inch OLED full-colour Control Display as the interactive hub, enabling connectivity between the Avinox Drive Unit and your mobile device via the Avinox app. Tuneable assist modes, wireless handlebar controls, and an intuitive app set the Avinox system apart from the rest.
Dreadnought E features a 2-inch OLED full-colour Control Display as the interactive hub, enabling connectivity between the Avinox Drive Unit and your mobile device via the Avinox app. Tuneable assist modes, wireless handlebar controls, and an intuitive app set the Avinox system apart from the rest.

04
AXS Extension Cord Compatible
AXS Extension Cord Compatible
Dreadnought E builds that are specced with AXS transmission come equipped with SRAM’s AXS Extension Cord. The SRAM AXS Extension Cord connects the AXS transmission to the bike’s battery, allowing you to power the drivetrain directly without the use of an AXS battery.
Dreadnought E builds that are specced with AXS transmission come equipped with SRAM’s AXS Extension Cord. The SRAM AXS Extension Cord connects the AXS transmission to the bike’s battery, allowing you to power the drivetrain directly without the use of an AXS battery.

05
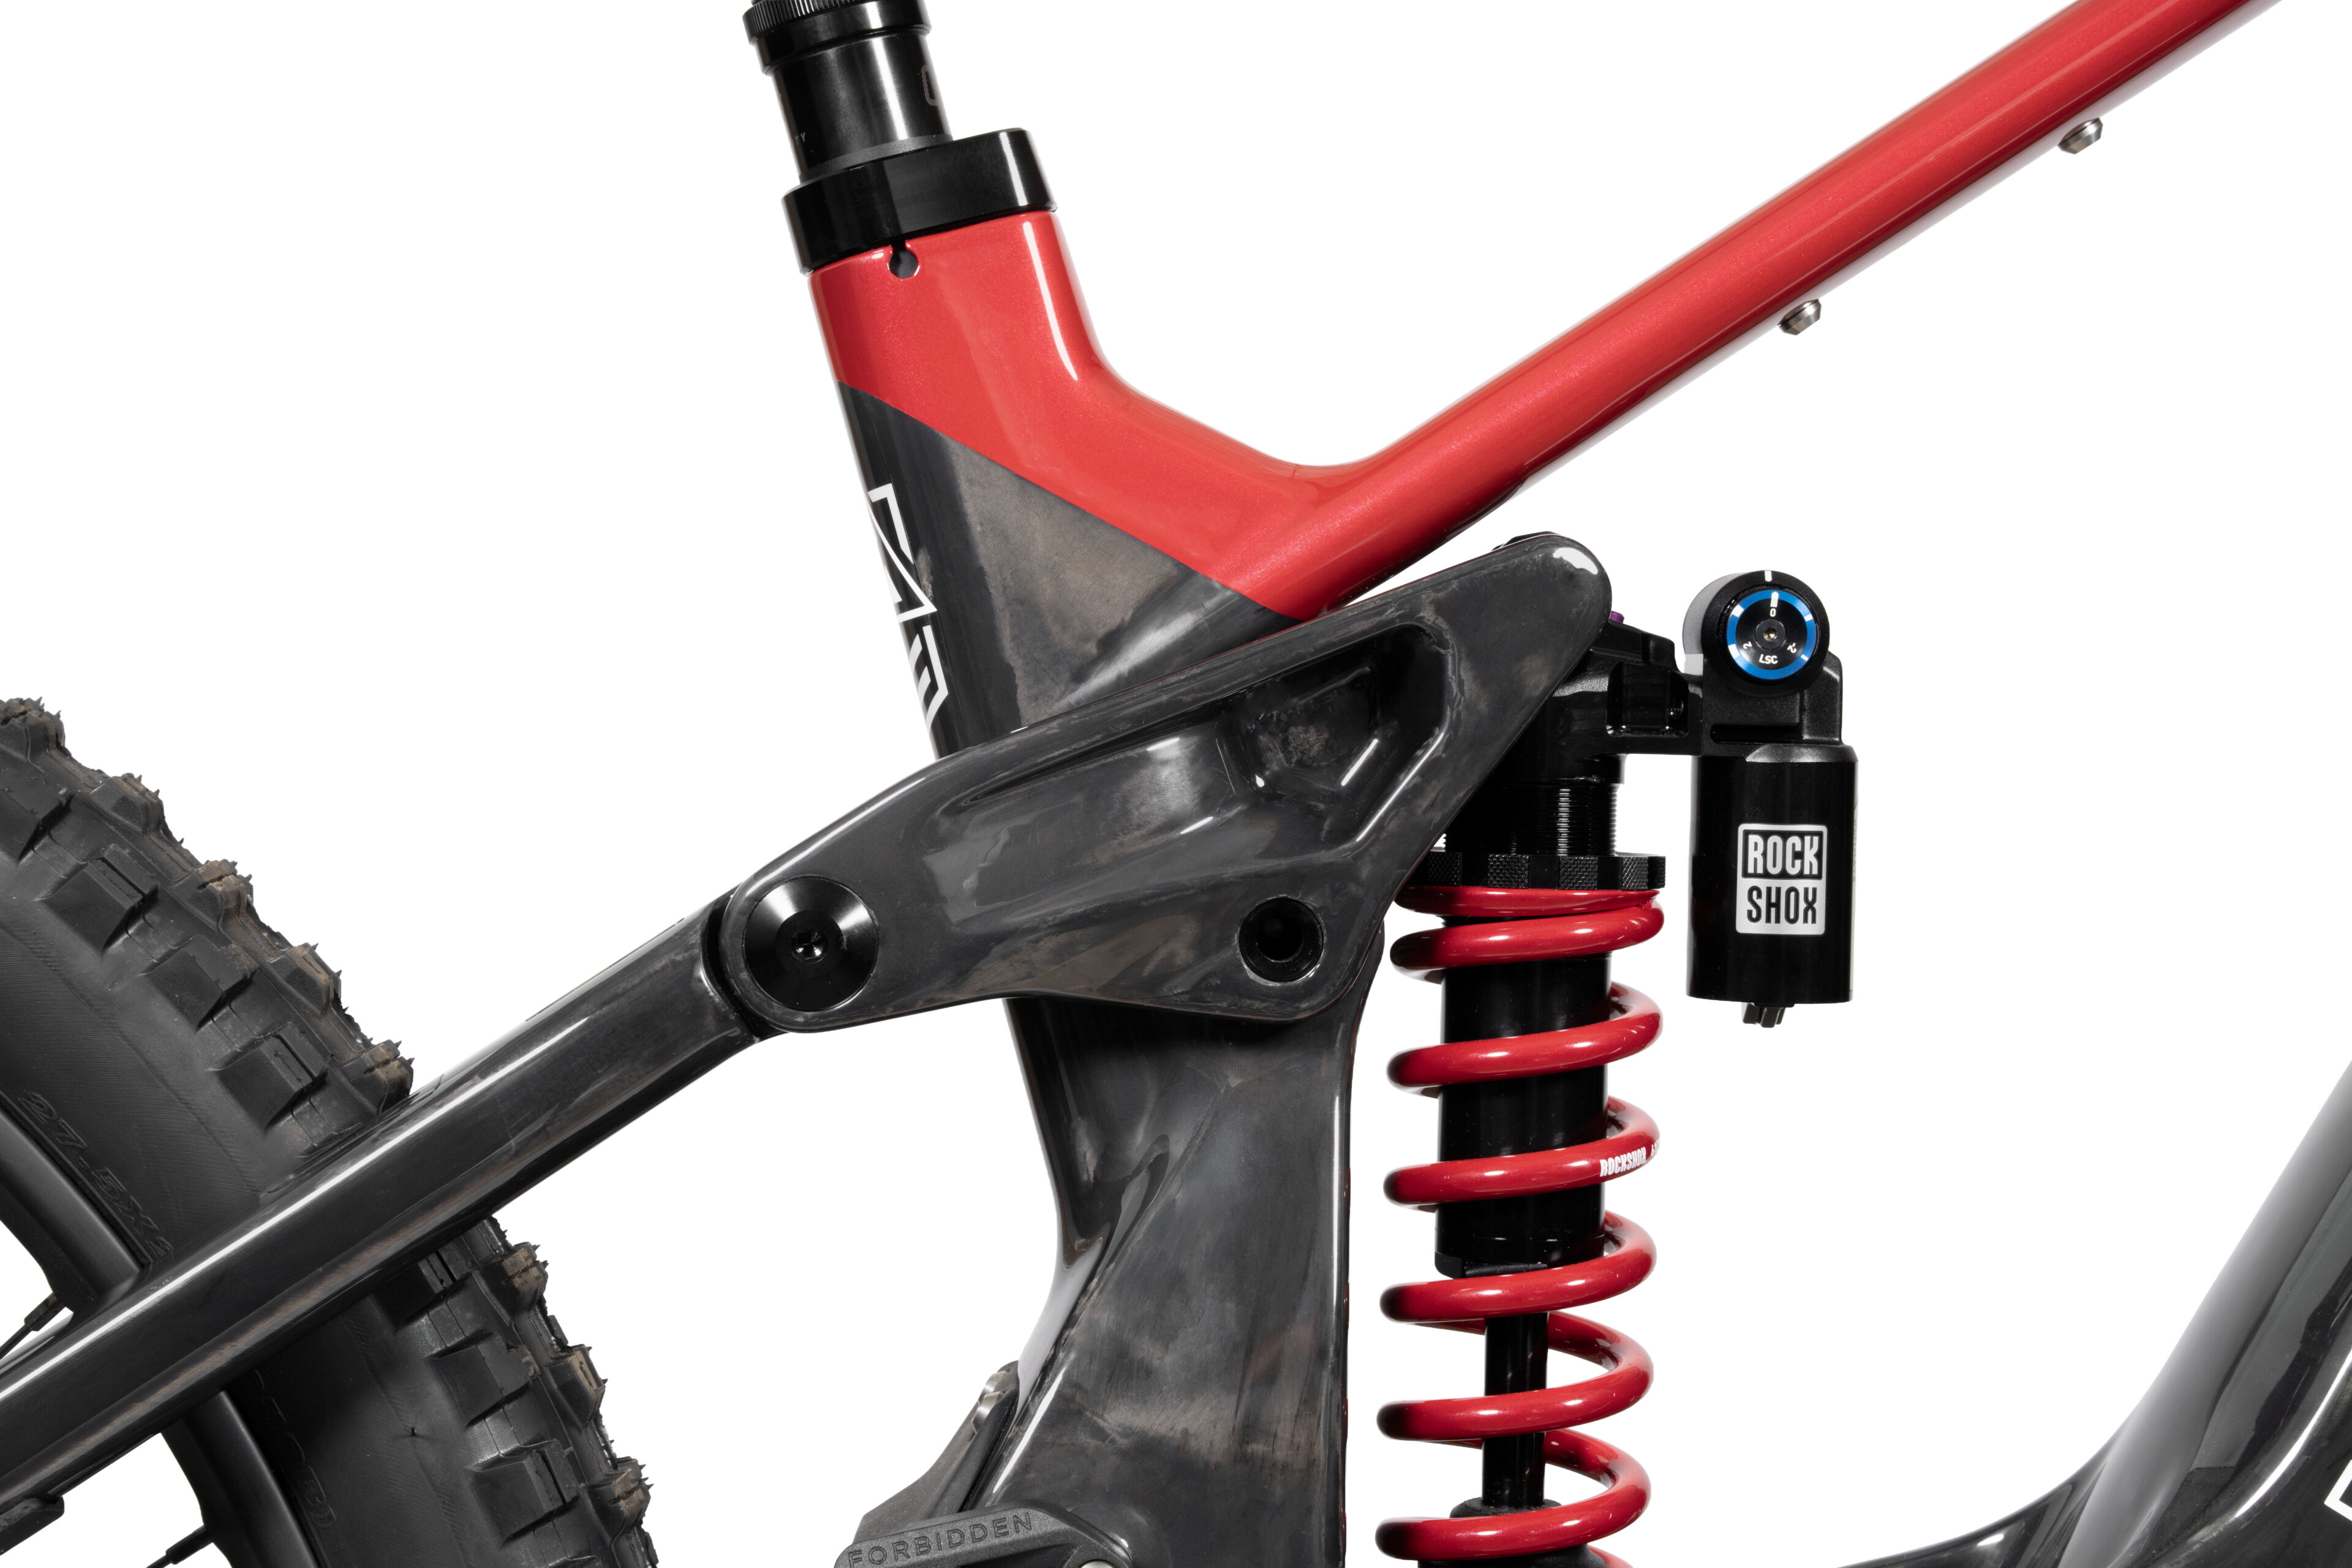
Carbon Rocker Link
Carbon Rocker Link
The Trifecta V3 platform features a carbon rocker link. The carbon rocker link is light, stiff, reduces unsprung mass, isolates the shock from lateral forces, and gives the bike the right amount of progressivity. 8 x 30 mm bearing hardware, top and bottom, comes as standard on all shocks.
The Trifecta V3 platform features a carbon rocker link. The carbon rocker link is light, stiff, reduces unsprung mass, isolates the shock from lateral forces, and gives the bike the right amount of progressivity. 8 x 30 mm bearing hardware, top and bottom, comes as standard on all shocks.

06
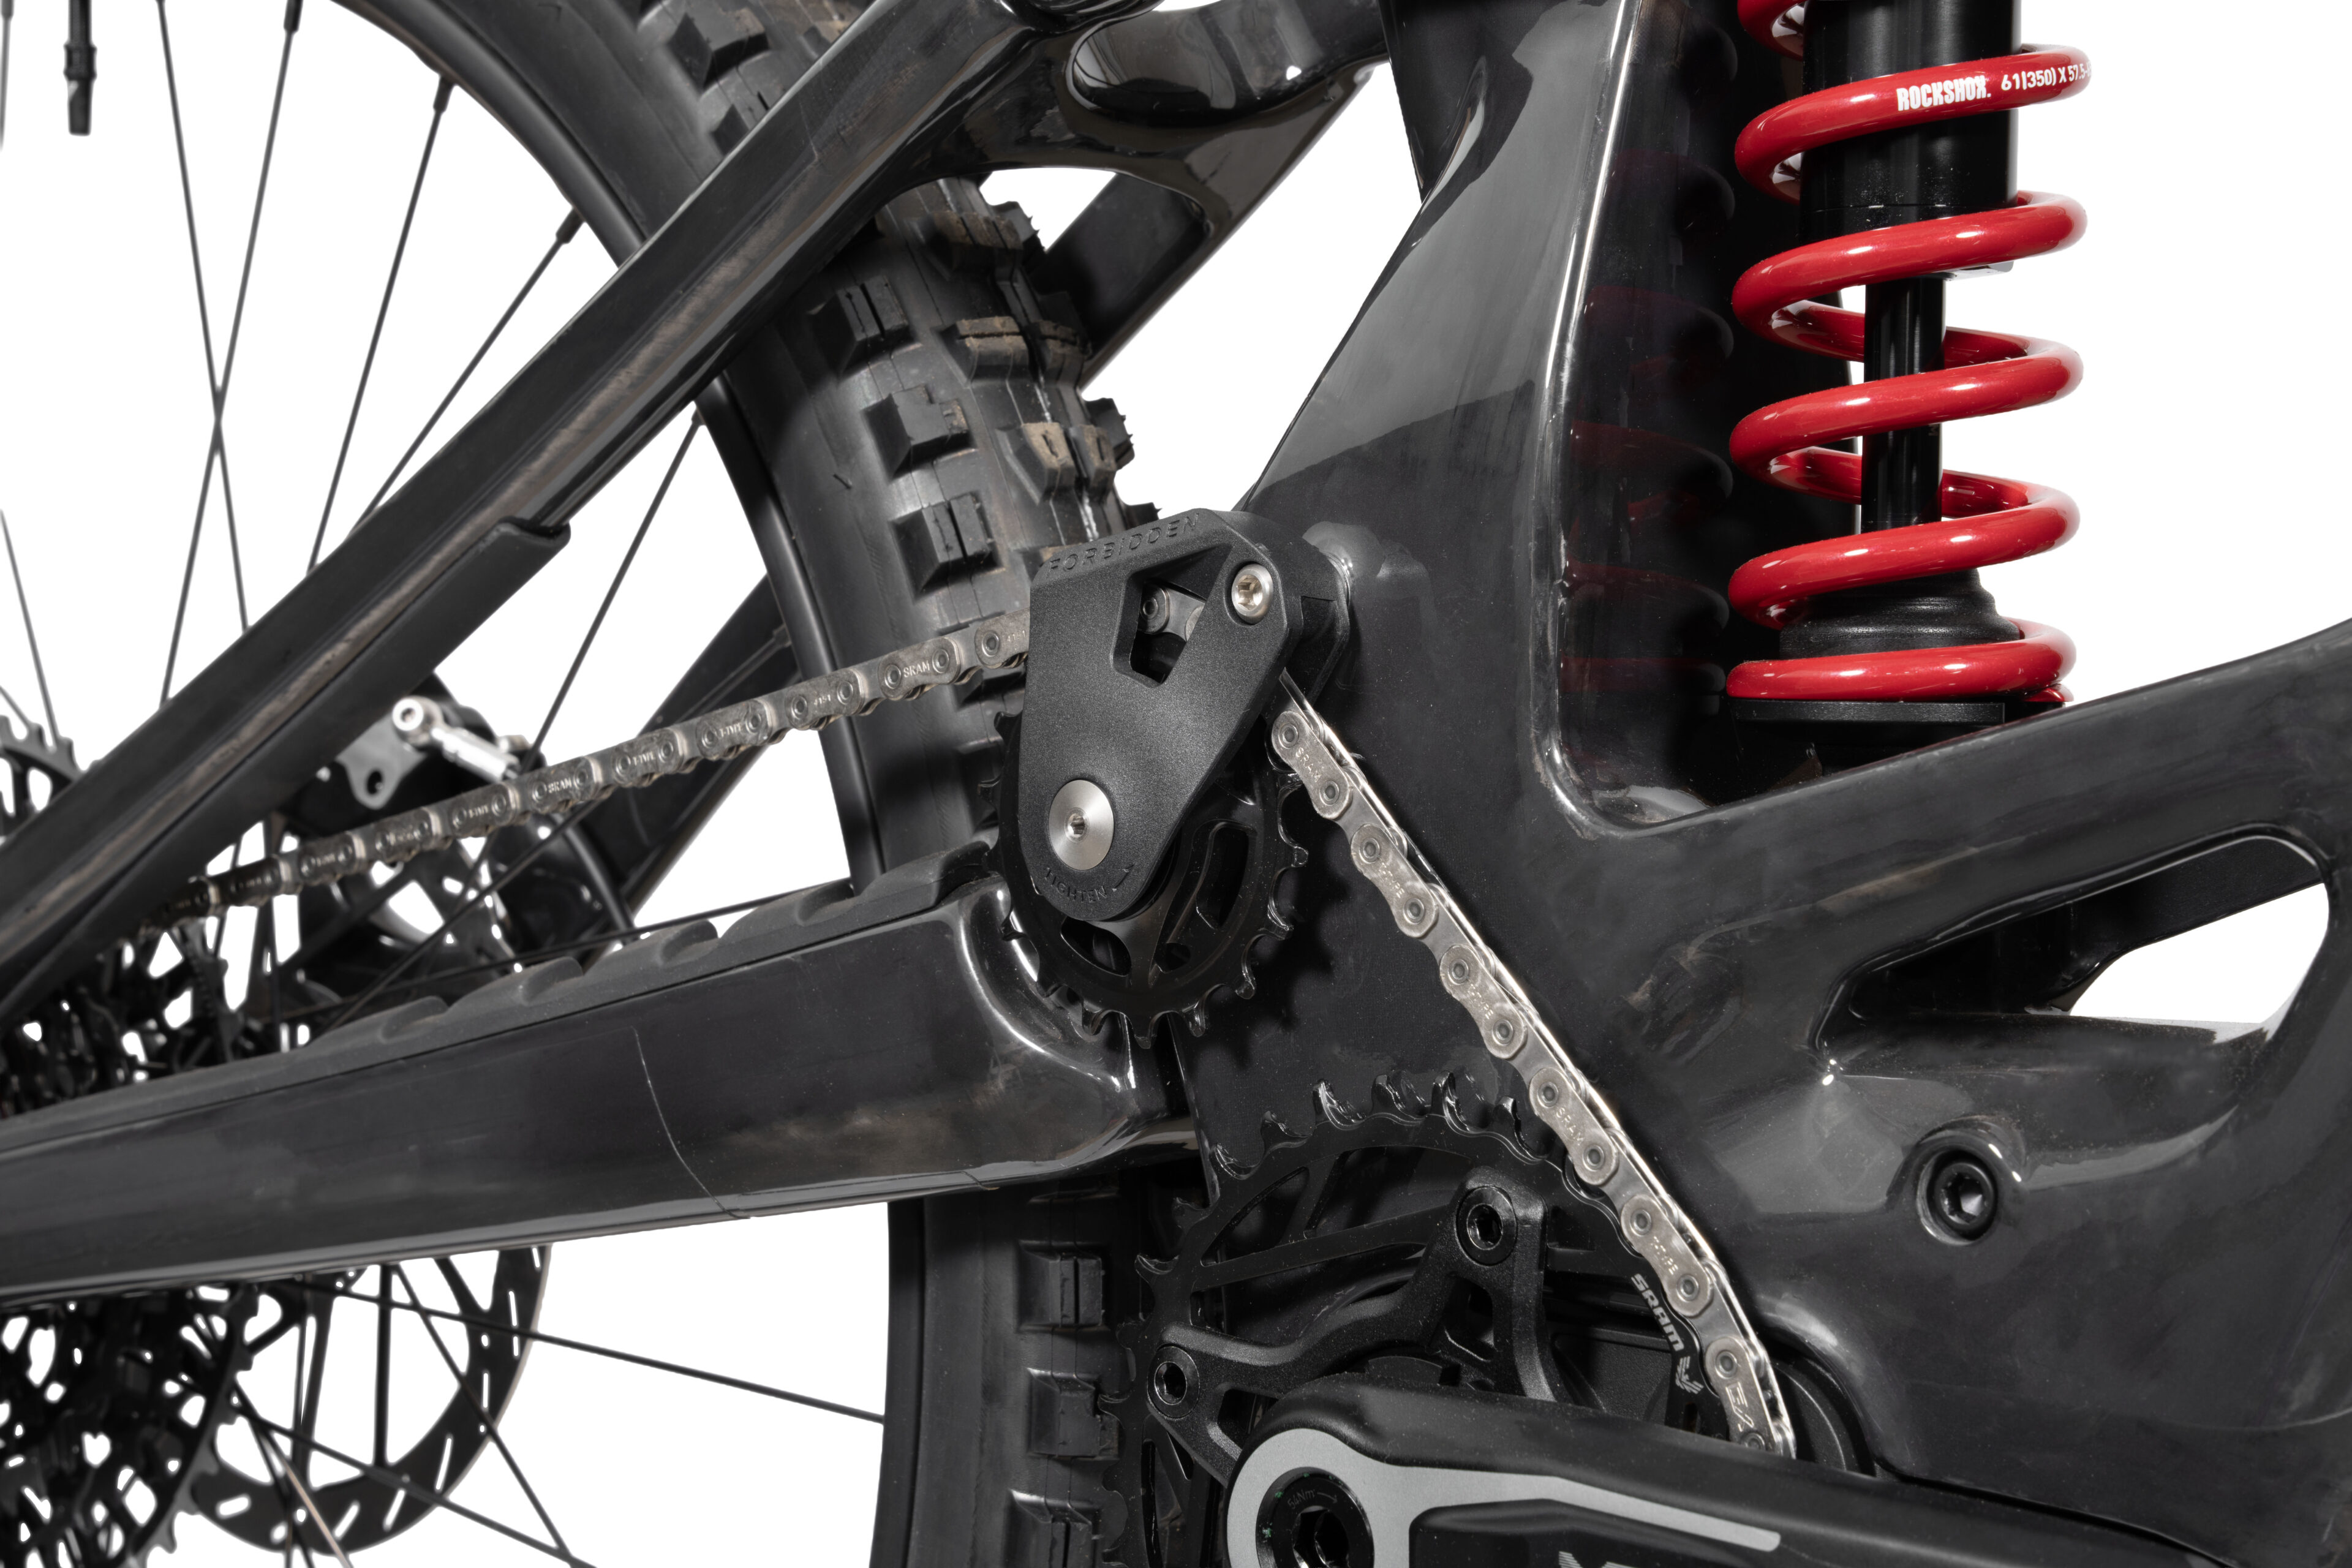
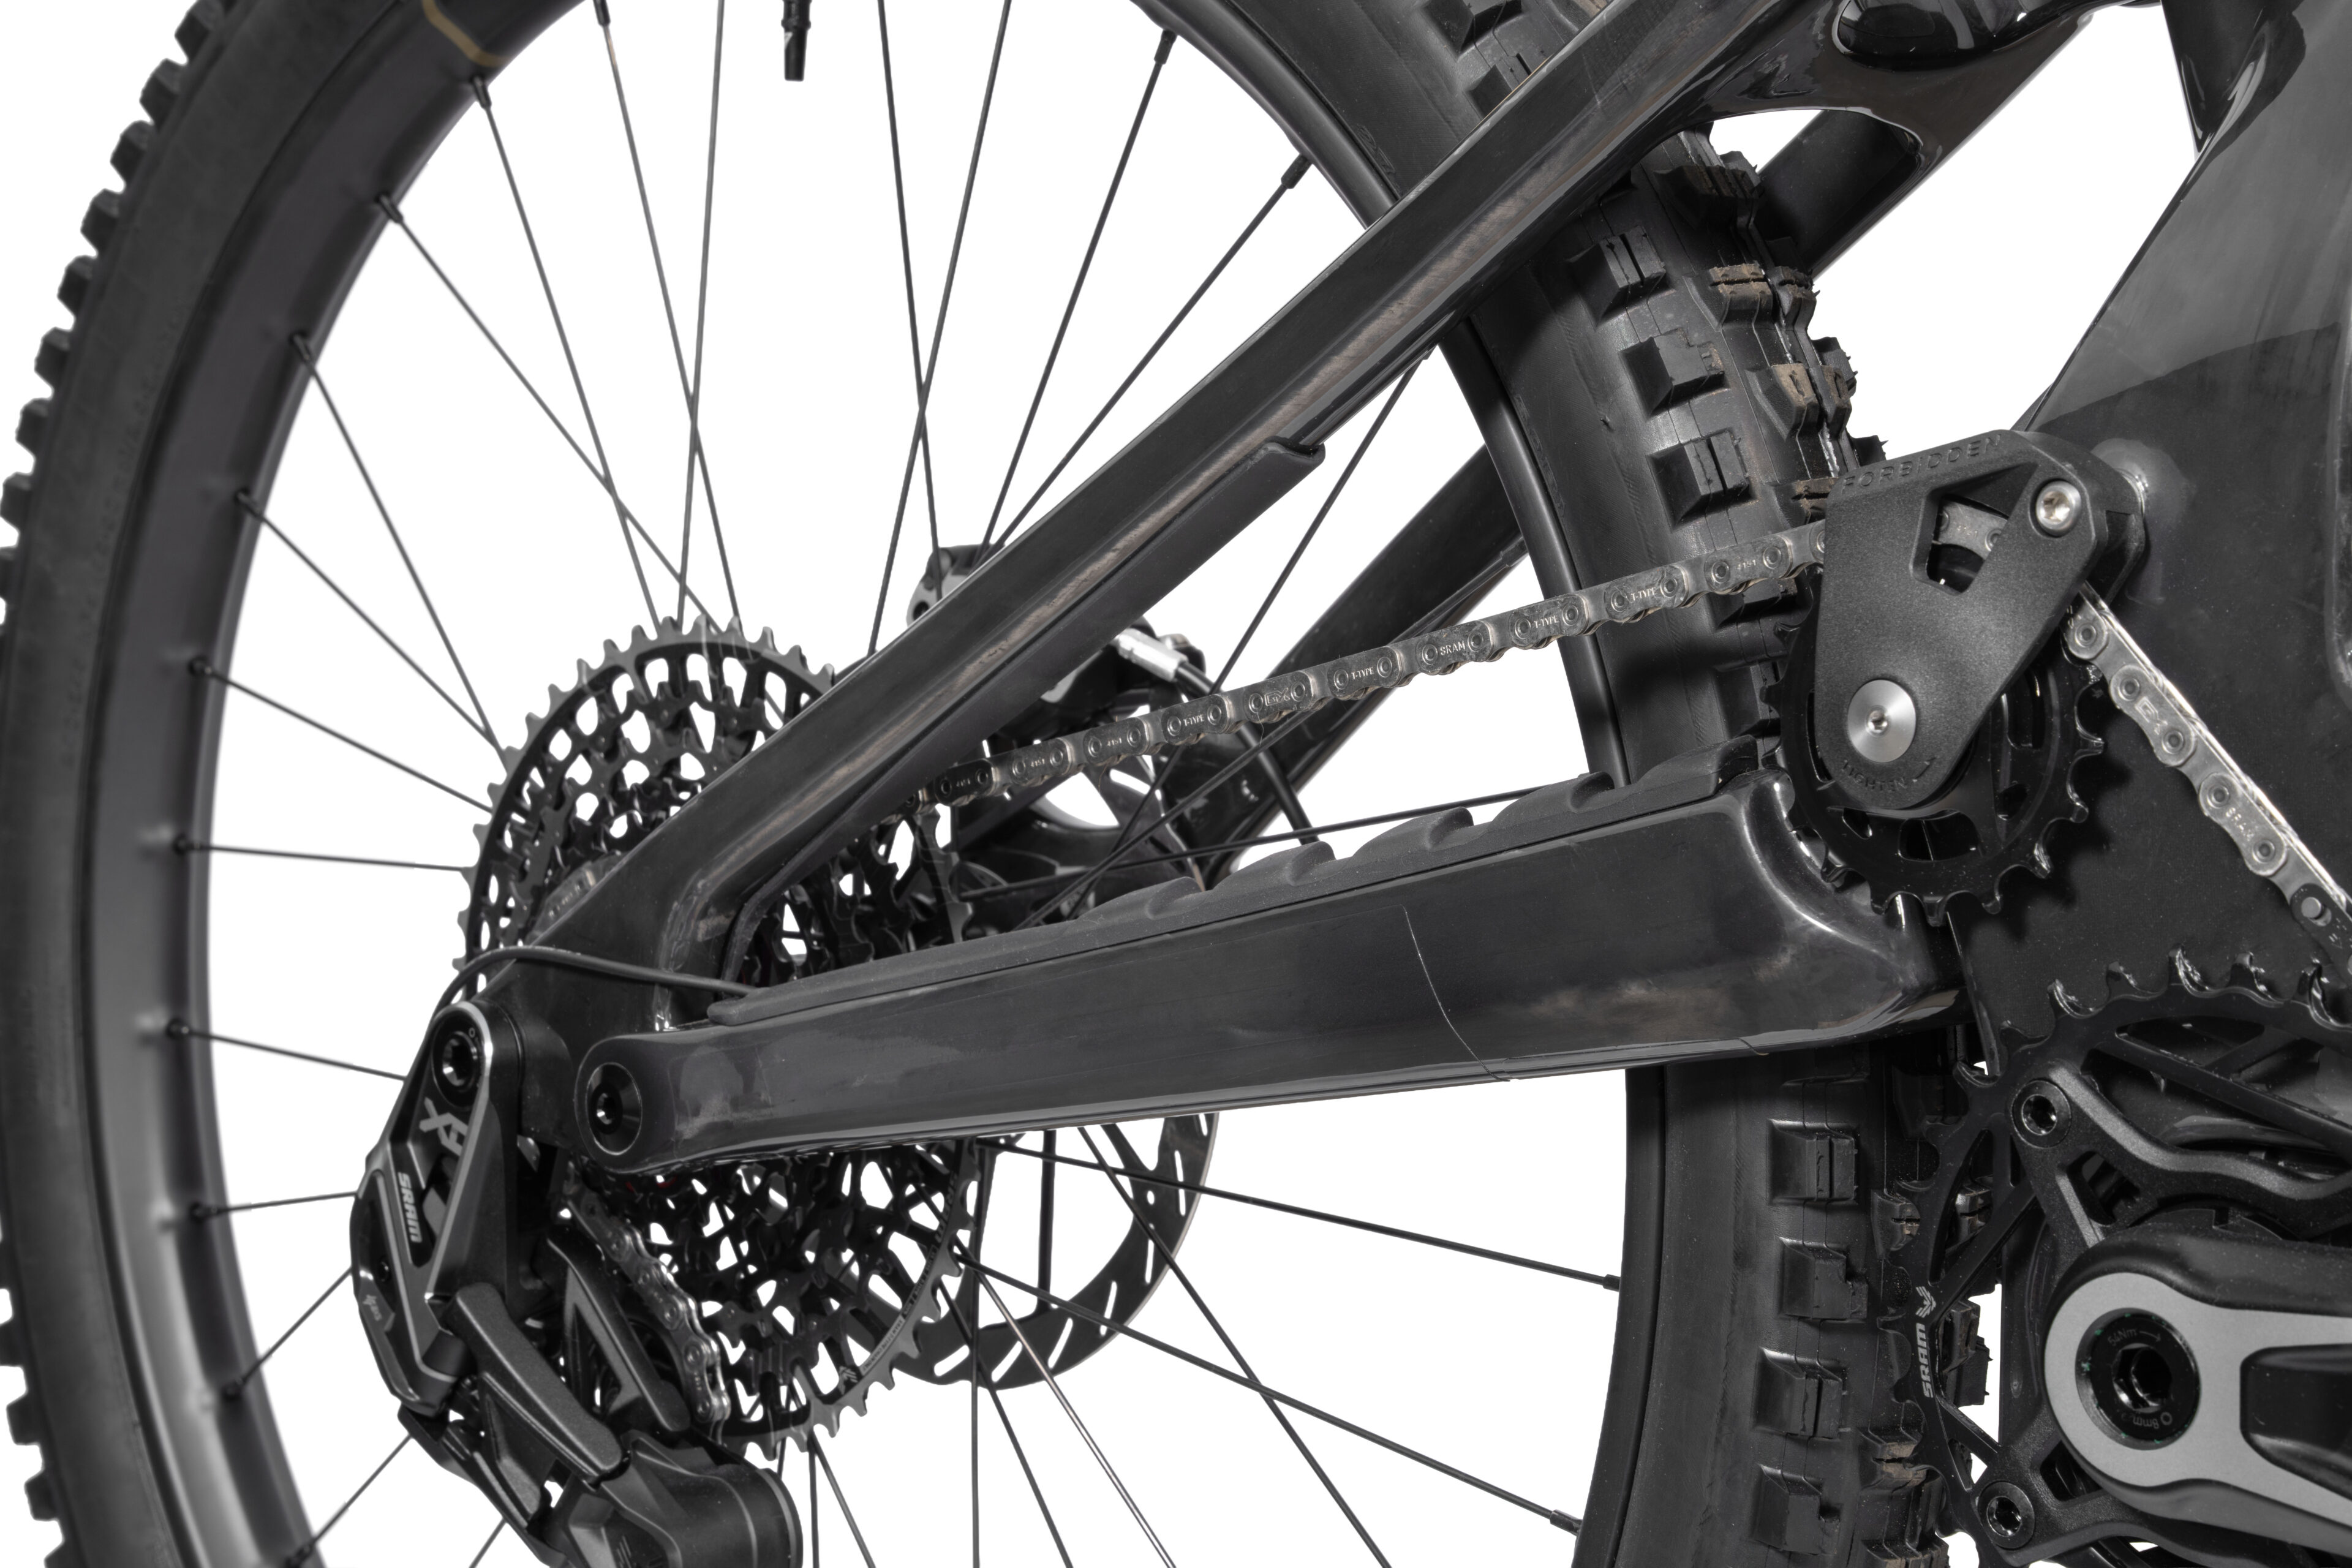
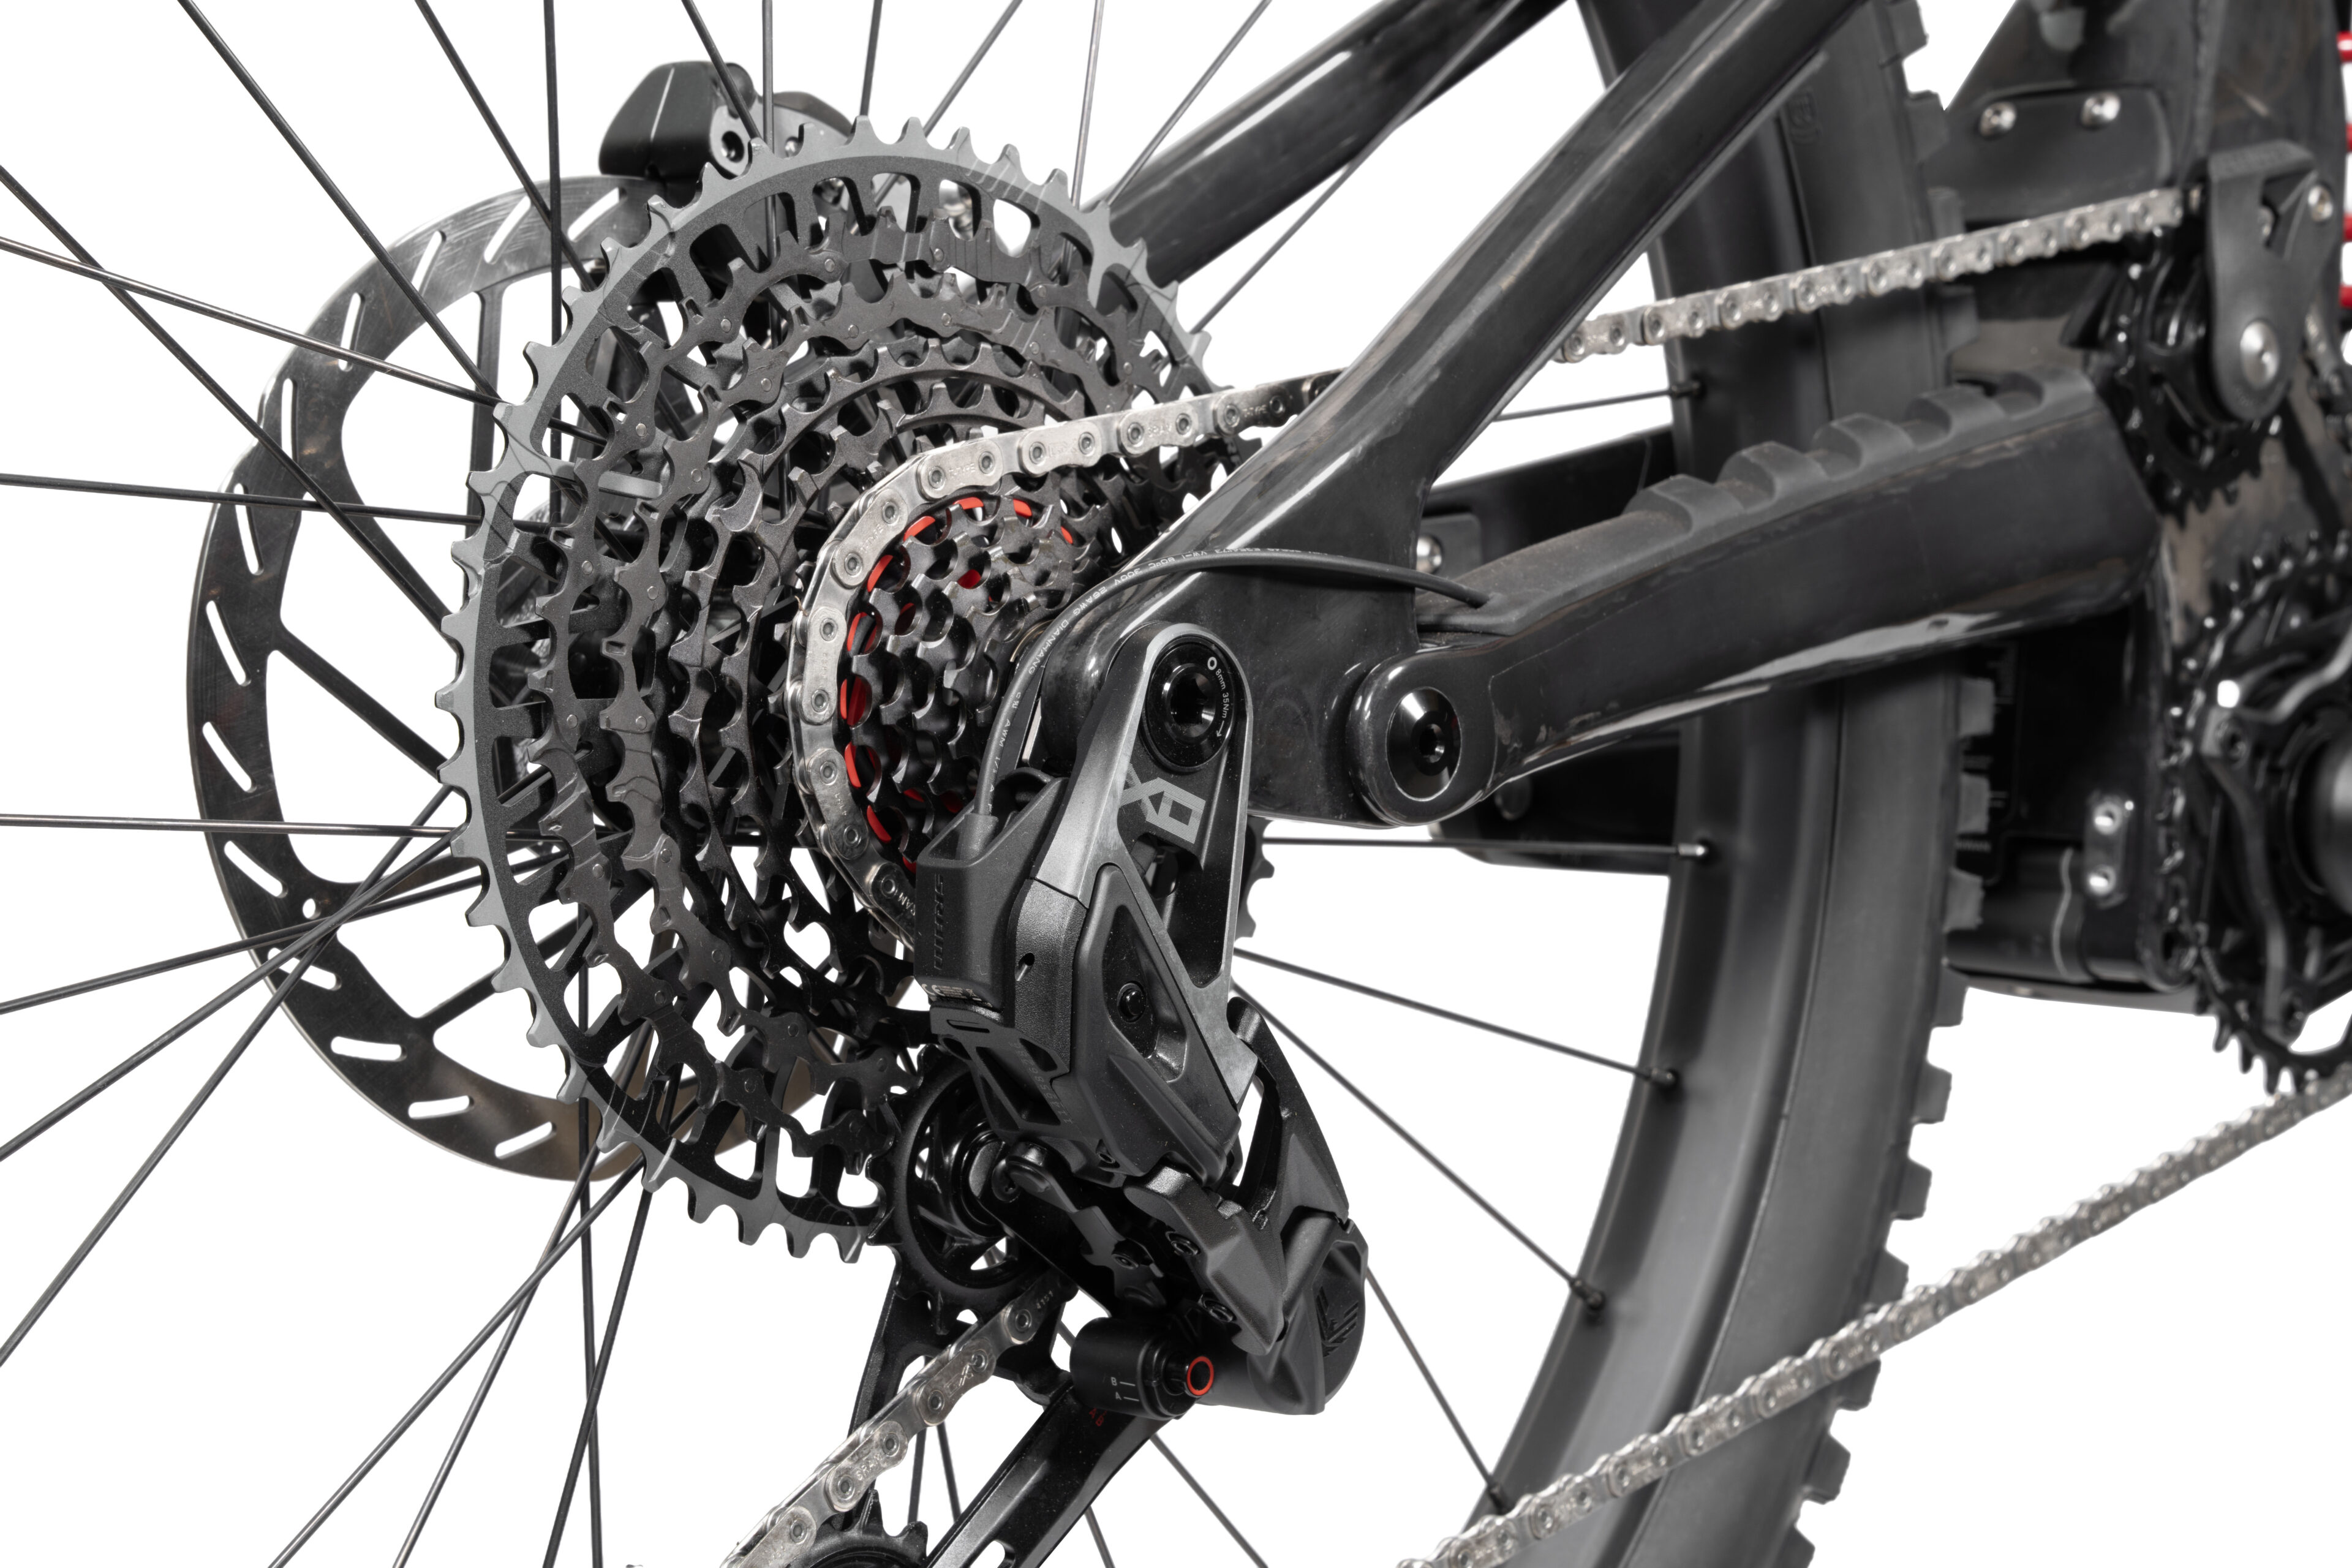
Idler Pulley
Idler Pulley
Dreadnought E sports our e-bike-specific 18-tooth steel idler equipped with two Enduro solid lube bearings. These changes, along with a refined tooth profile, increase the idler’s longevity while ensuring compatibility with the latest drivetrains.
Dreadnought E sports our e-bike-specific 18-tooth steel idler equipped with two Enduro solid lube bearings. These changes, along with a refined tooth profile, increase the idler’s longevity while ensuring compatibility with the latest drivetrains.

07
Custom Frame Protection
Custom Frame Protection
We developed a full complement of custom frame protection for Dreadnought E. Chainstay, seatstay, downtube, and motor cover protection have all been developed and designed in-house specifically for this bike.
We developed a full complement of custom frame protection for Dreadnought E. Chainstay, seatstay, downtube, and motor cover protection have all been developed and designed in-house specifically for this bike.

08
Waterbottle Fitment
Waterbottle Fitment
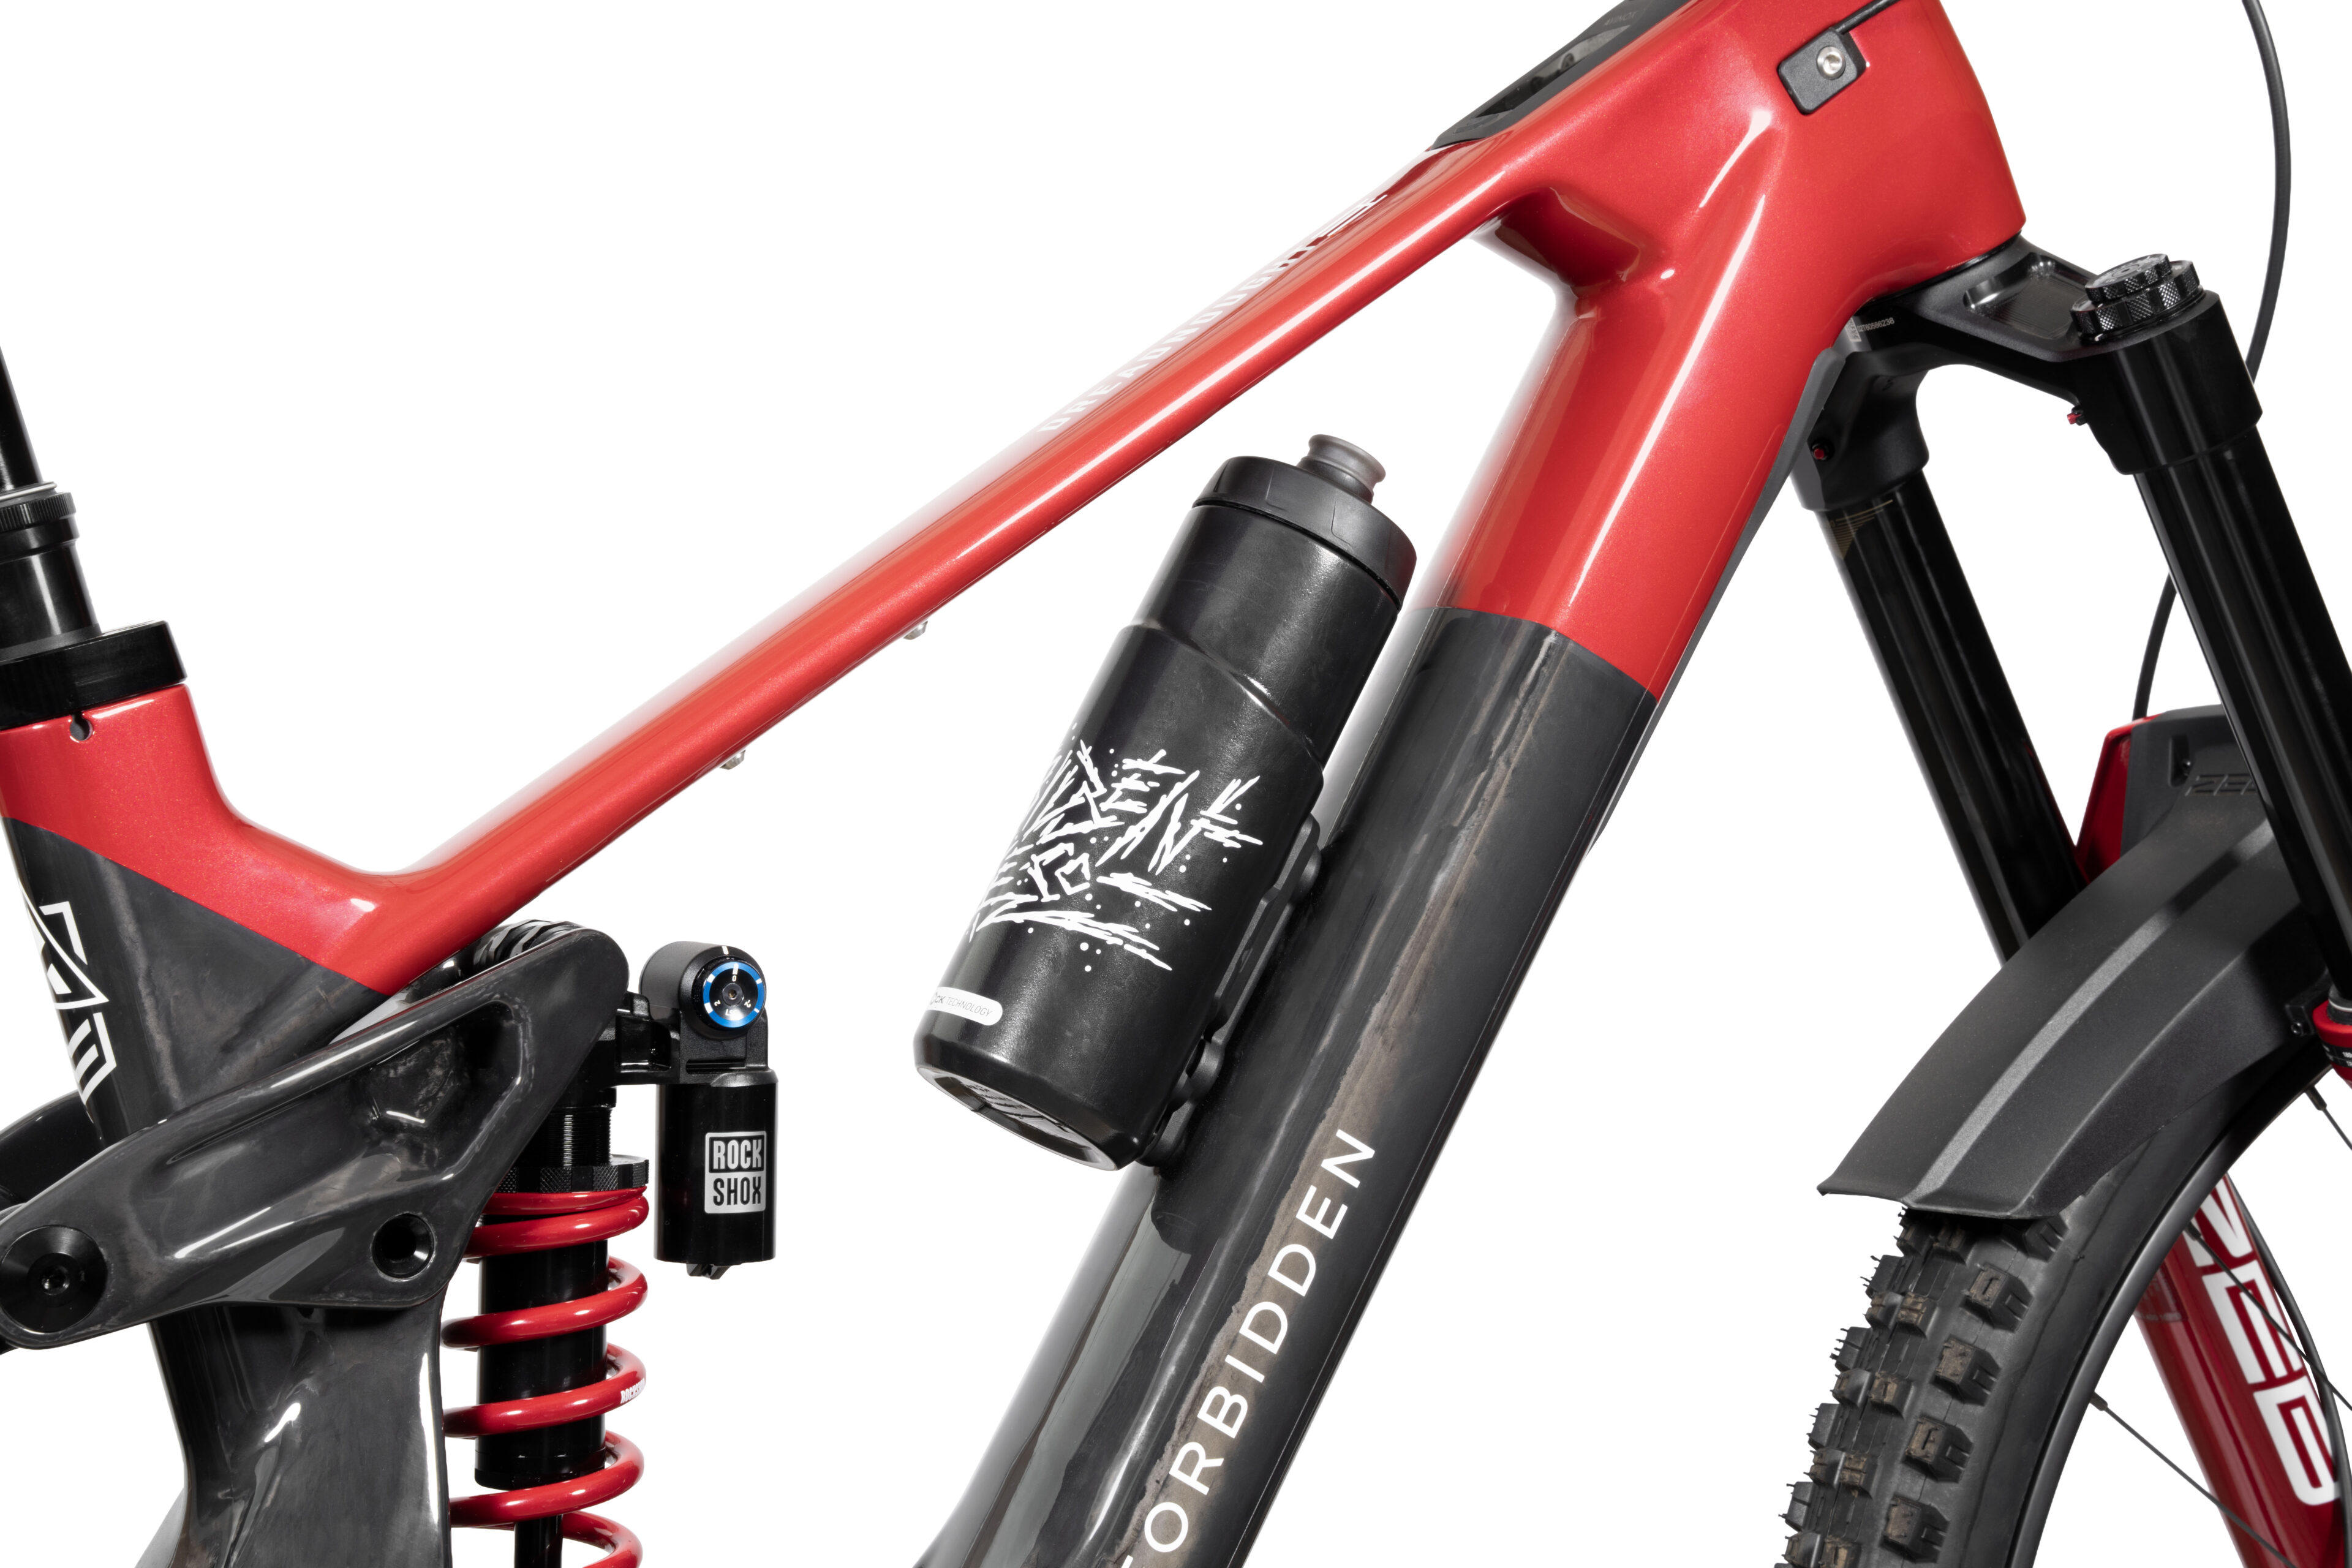
Even our smallest Dreadnought E frame size can fit a full-size 26oz water bottle, regardless of your rear shock reservoir. Remember, hydration is your friend, but sweaty backs most definitely are not.
Even our smallest Dreadnought E frame size can fit a full-size 26oz water bottle, regardless of your rear shock reservoir. Remember, hydration is your friend, but sweaty backs most definitely are not.